HOLIDAY DONATION DRIVE - SUPPORT MSW - DO YOUR PART TO KEEP THIS GREAT FORUM GOING! (Only 24 donations so far out of 49,000 members - C'mon guys!)
×


bhermann
-
Posts
548 -
Joined
-
Last visited
Content Type
Profiles
Forums
Gallery
Events
Everything posted by bhermann
-
Brad Thanks for the kind words. I hope the info posted here is useful to others so I it is always good to get some feedback. For the caulking I used a number2 pencil on one side of each plank. It has held up well over the years since it has been completed. Once I glued the deck furniture in place I gave the deck a coat of Minwax Wipe-On Poly, the clear satin finish. If I had it to do over I'd probably go for scale length planks. Live and learn! Floyd - I haven't checked the Gallery - do you have Bluenose posted there? Your build came out very well and it deserves to be commemorated there - especially since your DDM and MSW1 logs have gone to the ether. Thanks, Bob
-
Floyd - I think the knees are the way to go. It's funny but I was thinking about compass wood while looking at that split following the grain so exactly. Technique for removing the old stuff will depend on what was used to put it together. There are people here who can give guidance on that. Bob (from the little IPOD reply box)
-
Floyd Ouch! Is this Harveys way of getting even for the lack of attention over the past couple of months? I guess you know the glue you used on that piece is very strong. Do you think it was the pull of the planking to straighten out that pulled the piece apart? Makes me wish I had soaked and pre-bent the planking at the stem! Good luck with the fix - this will be interesting. Bob
-
Welcome, Nils. This is an interesting project you have started. I will be following along as you go. When you are writing a post, do you see a button labeled "More Reply Options" next to the "Post" button? Clicking that will open the full editor and allow you to move pictures around in the post and get them next to the text. If you don't see that button, we'll have to wait for someone with more experience than me to come in and explain what is going on . Bob
-
Jack - as JP said, I did have to repair a broken part, as it turns out it was the same piece you broke, the fife rail. I re-entered the information on the repair in my log (post #14). John from Australia (Jim Lad) gave me the paper trick and it worked fine for me. As I was painting the piece anyway, the paper fix worked fine for me. Your replacement part looks fine, I don't see any need for you to change anything. The mystery deck fixture - we had a lengthy discussion on MSW-1 of what it might be. The best anyone could come up with was a lazarette used for possibly stowing flags, or boom crutch tackle. No definitive answer was found. The plans I have say it was there at times and not at others. For now I am leaving it off.. Nice save on the fife rail, and I think replacing the walnut parts is a good idea. I did the mast caps with brass strip, which is what the plans called out for it. Bob
-
Chris All I can say is - WOW! If I were in the market for a warship, this would be the one! Thanks for your hard - and excellent - work and for thinking of the modeler as you work through the process! Bob
-
Yves - that bowsprit is just another example of your fine work. I am fascinated by some of the hardware shown here and the general shape of the spar. Keep up the good work! Bob
-
John - Instead of dry transfer letters, have you considered creating decals for the name? I went that route for the nameboards on Bluenose and am pleased with the result. You can find a short description on the first page of my log - just scroll down to post #10. I have been quietly enjoying your log - Morgan is one of those ships that holds a special place for me. I think I was about 13 the first time I visited her, and I get back to Mystic whenever I get the chance. Keep up the good work - I'll be following along. Bob
- 2,250 replies
-
- 1
-

-
- model shipways
- Charles W Morgan
- (and 1 more)
-
Eddie - those lines look somewhat familiar to me. I will be following along as you build. It looks like you are off to a solid start - keep up the good work. Bob
-
Interesting discussion to follow along with. Thanks for sharing your thoughts, folks. My question, if the one piece rail is flipped over, is it a good fit on the port side? If so, could you use it as a template to make both sets of rails? Bob
-
Richard - this is my first visit to your log and I am impressed with what I see. The details like the hinges and the lighting are really very well executed. Congratulations on a job so far well done. It was timely that I looked in today - I have been considering how to do the sails on Bluenose for a few months now, and you have given me insight into some possibilities. I was just browsing Amazon for the Steam a seam tape - it's nice to see someone here actually using it. I will be following along from now on - keep up the good work! Bob
-
Hi Rod - sorry for the late acknowledgement but I've been neglecting my log for a while. Thanks for stopping by and for the kind words. I have been enjoying your Syren log very much. If you want to see really small turnbuckles, take a look at DBorgens' Bluenose log - he got them closer to plan size than I managed. While I haven't been doing any hands-on for a while, I have been thinking (and overthinking) about the sails for a while. I know I want to try them and that cloth will be my medium. I think I do not want to sew them so I am looking at drawing the seam lines and using some sort of double-sided tape or iron-on seam binding for the hems. When I was looking only at the main sail, the 1/4" hem seemed very doable. Then I looked at the topsails and saw the hem is about 1/8". Tonight I looked at the jibs (the first sails I scanned to start making templates for) and I see the hem is actually at little less than 1/16" on the plans. I am less comfortable with with the idea of making hems in that size. I may just bite the bullet and go oversized. In any case, I think I'll start with the main sail and fore sail with the largest hem and see how that goes. After I am more familiar with materials, I may see that doing the smaller hems isn't that big a deal. Stay tuned - I am moving slowly, but I am still out here. Bob
-
That is some nice clean work Rod - you are doing a fine job on this phase, as you have with the previous phases. While the pink yards might have generated some interest, I'm glad you decided to go with the more traditional black Looking forward to more updates when you get back... enjoy the time away. Bob
-
Hey! Someone snuck in here and uploaded pictures of a ship model - kind of breaks the flow of things, don't you think? The gallery is looking good, as is the transom. Keep up the good work, Sjors. Now back to the topic at hand - is this the song you are talking about? Let me tell ya a story about a boll weevil Now, some of you may not know But a boll weevil is an insect And he's found mostly where cotton grows Now, where he comes from, hm, nobody really knows But this is the way the story goes... Bob
- 1,873 replies
-
- 2
-
-
- occre
- san ildefonso
- (and 1 more)
-
Nice find on the photo, Dave - a good bit of research. Now I see a note on the plan by the eyebolt that reads "Stowed position of flying backstay p/s - belay fall to itself". While it doesn't answer the question about color of the pendant, it makes me feel better about what they would do to allow the boom to swing out. Thanks for posting the shot. And keep up the good work - this has been a joy to watch! Bob
-
I haven't been able to find any photos that show the flying backstay rigged, so I have nothing to add. The plans I have don't specify a color either. I don't know, it seems like having it set up would severely limit the range of motion for the main sail, so i am thinking about leaving it off - but I've still got some time to think about that. I wonder how pendants on other ships were set up, tarred or not? Looking forward to see how you handle it, Dave. Bob
-
Wood filler vs. spackle
bhermann replied to rtropp's topic in Building, Framing, Planking and plating a ships hull and deck
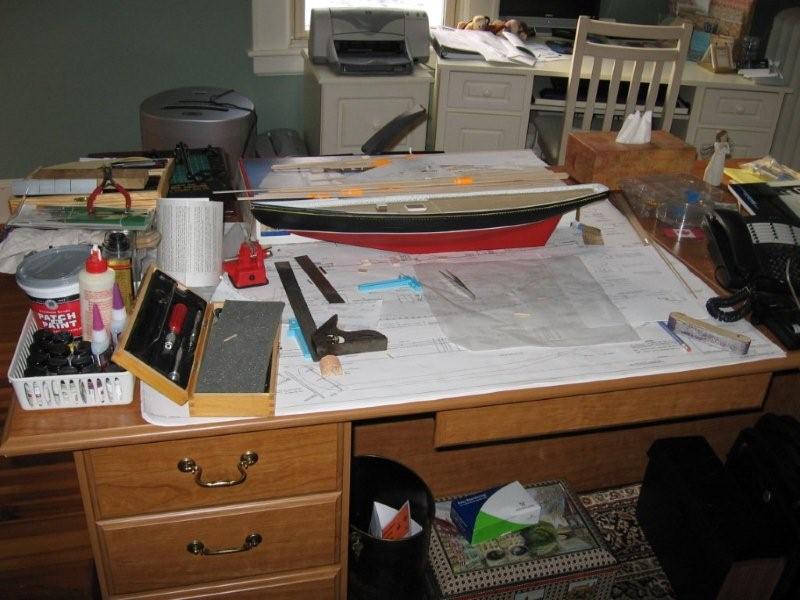
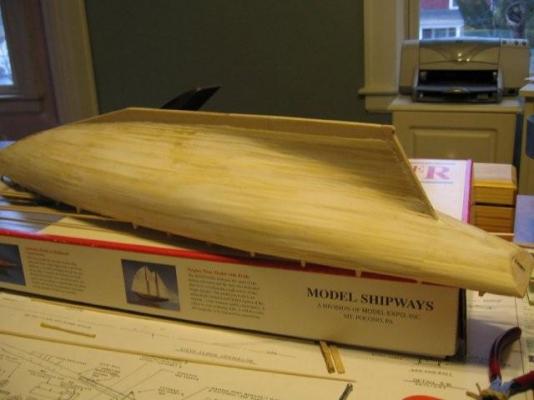
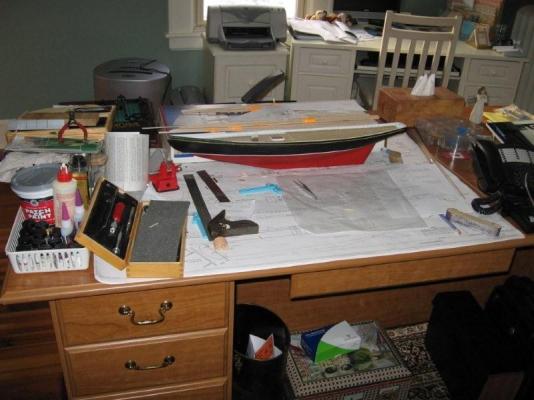
Richard - I have had success with a product called Patch-N-Paint for filling the hull and painting. It is a product I first discovered when removing wallpaper and painting plaster walls. It dries hard and sands to a good finish. It worked well when finishing the basswood hull on Bluenose. The label describes it as a lightweight spackle and it comes pre-mixed. Applied with a heavy hand: After sanding: The finished and painted hull I haven't had any problems with it in the 4 years since the hull was painted - nor in the 10 years since I started painting the walls of the house! Bob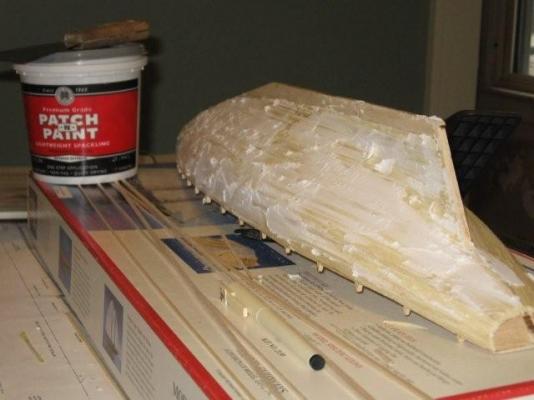
-
Looking good Dave - you are getting there very cleanly. I think you are right that the long part of the flying backstay would look more natural (no pun intended) in tan. I'll have to see if I can get a definitive answer on that. Maybe Floyd will chime in on this, or someone who has the Jenson book on Bluenose II. Bob
-
Cutty Sark by NenadM
bhermann replied to NenadM's topic in - Build logs for subjects built 1851 - 1900
Welcome to MSW, Nenad. Cutty Sark is on my list of "someday" models, so I will be watching your process with great interest. Your life story sounds familiar, so many things to get between a modeler and his build. I'm glad you are able to find some time now to pick up on it. Wow, that is a lot of deadeyes for setting up a single mast - I forget how complex these beasts can be. Enjoy the process and please share your progress! Bob- 4,152 replies
-
- 1
-
-
- cutty sark
- tehnodidakta
- (and 1 more)
-
Nice pickup, Jack, Having those starboard pins behind their port counterparts would have looked odd. Isn't it great to find these things early while they are relatively easy to fix? Nice attention to detail on this. The hull is looking good too. Bob
-
Dave - that's the way I understand it - take a deep breath, drill pilot holes up through the keel, and then send the screws through the pedestals and into the pilot holes... I am feeling better and better about putting mine on a cradle I guess this is something a lot of us newbies miss - better to drill the holes at the beginning of the build. I know I missed the implication of trying to do it later. Bob
- 95 replies
-
- 1
-
-
- bluenose
- model shipways
- (and 1 more)
-
That is sweet, JP - your hard work and planning - and rework - have certainly paid off. And your documentation of the process will be a great resource for the rest of us. Thanks for sharing your struggles, and congratulations on a job very well done. Bob
-
Looking good Andy. I have been following along since MSW1 days. You should be proud of what you have done with her! Bob
- 246 replies
-
- 1
-
-
- revell
- constitution
- (and 2 more)
-
Dave - that came out really well. Like Russ, I was admiring the work around the windlass. The coils that you have on there have a nice realistic look to them. Nice job indeed! Bob
-
HMS Victory by Sven - FINISHED - 1:600 scale
bhermann replied to Sven's topic in - Build logs for subjects built 1751 - 1800
Matt - congratulations on completing her. Fabulous detail at such a small scale. I too am looking forward to the next project! Bob