


popeye the sailor
-
Posts
16,007 -
Joined
-
Last visited
Content Type
Profiles
Forums
Gallery
Events
Everything posted by popeye the sailor
-
 don't I know it Ulises....I'm a mechanic by trade....errr..technician {I say that with my pinky raised}. oh.......if I only had a REAL garage!.....all I got is this dinky little one. I bought a 1/2 impact w/2" elongated anvil .....impact sockets... they have clamps too.......saw a few other tools as well. spent about $400.00 in there the other day for Christmas none of it for me!
 -
beads?.....only folks using beads, are those either fastening yards to masts, or making antenna wire insulators. in my experience.......it's a matter of taste whether or not a modeler is satisfied with using the plastic parts found in wood model kits. there are some that will build a kit out of the box, using all of the supplied components of the kit. on the other hand, you have those who want to build a model that better represents the actual subject, and find that some of the supplied parts will not suffice. there are some that will even substitute the wood itself to achieve the overall look of the finished model. I myself have a problem.....not with the plastic parts per say, but the plastic they are made of. Billing's for example does not use a styrene plastic, but a plastic that is denser and fairly resilient to most cements. aside from resorting to the use of a two stage epoxy, I have yet to find a suitable cement for it. plastic in a wood kit also has to have a purpose, and fit or enhance the overall look of the model. modeling has many mediums......plastic, wood, and diecast........there are others, but they don't fit the type of modeling we do. I have encountered only a few plastic models that actually had wooden parts supplied in them...and those are older car kits. plastic differs from wood for one major reason......exactness of scale. plastic models are made from molds, which are tooled to the scale specified. wood models don't have that option.......the wood is laser cut to the specific scale, but it's the fitting that give the kit it's shortcomings. I guess it would depend on the quality of the kit, as to how exact to scale the fittings are. I've seen some that look good.......others, well.....not so much. tackle along the lines of blocks and dead eyes should be wood....in wood kits, and not plastic. this is something that expanded through the years of wood model kit production, as a means to cut cost. I don't mind them, but I'll only use them for fishing boats.....there is SOME detail value to them. all this goes back to what I said in the beginning....everyone has a preference. what I like may not be something you like.......I get that. so before this gets too off topic, we'll end it here. I think we know what we all like or don't like about model kits. we do the best with what's available to us
- 453 replies
-
- 6
-

-
- thermopylae
- sergal
- (and 1 more)
-
I got a pleasant surprise last week........I visited a Harbor Freight tool store. not that I needed any tools, but I hadn't checked it out since it opened. I ended up buying a torx bit set.....and a mini drill index that goes from 3 mm all the way down to 0.5 mm. it has five each of the 0.5, 0.6, and 0.8 mm.......3 of the 1.0 mm... .....and 2 of the 1.2, 1.5, 1.8, 2.0, 2.35, and 3.0 mm. if you have a store like this near you, might be worth checking it out
-
I guess the next question then, would be the difference in scale.......how far apart are they? I'm not familiar with the Heller Thermopylae. kind of a unique reversal you'll be doing......I've heard more of folks adding wood to plastic, rather than the other way around. most are not happy with the amount of plastic they find in a wood kit, and end up replacing the plastic stuff with either brass, or scratch build the parts from wood. it's your call. I have the links at the beginning of this log. check them out to weigh out your options
- 453 replies
-
- 3
-
-
- thermopylae
- sergal
- (and 1 more)
-
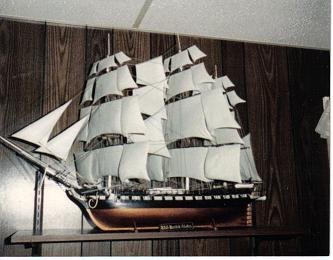
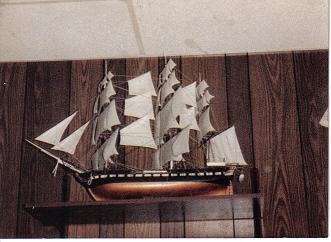
you still have the kit.......I thought you might have already traded it away. there a re many ways to build a model......if you don't want to feel like your building through imitation {building the same model twice}, you could build her as a barque. she was refitted in the 1890's, after being sold to a Canadian company. I have no info if she was renamed.......in 1897, she was sold to the Portuguese Navy as a training ship, and renamed the Pedro Nunes. she does have some stark differences than the Cutty though. I've always had the notion that Revell back in the day, cloned this particular series of ship models. that's the reason why the Cutty kit and the Thermopylae kit are so identical.....they were produced using the same molds. now that I have the Connie kit, I want to compare it to the United States kit.......these two are clones of each other. the Kearsarge and the Alabama are another example of cloning. I know it's not a new thing.......this method of kit production has been done many times, in the production of kits through the history of plastic models. it cut down of the time it takes to make the molds for different models. later on they came out with the 3 in 1 models and kits with extra parts to create different versions { the latter mainly pertained to aircraft and armor}. I do apologize if it sounds like I'm trying to sell you into keeping it......I think this particular series of kit by Revell was the best they've ever done. I've built many of the 1:96 series.......I liked the fit, the detail, and the size of the model. the Sergal Thermopylae kit is not as easy as the Revell kit, in my opinion, but that's up to you. hope you find the ship your look'in for
- 453 replies
-
- 2
-
-
- thermopylae
- sergal
- (and 1 more)
-
really nice progress EJ.....I can agree that they are added detail. be careful though in places that can be seen, along the bulwarks for any poking through. you wouldn't want to be known as EJ the impaler.
-
that depends on how detailed you want to get. you can get a nice screw effect by twisting thin wire and bending the twist at the top for the 'T'. a hole drilled through the shaft at the end of the barrel will accept it nicely. you can find examples of this in some of the logs........good to check them out to see what others have done. good to see your still making progress on her
-
I have to apologize gents.......just ditsy 'ole me for not hitting the submit button thanks for the good word gents......I'm so glad I was able to get to the table work. for the other project, I've been stuck at my desk......to be honest, this small crane lamp I've been working under........is by far......under par I have Jeanne at the table......that's why I mention this. the decals may be just a little off....but once I populate the deck, I think it will look OK. still have a bit more to go on her. decals can make or break a model Piet..........an incorrect insignia, and all you have is a model with a lot of colors on it it's hard to tell if the decals your supplied with are intact and OK to use......my dealings with the old Revell kit taught me a lot. it's good if there are insignificant decals that you can test, before you use the ones you need. with the program I have, I can make decals that are not supplied in the kit. there aren't too many decals for some of the ships we build of wood......perhaps that's one aspect that sets the two mediums apart. I've tried to bridge that gap thanks John and Mark........and thanks for all the likes appreciate ya'll following along thanks RG.....I've built a few Heller kits in the past......totally agree with you. appreciate the good word
- 133 replies
-
- 4
-
-
- jeanne d arc
- heller
- (and 2 more)
-
nice job on the windlass........the deck is really look'in my-t fine
- 682 replies
-
- 5
-
-
- halifax
- lumberyard
- (and 1 more)
-
now.......that's more like it! the hull looks super J! are to be exposed paddles under the wheel houses.....or you haven't put them in place yet? still, you've done a great job with the hull nice work!
- 258 replies
-
- 3
-
-
- harriet lane
- model shipways
- (and 1 more)
-
Floyd gave a good explanation of the messengers.......if you want to see more, go into Dafi's Victory project. somewhere in the middle of the log, he shows these ropes and their function. she's look'in good Jesse.......very nice progress. any tool is a good tool, if it does the job. I don't even own one.
- 1,306 replies
-
- 4
-
-
- syren
- model shipways
- (and 1 more)
-
cranes came out nice the 'D' effect will certainly be there......1D, 2D, 3D...the detail is so good on these paper models. your doing a superb job of bringing the detail out
-
she looks superb Tom.......really nice that you left the aft battery of guns closed. I had posed a question about that in the past........never really got an answer for it.....so cool to see the effect you've done an amazing job.......she'll look even better with the yards !
- 1,350 replies
-
- 1
-
-
- constitution
- model shipways
- (and 1 more)
-
please.......no fuel to the fire Carl I've had a Bat boat on my mind....that's bad enough. I've put a couple of things together.....but I ended up putting the rest on the back burner for the time being one of these days, I might try something that is truly alien hello Bob.......I will be getting back to this one very soon. many thoughts on how I'm going to mast her. it's not that I dislike the kit.....I never pictures my self having to scratch build something at this scale. aspects that are left out of the kit, is another turn off. if your not big on scratch building, this may not be a kit to consider....there's a lot of it. it does appear to build into an attractive model though.....I have no intentions of shelving it. too bad you got rid of the Revell Thermopylae....along side the Cutty, it would have made a great display. I recently acquired a Revell U.S.S. Constitution, 1:96 scale......something I've been wanting for quite a while now. I have the United States.....my second attempt to build her again. she was such a grand build, even though I didn't do a lot of painting on her. as you've read......there is something that looks like photo etch available for this kit......finding clinker style life boats is frustrating in 1:124 scale......not to mention that the rigging diagram has the braces backwards. I haven't encountered a build log that is very descriptive......so I guess it's left up to me. I will try to depict every step of the way, in the event that you decide to pull the trigger on this kit. I hope you continue to follow along.
- 453 replies
-
- 9
-
-
- thermopylae
- sergal
- (and 1 more)
-
yep...and then you ask the admiral what's for supper...........she says, spaghetti! awesome rigging there.......and that's just the bow and the foremast! wait till you get to the stern........your gonna look back......."did I do that?!?!?!?! amazed with your rigging....looks so nice!
- 652 replies
-
- 2
-
-
- royal william
- euromodel
- (and 1 more)
-
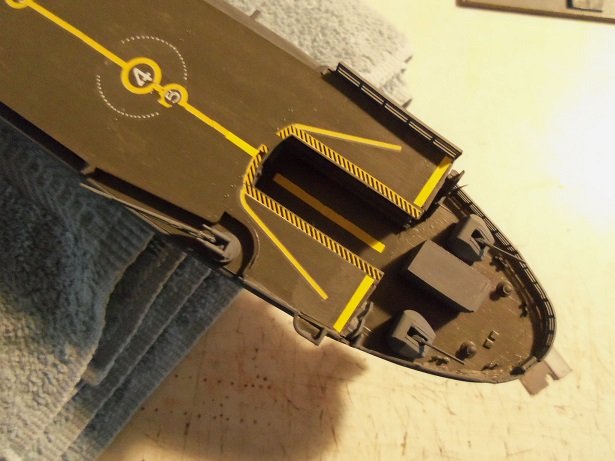
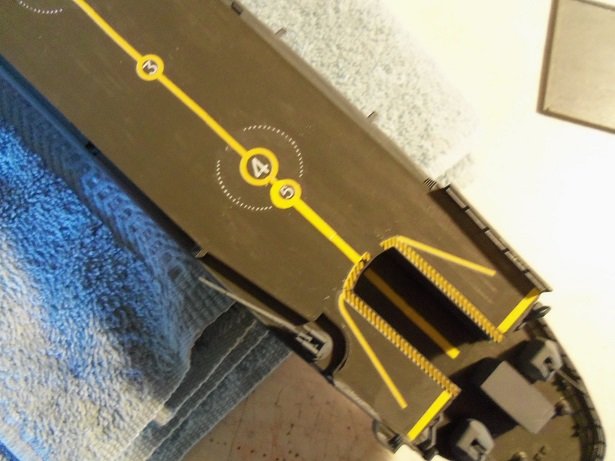
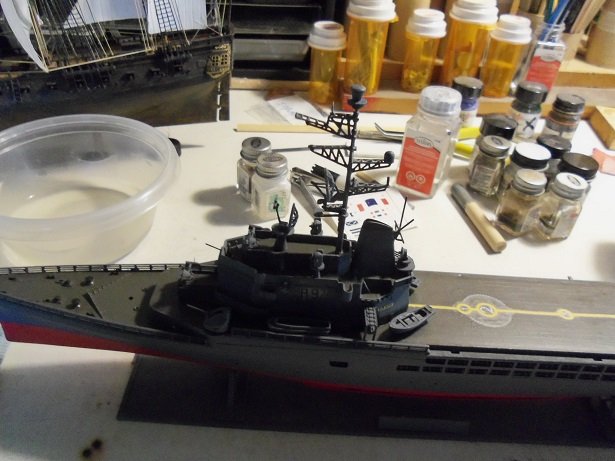
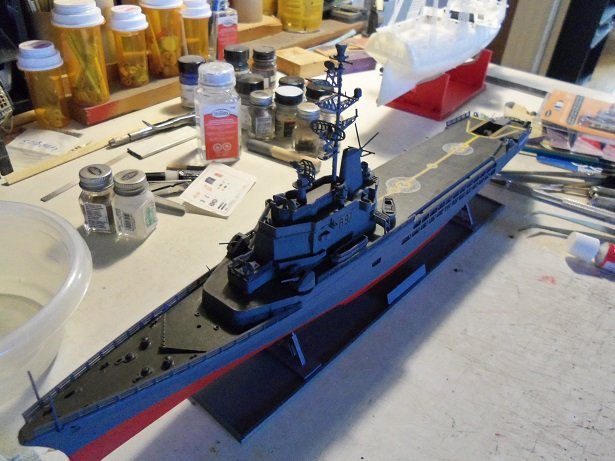
once I started with it, I was compelled to go further. to move on my idea would be futile....the bonder I use is glossy. so, I started to cut up those insignia decals I got from a Fokker kit. I also added the last two yellow lines that run off of the caution stripe. I added the two stripes along the two walls...just though t they needed to be there. I used a paper punch to cut the rounded part of the #5 circle. I'll just park a helicopter over it and hopefully it won't show. the gap in the caution stripe was filled in. perhaps I'll try an archive pen to draw in the lines.......whatever will work, I guess. I noticed that one of the antennas was knocked off the funnel mast....so I fixed that. then I added the main mast. waiting for it to dry...it's OK though, the admiral and I have to go out for an errand. depending on how you look at it......the repairs look either ok......to 'sticks out like a sore thumb'. I'm glad the decal work is done. there are only a small handful of parts left. for the folks who celebrate it, I haven't had the chance, but I hope everyone had a good Thanksgiving. ours was very nice.......a great dinner and the traditional snooze in the afternoon the admiral wasn't complaining.......I did the after dinner dishes
- 133 replies
-
- 16
-
-
- jeanne d arc
- heller
- (and 2 more)
-
some really great progress Pat.........love the bench. your end result will be some my-t fine detail
- 1,013 replies
-
- 1
-
-
- gun dispatch vessel
- victoria
- (and 2 more)
-
you could probably get away with adding 1/16 or 1/8 strip to one of the deck edges and sand down to fit. the other problem is those two raised areas....if something is to fit on them, they are not going to fit very well. I'm sure that if any of those problems arise......your more than apt to handle them
-
super progress with the sails.......they are a bit of a challenge. the last picture is a good one......one with the flying jib, and one without.
- 101 replies
-
- 1
-
-
- L Toile
- Billing Boats
- (and 1 more)
-
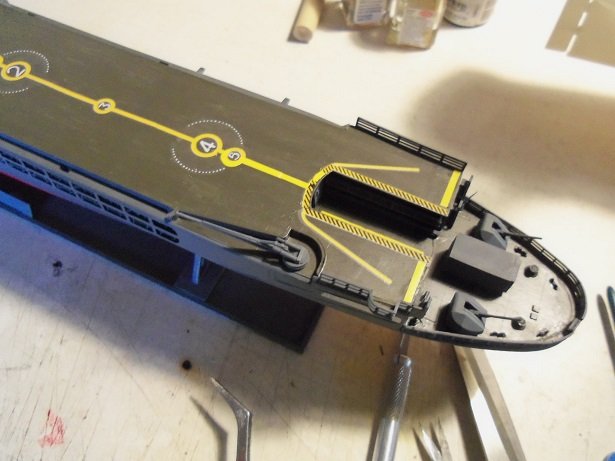
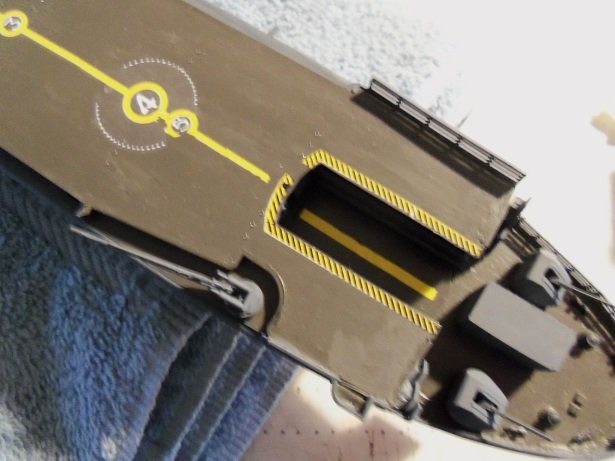
I have a minor update to this project.......I've been busy putting the finish on a couple of non related projects. after disastrous affair with the decals, I worked up the courage to try and finish the deck. I still need to repair the center line......but the caution stripe around the elevator needs to be in place to do it. as I figured, the decal broke into five segments......unfortunately, I was only able to utilize four of them {shoulda used the decal bonder}. live and learn. I might have a way out though......I might be able to fix this using HO train decals.....but only if they don't come out glossy. I'll see how it goes
- 133 replies
-
- 8
-
-
- jeanne d arc
- heller
- (and 2 more)