


popeye the sailor
-
Posts
16,007 -
Joined
-
Last visited
Content Type
Profiles
Forums
Gallery
Events
Everything posted by popeye the sailor
-
 sounds like your moving right along. I wonder if copper or gold leaf paper will work? I can get it at my local craft store? I've seen folks use it on plastic models. {I call it paper because that's how thin it is}.
- 1,208 replies
-
- 1
-

-
- great republic
- clipper
- (and 1 more)
-
super paint! it looks like your finished no....really Patrick..........she looks great!
-
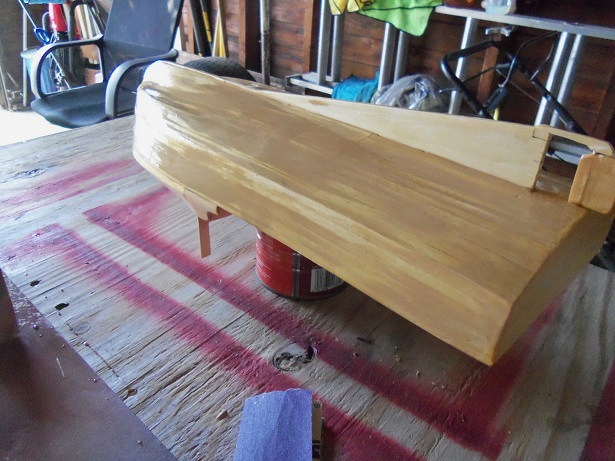
thanks all for the kind comments and the likes! I ended up leaving the hull out there for most of the afternoon. I've got that kind of luck, where I'll go and hit the sandpaper, only to find that it wasn't ready.....and we all know what that does. had to laugh though.........the admiral love the finish! today, I'll bring her back out there.......I need to redo the cabin. I started with the bottom, and by the time I got to the cabin, the resin was starting to get globby, so the cabin is kinda rough to the touch. the bottom looks like glass, with just a couple of areas that will need attention. I'll see how far I can go today thanks Rob........kinda looks that way there are a few factors why I'm trying this.......sealing......smoother finish.......and yea, you can say I'm stick'in a big toe in the water. our last 'baby bird' will be leaving the nest very soon {it's in the works}, and I'm trying to hint at a lake or a pond if we plan a move to a smaller place. can't be too small though, with all the models I have thanks Patrick....yes......I feel much better about this hull. I also have a couple of ideas for outfitting her.....enough to keep the balance between fishing boat and the subject. it will be a good platform for paint......but I gotta keep with the same formula. as I did with the Andrea Gail, I thinned the paint down just enough to reduce the sheen down to a semi gloss. I have a few builds, where the paint is very shiny.......it's nice, but for fishing boats, the sheen factor needs to be reduced.......even a flat is livable. I'm not wearing my boots right now {it's getting deep} I'll get into more later thanks Mobbsie.........no headaches....! I held my breath.......only taking a breath when it was safe it went on though just like I thought it would. you might be onto something with the catamaran.....that would be something cool to see I commend you John for your perseverance Actually, the major accomplishment of this whole log was the Andrea Gail. I think now that adding the fore deck blew the other hull out of contention as well. true, this log isn't as long, as others on the site, but the subject is a very wide field. I've done my best to keep it on track, but I keep losing hulls. so I'm down to these two........the other boat is waiting for a paint scheme, as well as a subject name. chances are, it will remain here.......can't see myself creating another log just for a little bit of work. I welcome you to the log.........my trilogy, and I hope you enjoyed it. there's still more to go, so I hope you'll follow along. thanks for taking the time to look in
-
I posted a while ago.........must have forgot to hit the post button again.......dough! really looks super............very well done
-
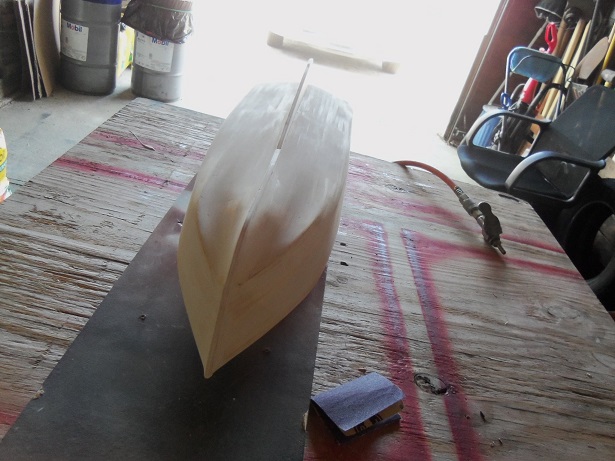
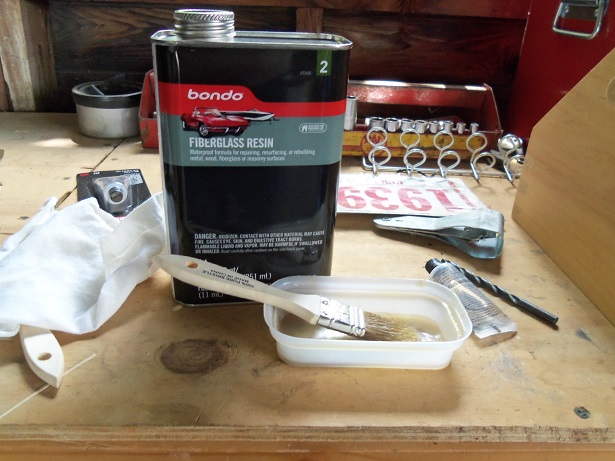
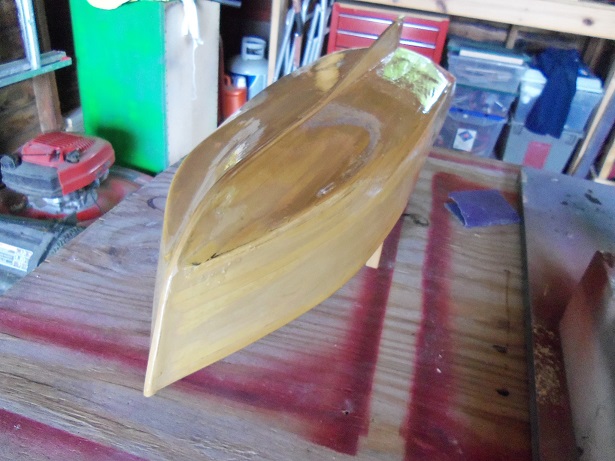
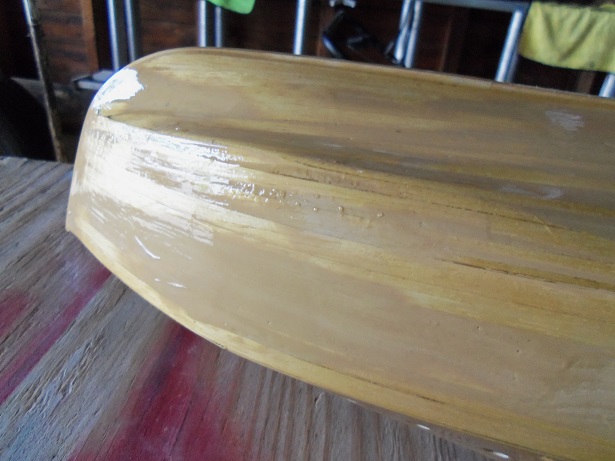
look what I done to my boat.............ma! well.........it is done.....the hull has now been resinized! after I blew the dust out of the admiral's vacuum filter, and then the table I'll be doing it on. as you saw from the last pictures, the hull hasn't been sanded yet from the second wave of filler. this was done first thing.........I'd say that a good 90% of the filler was removed. I brought it down even more from the first time. bad thing is, that I didn't think to use a finer sandpaper on the transom. I'll see later if I'll have to run paper over it.......I'll have to do it anyway. what I'm using is a fiberglass resin, which requires a hardener to activate it. this is a bit after the fact.......the tell-tale brush and can pan. I used a brush to apply it.......as soon as I mixed in the hardener, the clock started ticking. I have the two windows and the garage door open, with a slight breeze.....ambient temp is around 90 degrees. had I done this in the AM....I would have had more time. the next time I do this, I will include a fan...........smelled the high heavens! I will need to pay a little attention to this area. I will also find out if my theory was right........that this stuff should fill in any minor imperfections. we shall see....... I know I will have to give it a light sanding.......brush marks and such. I was amazed at the color change......it really shows too, just how much filler I left on there. I even did the cabin. the areas I did not do are the aft sheer tops and the cockpit bucket. after I was done.......I got right out of there........I was glad to get in the fresh air {I was holding my breath half the time}. I though to get the picture of the resin, so I went back out. I guess it was 15 mins or so......got the picture and passed by the hull. I put a finger on it to see how it felt.....it was barely tacky....somewhat dry to the touch. I figure that I'll leave it out there for an hour or so, making sure that it's good 'n dry before I bring it into the house. I'm not real sure if it's OK to paint....I'd probably need to give it a few more hours.


-
thanks Nils.......and thank you Mr. cool for the likes I finally did it.......I went down into the cobweb infested cellar and got all my paint stuff. it's a very nice day........hot enough to do some painting maybe I may just curb what I'm doing at the moment and go on out there. update soon!
-
must have taken you quite a while for all the riveting.......really looks super!
- 2,625 replies
-
- 6
-
-
- kaiser wilhelm der grosse
- passenger steamer
- (and 1 more)
-
I know.......I just found Piet's log today. splendid! as for Igor's work........I follow Daniel's and his work as well.......their ability to instill as much detail, as they do, is awe inspiring! the only two mediums {that I know of} that have touched the entire scale gambet, is model trains and ships....I haven't seen too many car or aircraft kits that go below 1:144. tip 'o the hat! no disrespect.
-
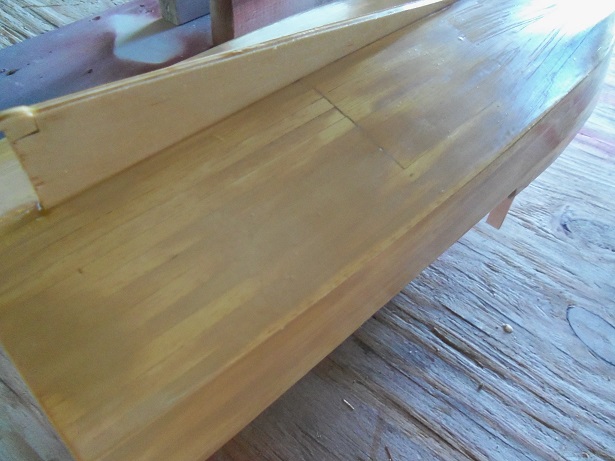
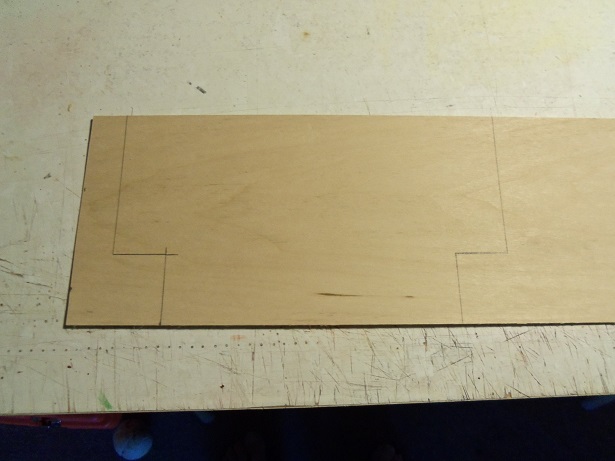
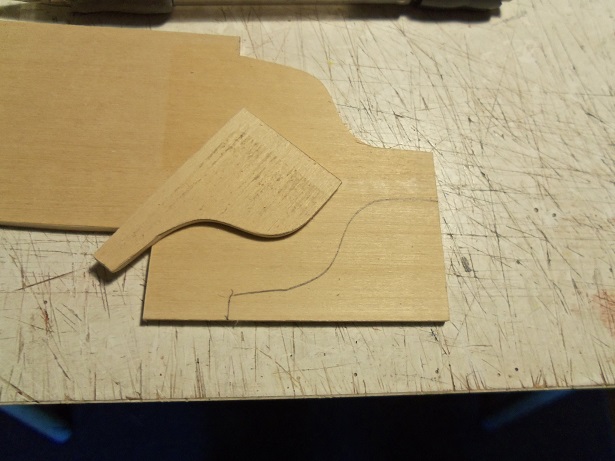
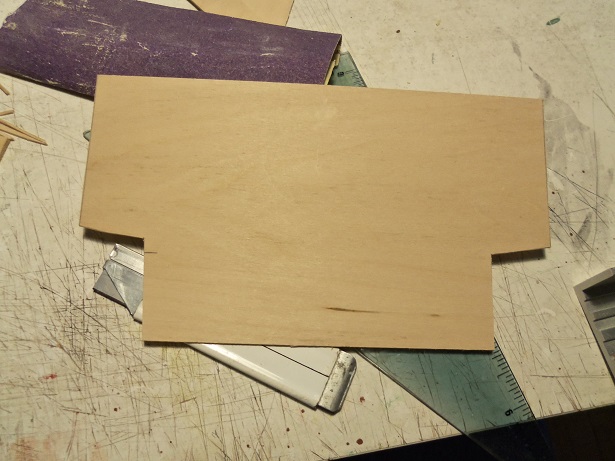
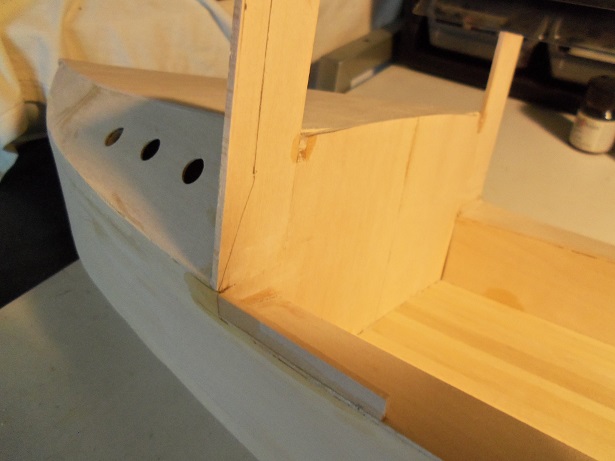
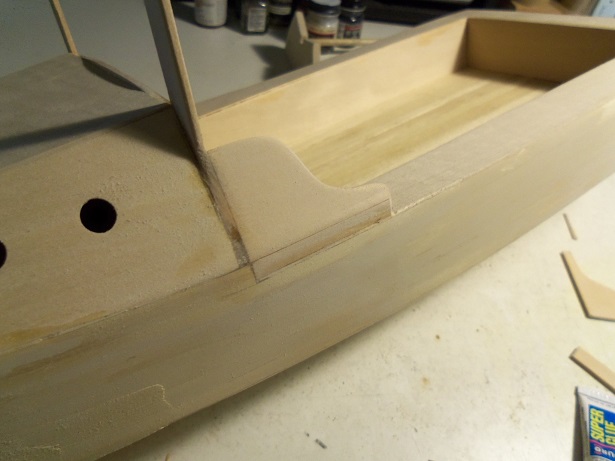
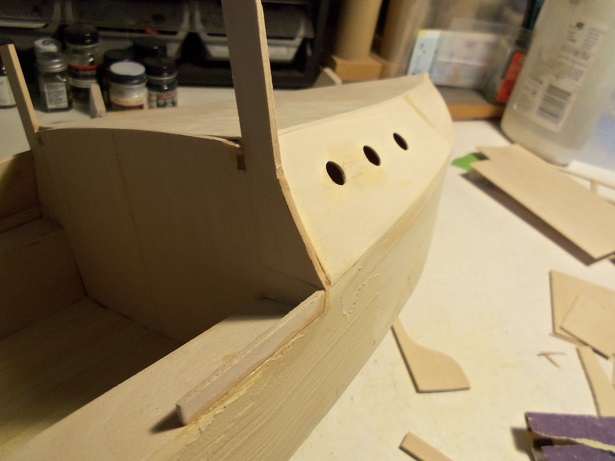
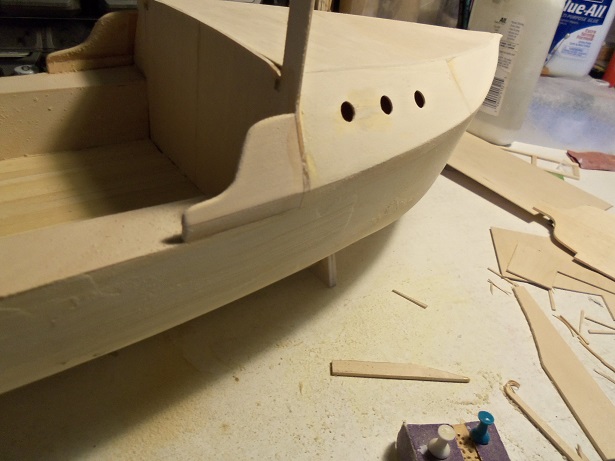
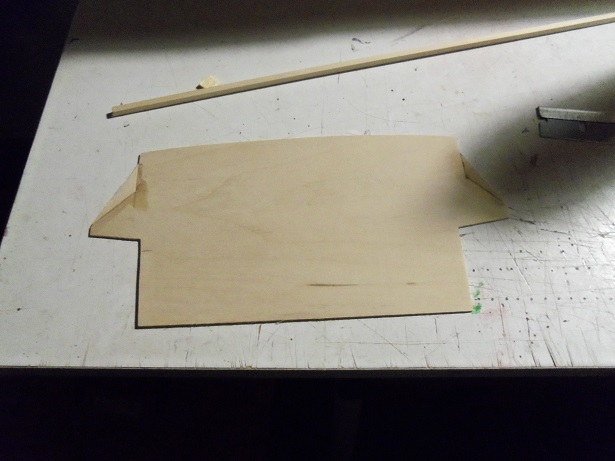
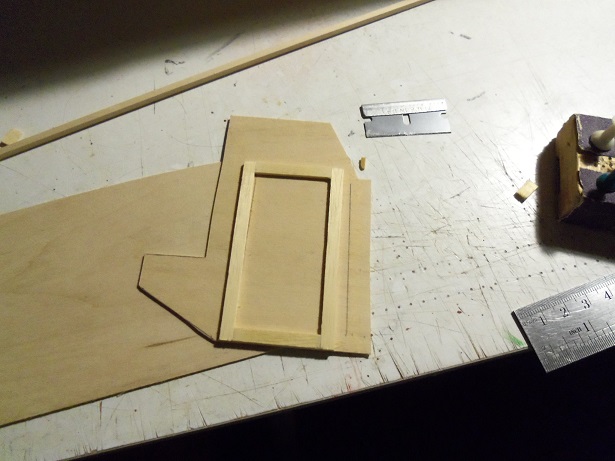
this week has proved to be a bit better.........hectic, but left me in a better frame of mind. I got some table time in yesterday, and did something I was going to put off till after the hull was done. I still have a tiny bit more to do in the adjustment of the windshield......but the frames I installed a while ago are screaming to be altered. along with this aspect, I want to add a pair of decorative side shields to box in the cabin / helm bulkhead. taking a piece of 1/32 flat stock, the dimensions of the cabin bulkhead was traced out......part of it anyway......... then from a piece of 1/8 flat stock, the shields were cut out. some trimming done on the bulkhead cover.......the bottom area of it. starting with the port side, the bottom part of the shield was cemented in place. the area that will be cut off was marked on the frame. the top part of the side shield was cemented in place.....once sanded, it come out looking alright. there was a small oopsie at the bottom.......it was filled with CA and sawdust. the same thing was done on the starboard side......it came out a little better though... .....and with the shield in place...... more cutting was done to the bulkhead cover....I ended up having to make a couple of adjustments to it. I might not use it. I will use it though to plan out the bulkhead layout.....starting with the cabin door. I will work on this more.......show you how that bulkhead cover looks in place.......the wings on the sides don't fully cover behind the shields....I dunno...............I'll do something

-
yes it does Rob..........one of these days......perhaps I can retire, and then........look out! when I began building wooden ship back in 2009, I never thought for a moment, that I'd be sitting here today with several projects on the go. makes me wish I was bolder in my younger day, to give it a try. thanks for popping in.......feel free to follow long
-
you've been a busy beaver Mark..........love the plaque. if I ever need one, I'll be putting in my order nice to see your finally getting some work done on the inside........quite a lot of work you have planned. looking forward in seeing more
-
She looks better than before! you did a spank'in good job of bringing her back to snuff! I was going to go with the Lilliput angle........but I see someone beat me to it she looks awesome Patrick.........you have a couple of pictures there that really show her beauty. you've done well....I'm really impressed with the work you've done on her but I think caution must be taken........your work here is starting to affect other folks......and pretty soon, we're all going to have to don optivisors just to view the site >just kidding< now .........no more heart stopping moments.....OK!?!?!?!? awesome work!
-
it's some good food for thought........I have the Sergal Thermopylae @1:124 scale. I'm holding off on it for the time being, gathering small things for it as I go along. so far, I've found a photo etch set for some of the deck detail.......hopefully, I will find more stuff for it. they show the bottom as painted copper. granted I have enough copper paint to choke a horse.......but it would be nice to show some copper detail, and plating it might be the way I'll go. I enjoy the ideas..........
-
structures are looking good........right down to the teak margins around them very nice I do the same thing.......I have three of my other builds on the smaller table.......each one has a shroud over them. I hate dust....grrrrrrr!
- 2,625 replies
-
- 4
-
-
- kaiser wilhelm der grosse
- passenger steamer
- (and 1 more)
-
so....this is where you've been keeping yourself. I had heard that there was a light bulb shortage up here.......never did hear where the buggers have been going to this is the mystery project?............your not going to have snow........are you !?!?!?!? of course not! very ingenious idea.........and something off the beaten path.......PERFECT!!! looks great so far! amazing how you cut the bulb.....that's some fragile stuff. I read about the trials with the rigging.........right away I thought of the armatures from those little toy motors. the copper wire is very thin. there may also be a solvent to remove the label on the glass {if you haven't done that already}. now that the cat's out of the bag..........{cat hair! anyone got an Angora?}.......I can follow along. I'm trying to play catch up........saw your log on the right hand side......and here I am! now......don't strain yourself lifting that heavy boat......
-
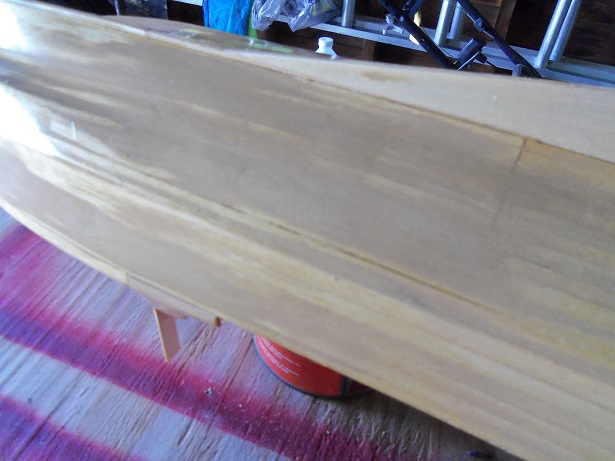
thanks Frank and Sean........the hull is a bit off the beaten path. I thought it would be fun to try. it might have turned out better if the bow was broader, but a goof on my part made it happen it would have been impossible to do, if I went from the garboard up. last week was a lost cause...my frame of mind was in a bad place.............but this week {starting with my work week} hasn't been too bad. I actually got a little done today. I was going to hold off on this bit, but I felt that it needed to be done, so I can blend it in with the resin. I'm hoping to do the final sanding later. everyone saw the transom, and how 'hairy' it looks. this is what basswood does.....the fibers want to stick up. I'm hoping some fine sandpaper knocks a lot of it off, so it can get a smooth hull. I'll have an update soon.........gotta go to the store {I hope it's a quick jaunt }
-
the hull is looking great Rob. I haven't done any coppering.......but it is true about ratio to scale and detail. at smaller scales, the brads used to make the rivet detail, would need to be the diameter of a common pin.........or you'd have a hull full 'o craters. with 1:96 plastic hulls, the texture of the plates can be felt and seen as very tiny dimples. I guess the best looking is some sort of pattern.......and not too busy. it don't look right giving the appearance like it got peppered with bird shot. when you've done a large area of the hull....it will be the best barometer some very interesting views here
- 1,208 replies
-
- 1
-
-
- great republic
- clipper
- (and 1 more)
-
I think you did a great job Piet.......the proto type showed you what need to be changed. I'm sure your next one will have these changes in place
-
nice job on the cat heads and the round house....once the port side round house is in place, it will look super hope the hand is on the mend.....reminds me of a vid on you tube......too bad I can't post it here. but consider putting the experience in the "betcha won't do that again" category awesome update Sean!
- 2,191 replies
-
- 5
-
-
- confederacy
- Model Shipways
- (and 1 more)
-
such wonderful work Daniel.........the decks look great! really great progress........would never thought how to make a locker like that.
-
really coming along Grant..........love the color of the interior parts. the mechanical aspects are so cool too!
- 339 replies
-
- 5
-
-
- dumas
- Chris-Craft
- (and 3 more)
-
decking looks great Jerry...........I might give nibbing a try too, when I get 'round to building my Bluenose. have a great time on your trip!
-
to leave 'em or make the adjustments........you can see that there was no real answer.......only the one that you decided on personally, I would have left them too......especially after seeing that picture of the instruction diagram. your on the right track Jesse.........wonderful progress!
- 1,306 replies
-
- 8
-
-
- syren
- model shipways
- (and 1 more)
-
ship's boat looks great Sjors........do you have others to build? you mentioned that you stopped using the bamboo.......did you remove all of it off the hull? I see what looks like different woods on the hull.......is that going to be a factor if you choose to stain her?
-
I don't believe that Pat........your work suggests that you've built a few in your day great fix with the booms.....reading your earlier post on this.....I knew you'd fix it before going any further. better than me though.........when I built the first kit of the Revell United States, I didn't even attach the booms to the yards.......I suspended them with the sheet lines! {Revell doesn't show this in the instructions}. I don't even notice any marring in the repair..... just the spot of solder sweet looking ship!
- 517 replies
-
- 2
-
-
- Endeavour
- Artesania Latina
- (and 1 more)