


mtaylor
-
Posts
26,273 -
Joined
-
Last visited
Content Type
Profiles
Forums
Gallery
Events
Everything posted by mtaylor
-
Thanks Remco. I'll give it a try when I get closer to needing cannon. I was thinking of a cutter as a file on brass would take forever. I'm just trying to think outside the box on some things.
- 1,215 replies
-
- 3
-

-
- sloop
- kingfisher
- (and 1 more)
-
Remco, I'm curious about that brass duplicator for spokes. Do you think something like that would for turning cannons in brass? I'm looking ahead at 28 cannon....
- 1,215 replies
-
- 6
-
-
- sloop
- kingfisher
- (and 1 more)
-
Interesting problem.... This is a first. As for mounting the whole assembly, maybe glue and pin the trucks to the deck and the half breeching rope, harden it with CA or epoxy. Or maybe run a wire in the middle of it? It would need to be secured to the deck to help hold things in place. A bit of cantilever construction methinks.
- 572 replies
-
- 6
-
-
- constitution
- frigate
- (and 1 more)
-
Greg, The answer is "yes".. it can be done. The only problem is that the lines scale up also in thickness. I've settled into 1:64 and I have plans for some that are 1:96 which have been enlarged. That's the biggest pitfall I can see. If you're not careful, some parts will be bigger than others.
-
Pete, Here's everything you might want to know... http://modelshipworld.com/index.php/topic/4339-announcing-the-model-ship-world-ship-kit-database-project/ It's pinned at the top of this sub-forum.
-
Harbor Freight Mini Wood Planes
mtaylor replied to grsjax's topic in Modeling tools and Workshop Equipment
Rats... That Garret-Wade honing guide looks perfect for the small plane blades. It's rough being a toolholic. On the bright side, there's a good holiday coming up for making a gift to myself. -
What shihawk and Nils said. Also, it's a matter of practice and "feel". Put some beeswax on the line before rigging as this will help keep the humidity out of the fibers.
-
Crackers, Yes. That would work.
-
Nice work on the Niagara Brian. Spot the cabins and see if you have finger room. I would think that the rails need to be in place before the cabins and other things as you'll want to make sure they are in securely. Some pin them in place for security.
- 287 replies
-
- 2
-
-
- niagara
- Model Shipways
- (and 1 more)
-
What might help also, is to put the balsa on a slab of basswood with some PVA. cut what needs to be cut and the drop it in an alcohol bath. Once the glue dissolves, let it dry and you can use it.
-
Echo by Maury S - FINISHED - Cross-Section
mtaylor replied to Maury S's topic in - Build logs for subjects built 1751 - 1800
Just beautiful, Maury. -
Stunningly beautiful work, Ray. Indeed, be proud as you've done a fantastic job on her.
- 536 replies
-
- 3
-
-
- diana
- caldercraft
- (and 1 more)
-
Wouldn't the color be a huge variable depending on the type of tree used for the bark? Perhaps even the individual methods of the dyer also influence this? I'm asking as I'm curious.
-
Ben, Can you make the mast removable? In for when it's on display, and out when it's on the water.
-
Beautiful work, Giampiero. I noticed the wonderful touch of the ropes securing the chimney hood over the fireplace. That's a detail I don't think I've seen before in any build.
-
Greg, The problem with many of the full-size tools is the size. For example, a full-size table saw. It's tough to find a blade with a fine enough tooth count that doesn't splinter the woods. Some things though, like a drill press or scroll saw (with appropriate blades), work very well.
-
This might help with the archaic language problem: http://southseas.nla.gov.au/refs/falc/contents.html Jeff and QA: What the others have said about a build log and asking questions. We all ask as no one has 100% knowledge, although some are pretty close to that. QA: Those instructions seem to be very typical of Billings. I think the Wasa's were about that simple. :D But it had a great set of drawings and booklet of photos (bad reproduction problem) and excellent drawings with dimensions, etc.
-
Denis, The secret to not getting "the look" is to no bring it up. Just do it and mumble something about "finding it in a box of junk".
-
Tool for Sanding Inside of Curved Pieces
mtaylor replied to ChrisLBren's topic in Modeling tools and Workshop Equipment
Chris, One tool I found works well is a variation of a floor polisher/sander I picked up from DaveS. I take a large Dremel felt disk and counter sink the hole a bit. The disk is then attached to the mandrel and then sticky back sandpaper is pressed into place the disk and trimmed to something approximating round. In the Dremel 90 degree attachment it gets me into the hull with ease. Just don't press hard, keep the disk moving and the high spots come down pretty quick. Finish is with another bit sticky back sand paper on small sheet of cardboard like the back of note tablet. Something flexible. I also use this on decks. Here's a pic: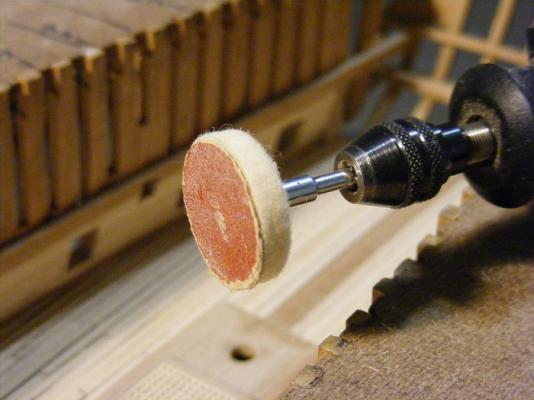
-
Have a great birthday, Grant. (I hope I didn't miss it)..

- 456 replies
-
- 6
-
-
- finished
- bomb ketch
- (and 2 more)
-
I looked at the list for descriptions and then a only a couple for actual ordering.. not the whole site. Luck of the draw, the ones I looked at had translations available. My bad. I'll go sit the corner for now.
-
Mike, I think that curve around to the counter throws a lot of us off and into "blue air" mode. You are not alone.
