


James H
-
Posts
5,613 -
Joined
-
Last visited
Content Type
Profiles
Forums
Gallery
Events
Posts posted by James H
-
-
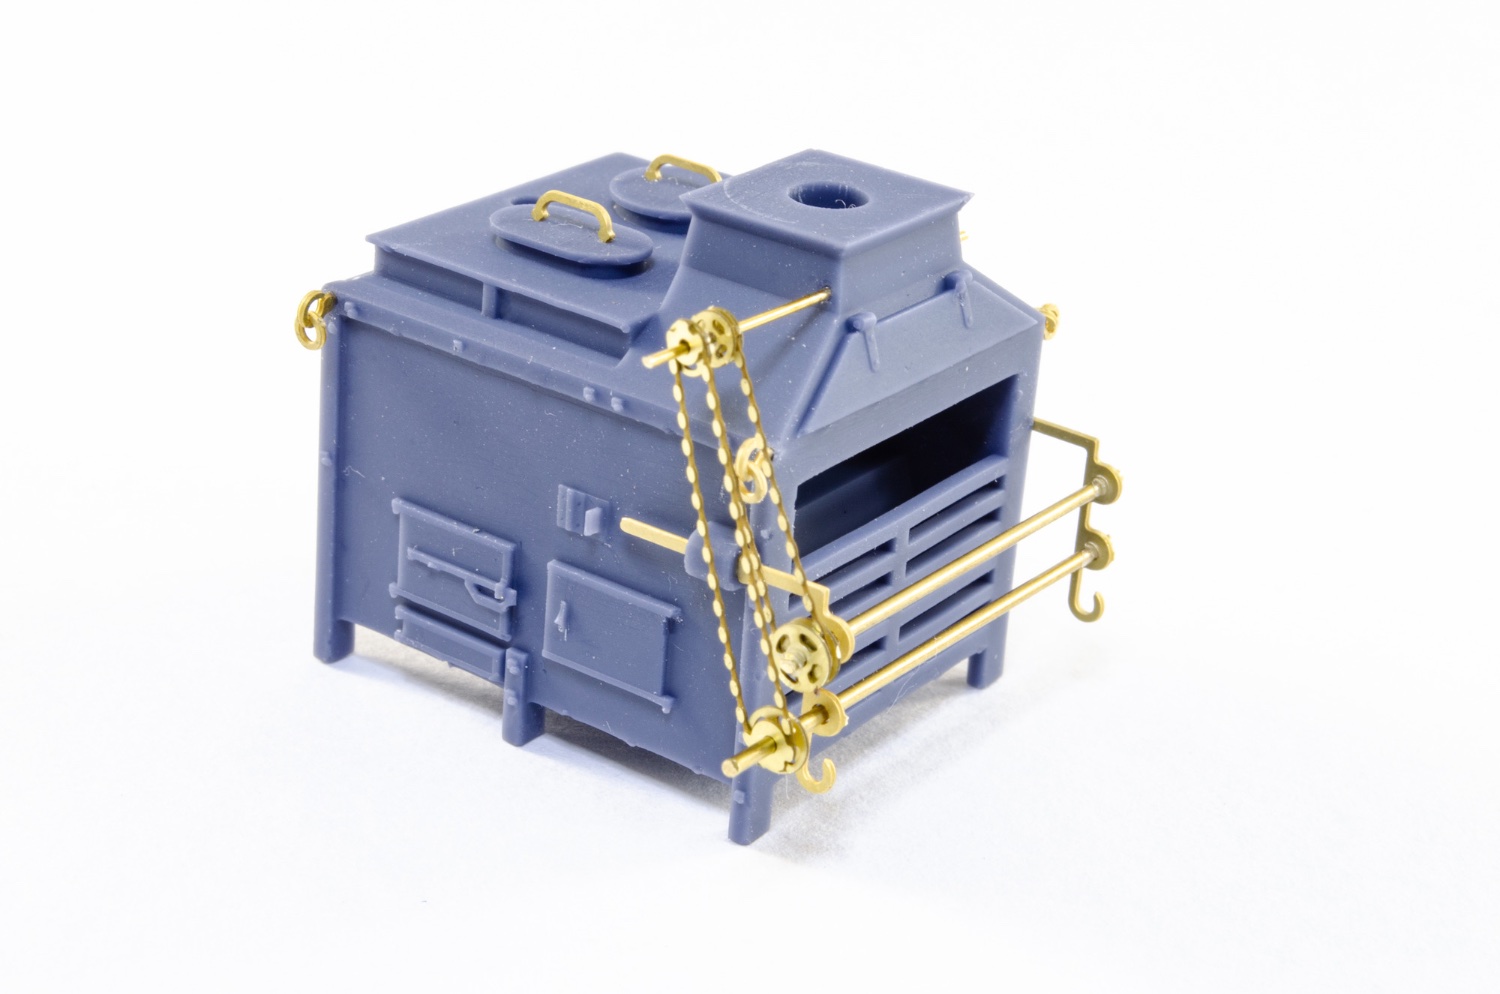
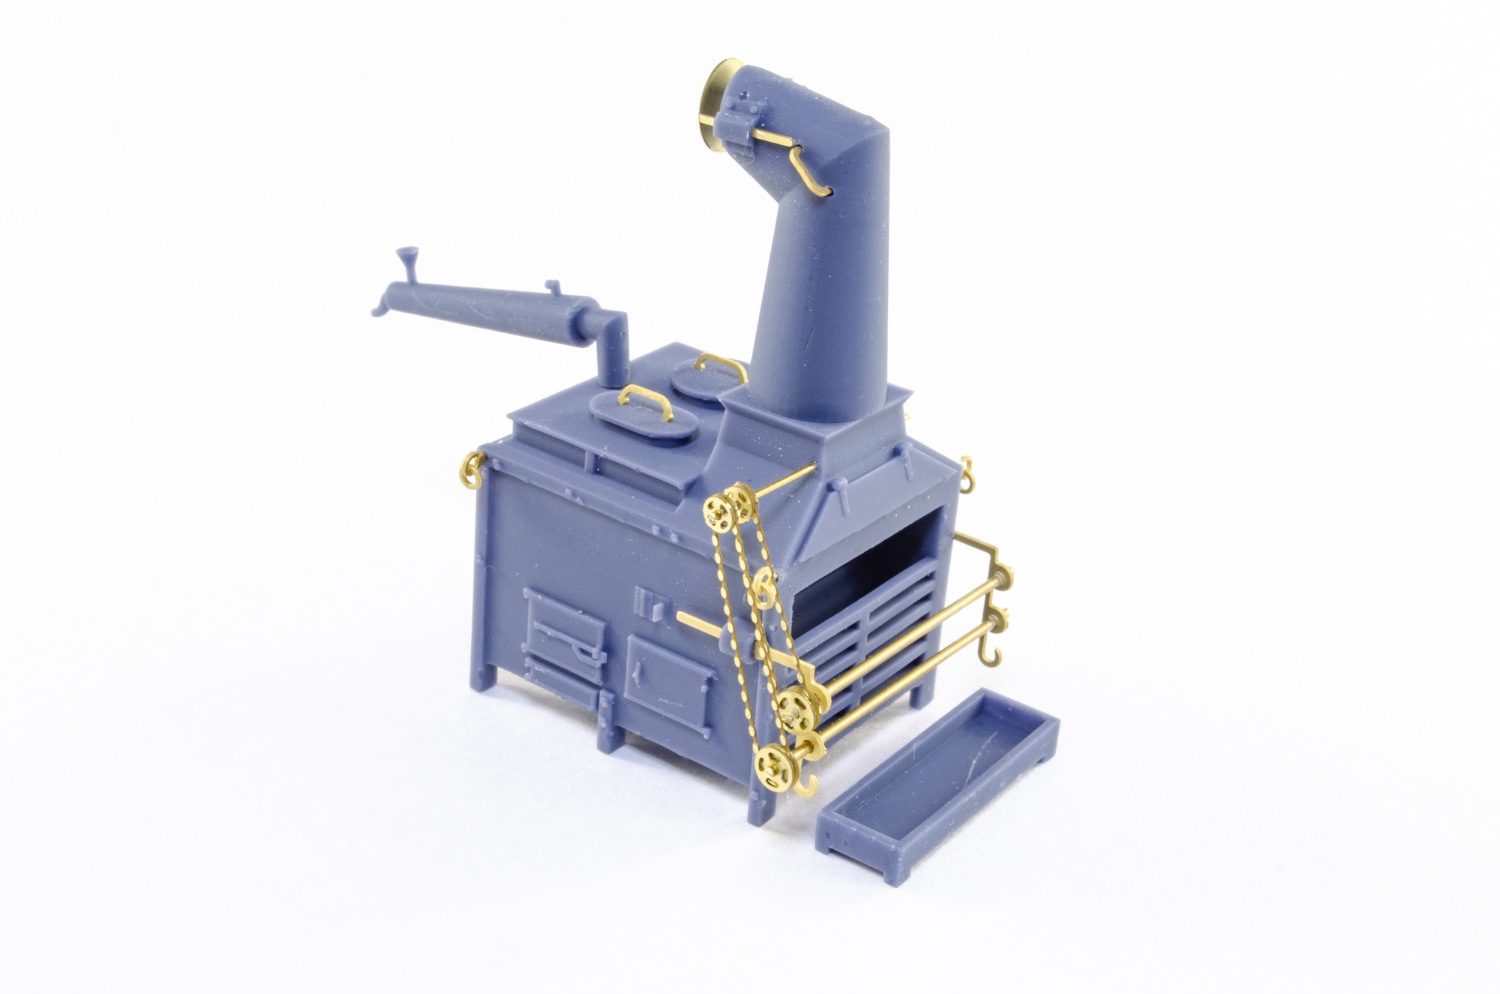
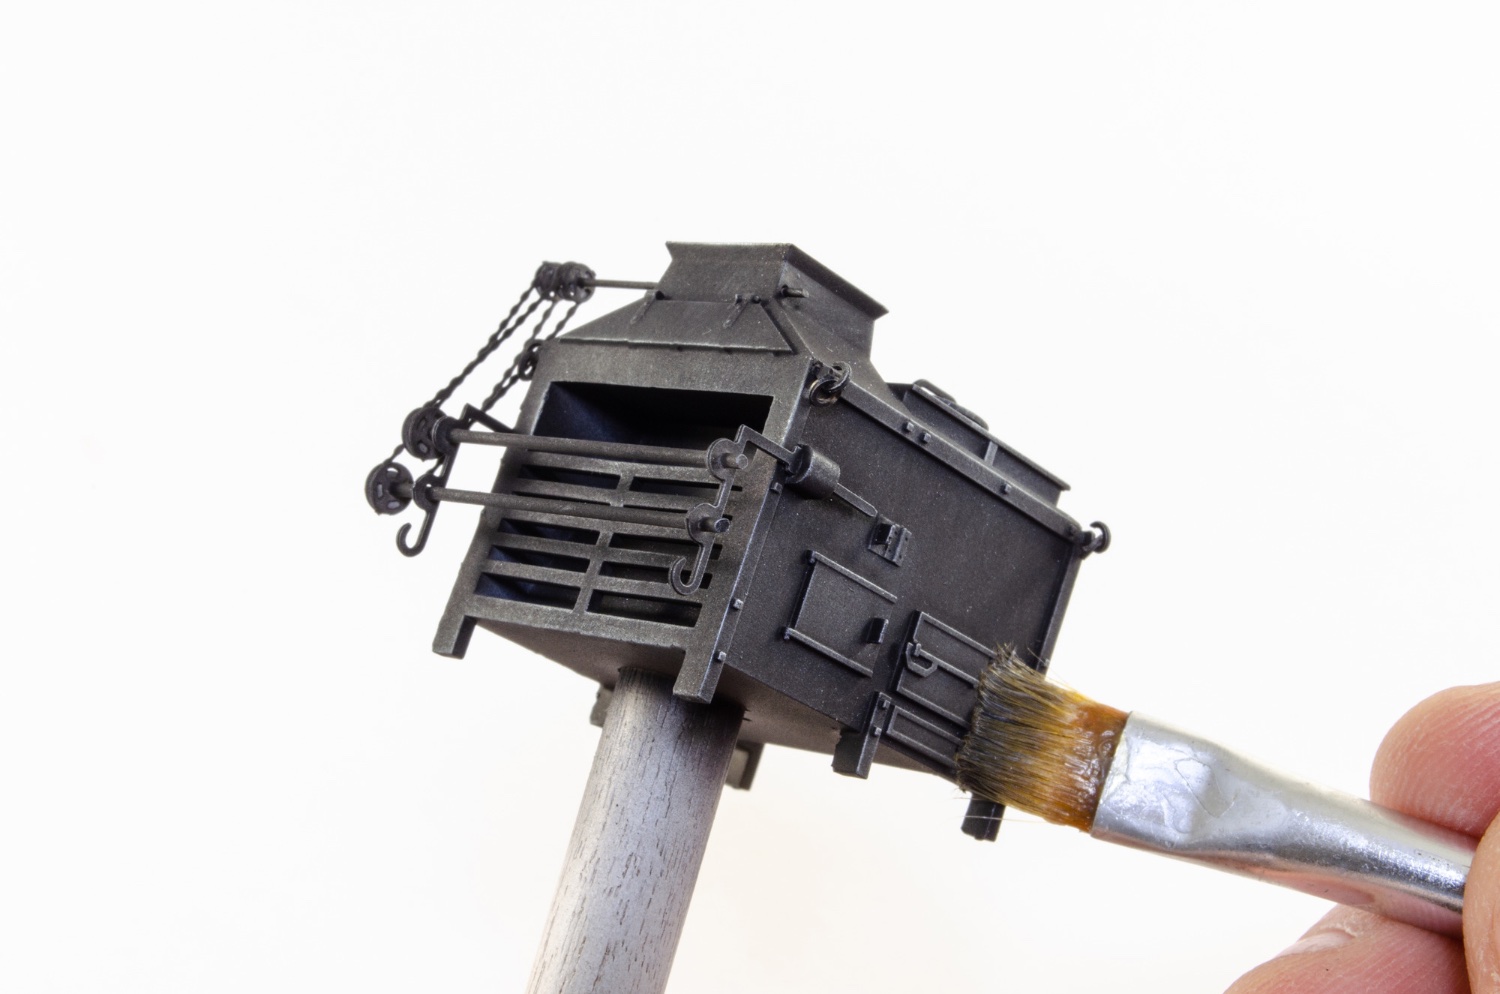
Ship's stove.
I know I did the for the VM web-shop but this one is now printed in 8K resolution using a different resin which is tough. There are two PE frets with this stove, with a few spares for things like pulleys and eyelets etc. The stove assembly is the same as the one in the shop, but here are some pics of the work.


Tamiya fine primer was used on the stove, followed by Tamiya Flat Black. The stove was then weathered with Uschi van der Rosten steel pigment. At this stage, the chimney and pipe are only sat in position. They'll be glued to the stove later in the build.


-
You can have a look through my build logs for stuff that you might be wanting to use. I'm UK and everything I buy is either local, or Amazon.
- mtaylor, Keith Black, bruce d and 1 other
-
 4
4
-
Tiny update as I am doing a few other things in other build areas of Indy too.
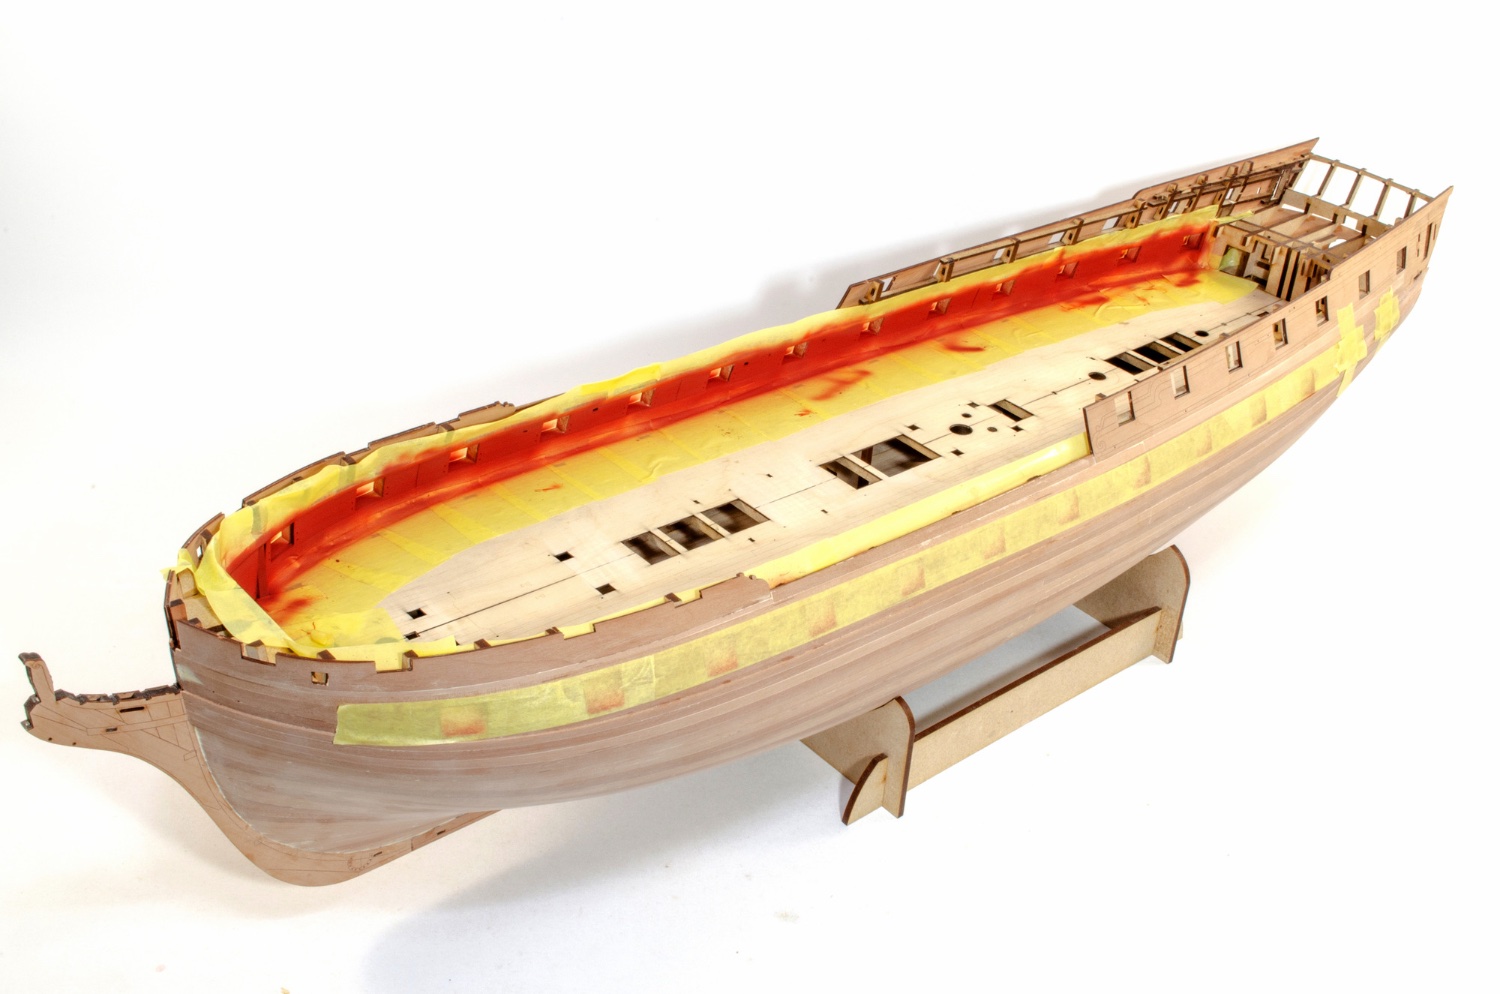
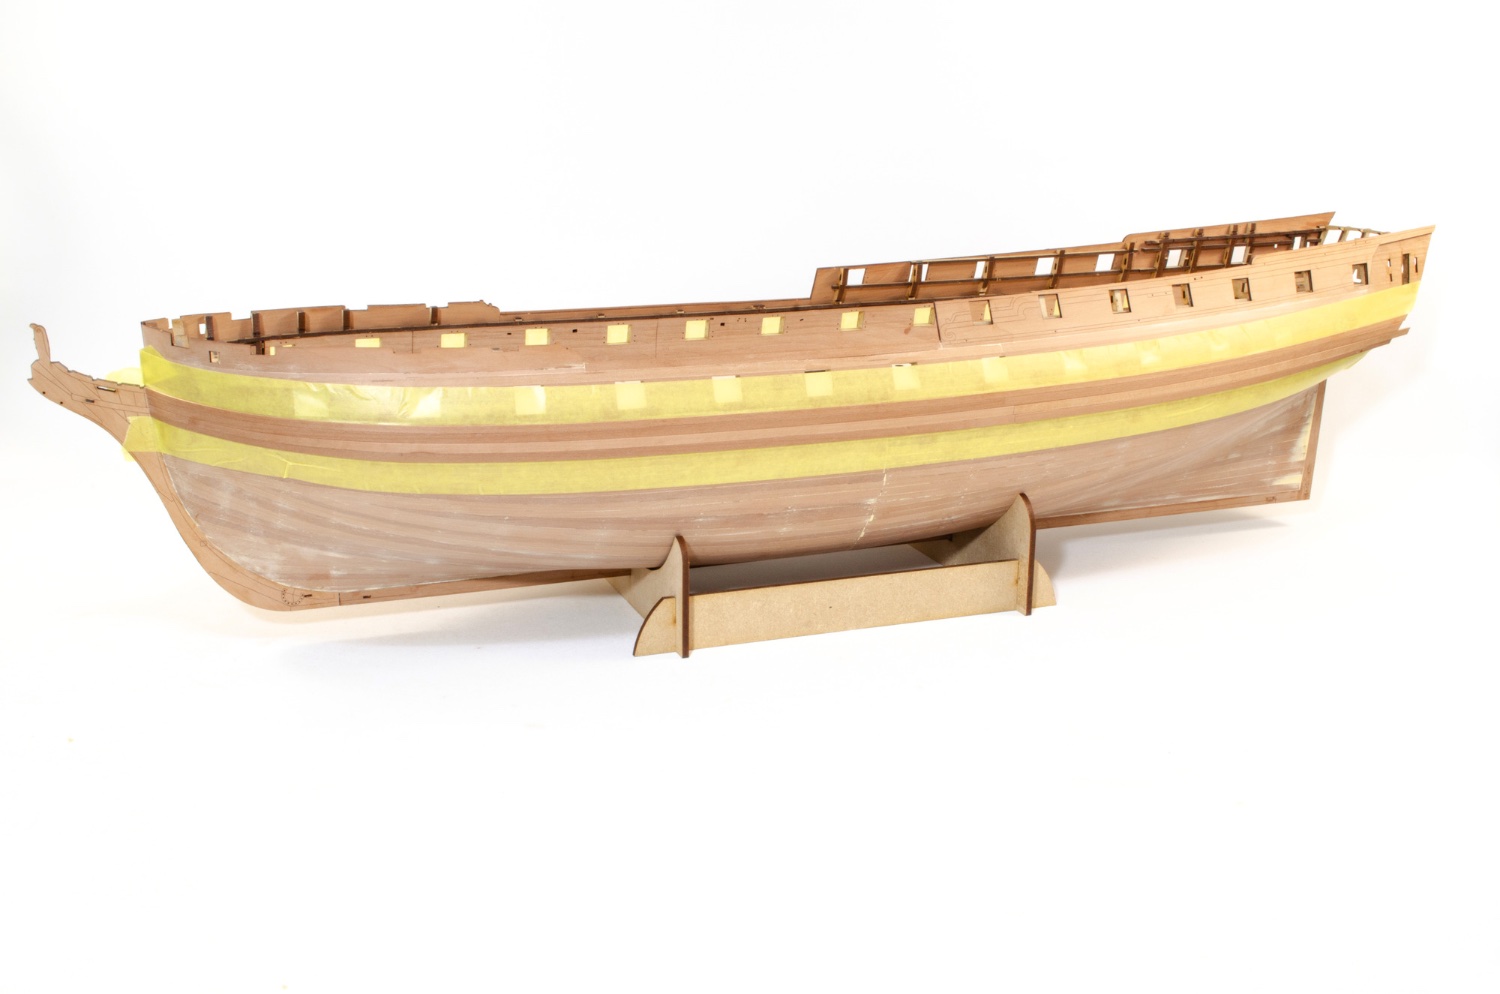
I now have some colour on the model. I first varnished the exposed strip on the inner bulwarks and then used masking tape before I added paint. For this, I used some Plastikote Red Oxide (same as on the lower fisher hulls) and decanted it from the aerosol so I could airbrush it. The paint was left to de-gas for a few hours. That's important as it'll boil if you try to use or do anything with it when fresh from the rattle can. The paint was then thinned with mr Levelling Thinner, about 60:40 paint to thinner. When completely dry, I airbrushed Tamiya Flat Red over the red oxide.
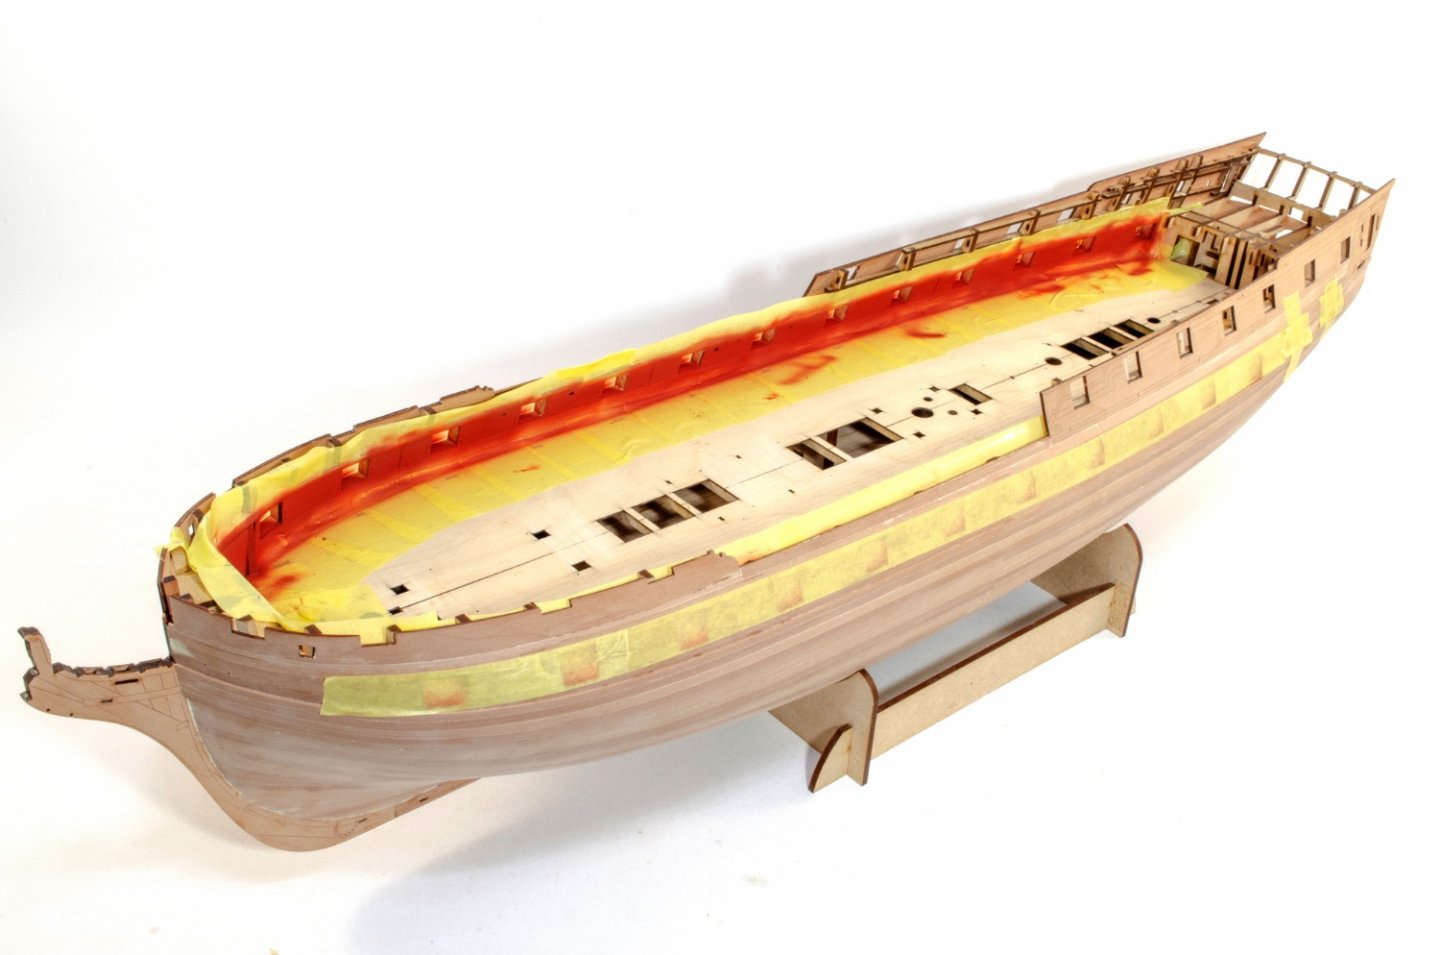
After more judicious masking (and masking the ports off from interior), I did the same paint regime for the gun ports. Once dry, everything was unmasked.
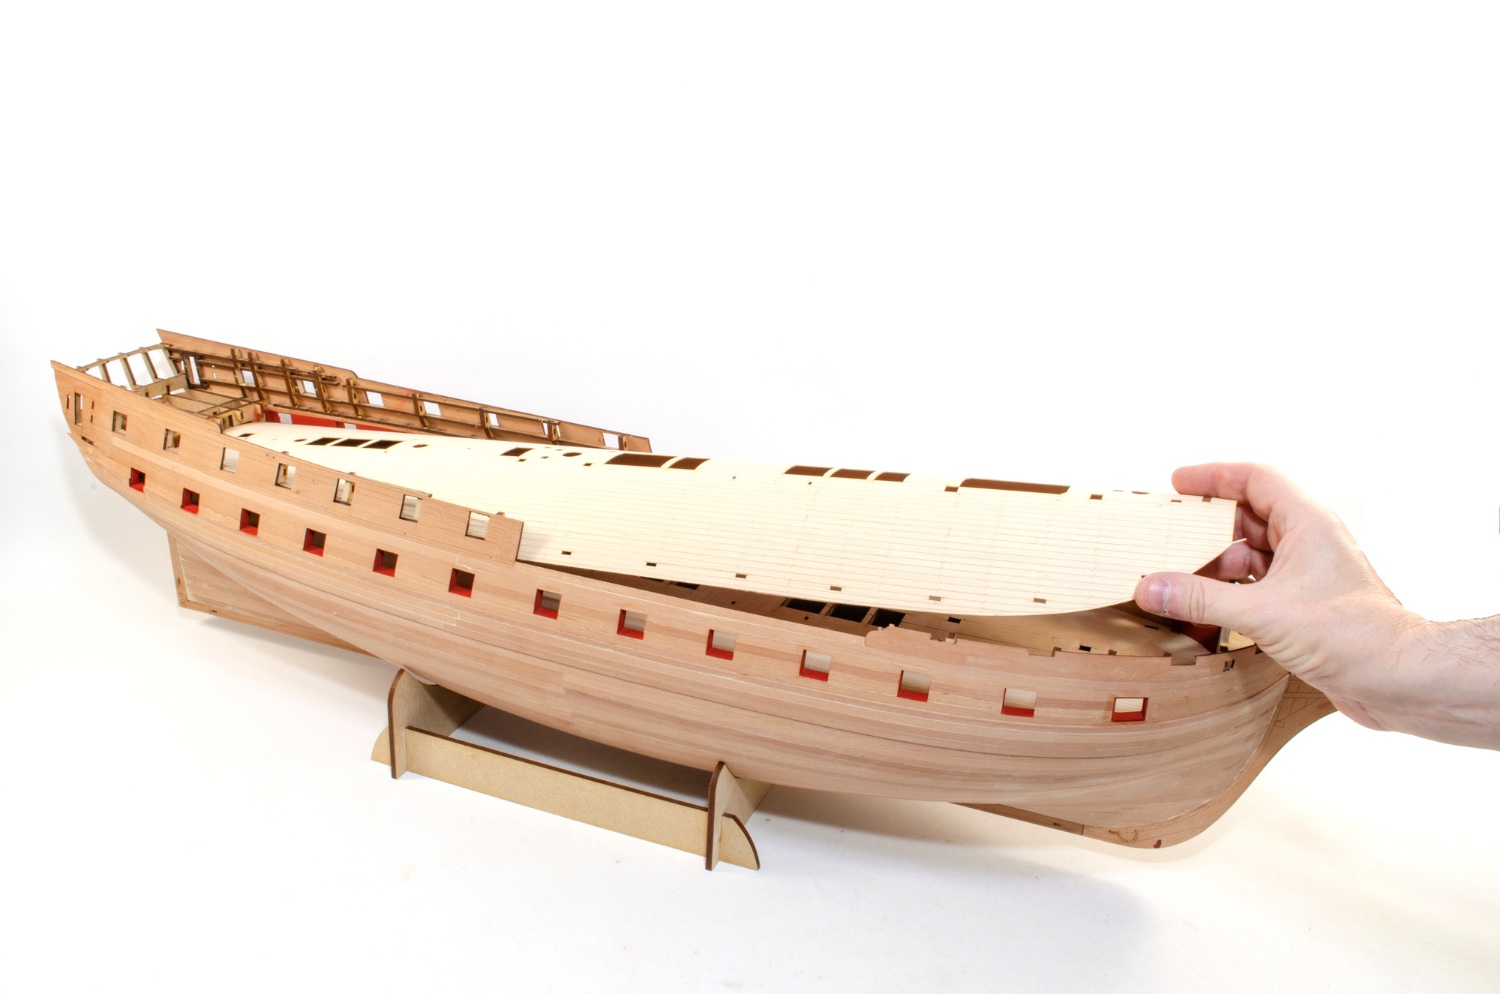
The standard kit will be supplied with Red Alder for deck planking. This is a beautiful timber. However, for this, I am using an engraved maple veneer deck. There will be an option for a maple deck, but it's an actual maple deck, not veneer. Fitting the deck will be the same as for this, with a subtle flex and sliding into the rear first, underneath the stern timbers. First though, a test fit should be done and the edges sanded so it lies flat to the bulwark edges.

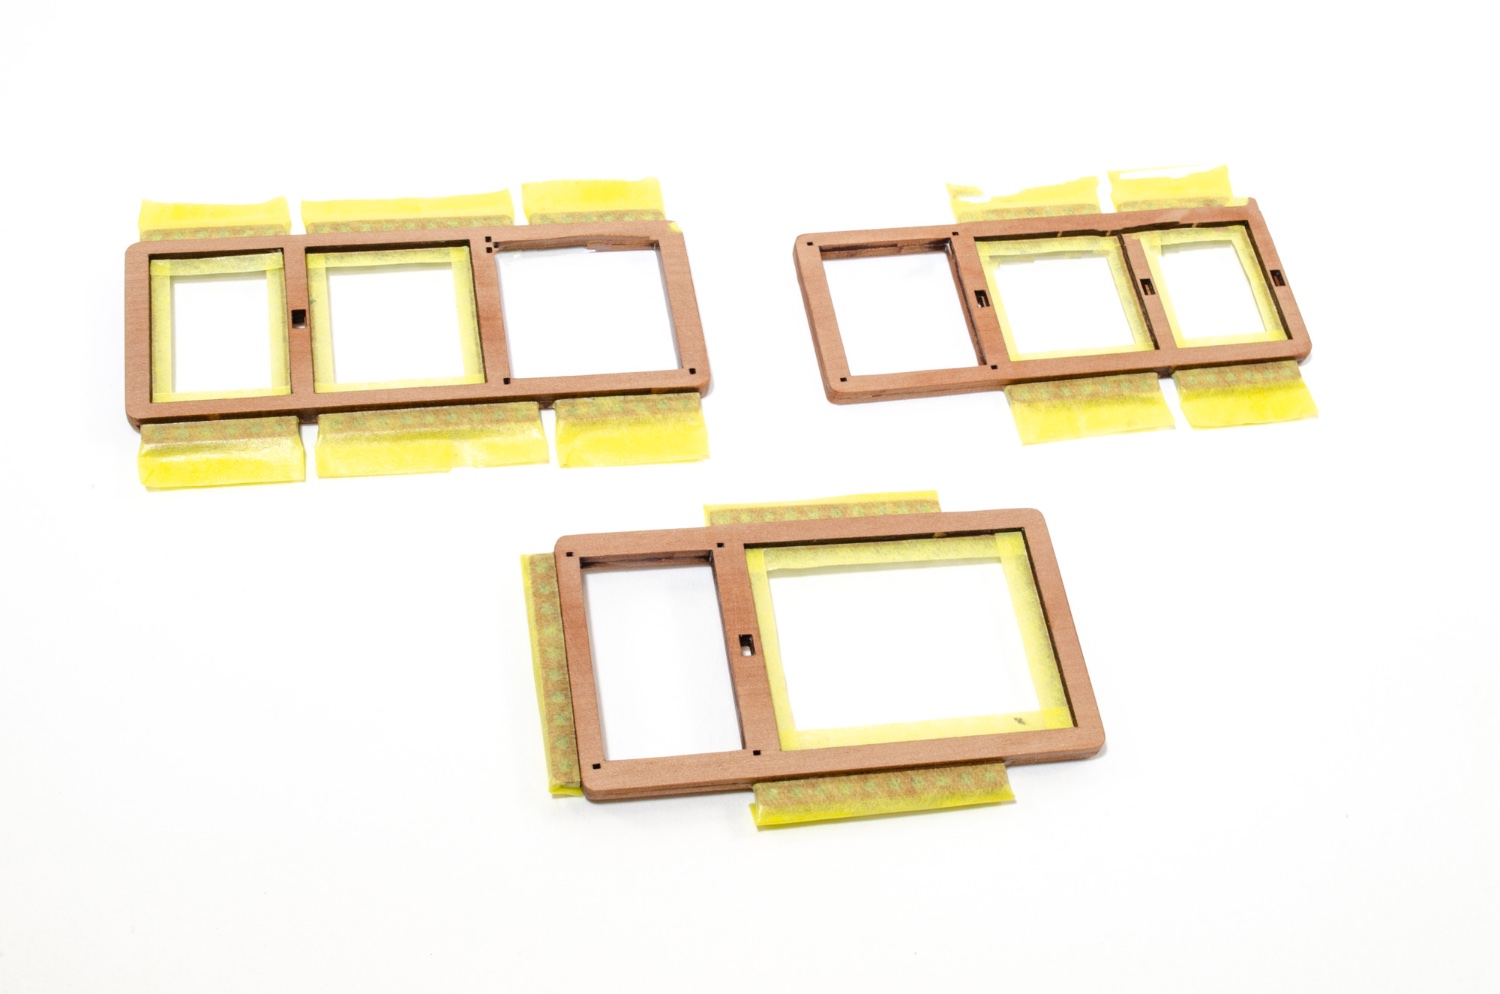
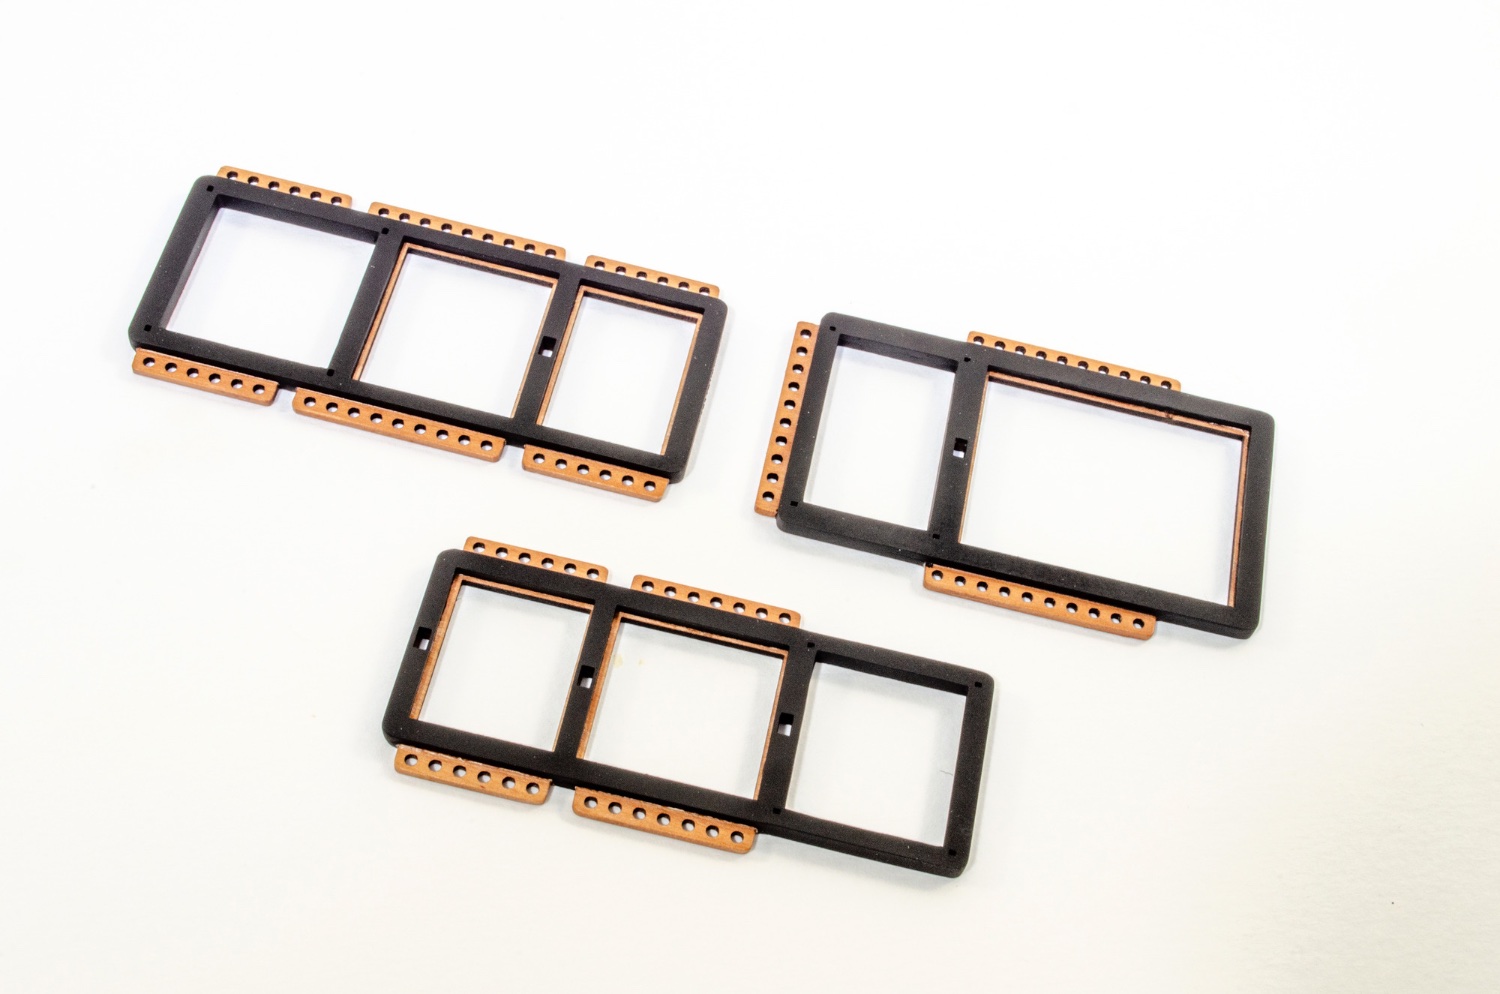
The deck was then glued down and left to dry. In the meantime, the main gu deck coamings were masked and airbrushed in Tamiya Flat Black. The grates will be added after the coamings are fitted, so to reduce rigidity when fitting.


More soon(ish)
-
7 minutes ago, ECK said:
So have some questions. I am about to attach the yards. Interestingly there is drover on this model, on the plans or the finished picture. Not sure why. Also, although I can see lower yard trusses in the finished pictures, there are no instructions about them. I can make them from previous model instructions (ie Diane and Agamemnon) but am I missing something ?
I'm not sure what a drover is.
Also the rig plan instructions are pretty much what I followed when I rigged Sphinx for the manual. I didn't replicate every single rig item as a photo as the drawings suffice and photos of such things aren't easy to take. It'd also bloated the manual out by another 20 pages! 😁
-
-
3 minutes ago, allanyed said:
You are right about that Chris, it seems that with the exception of Syren, most, if not all, kits have it wrong. But, some might call this an opportunity for some kit maker to stand above the rest even if it is only mentioned in a few sentences with a simple sketch in the instructions.
Allan
Ok, this is derailing an excellent build log with material which is totally pointless.
Let's respect what Doug is setting out to do here.
If you want a topic on prow tapering, which isn't included on any commercial kit, or ever been asked for to my knowledge, then please open a topic about it ad create discussion there. Same goes for application of a ship's name to the stern, period depending.
- Nirvana, chris watton, Gregory and 2 others
-
5
-
37 minutes ago, Dfell said:
Chris am sure would make his Vanguard models as accurate as possible.
No matter how much work is put into a kit, nothing can ever be absolutely represented in the minutest of detail when the kit needs to be released without the company going bust because it's spending too much time on stuff no one will ever notice. Well, almost no one.
-
-
That is spectacular!
- MICHELE PADOAN, mtaylor, Mirabell61 and 1 other
-
4
-
-
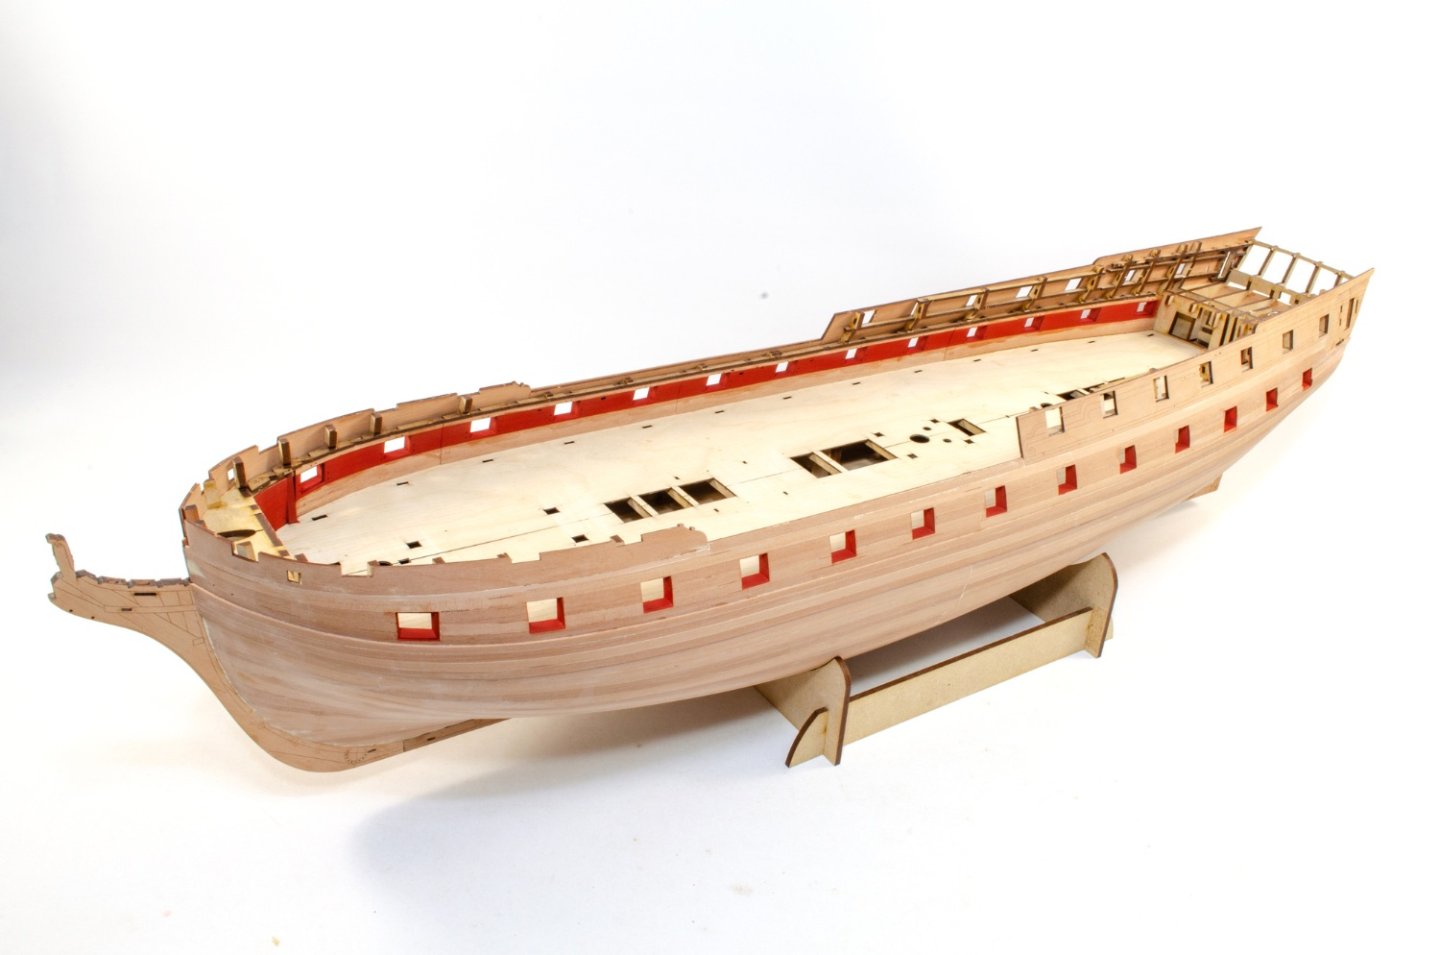
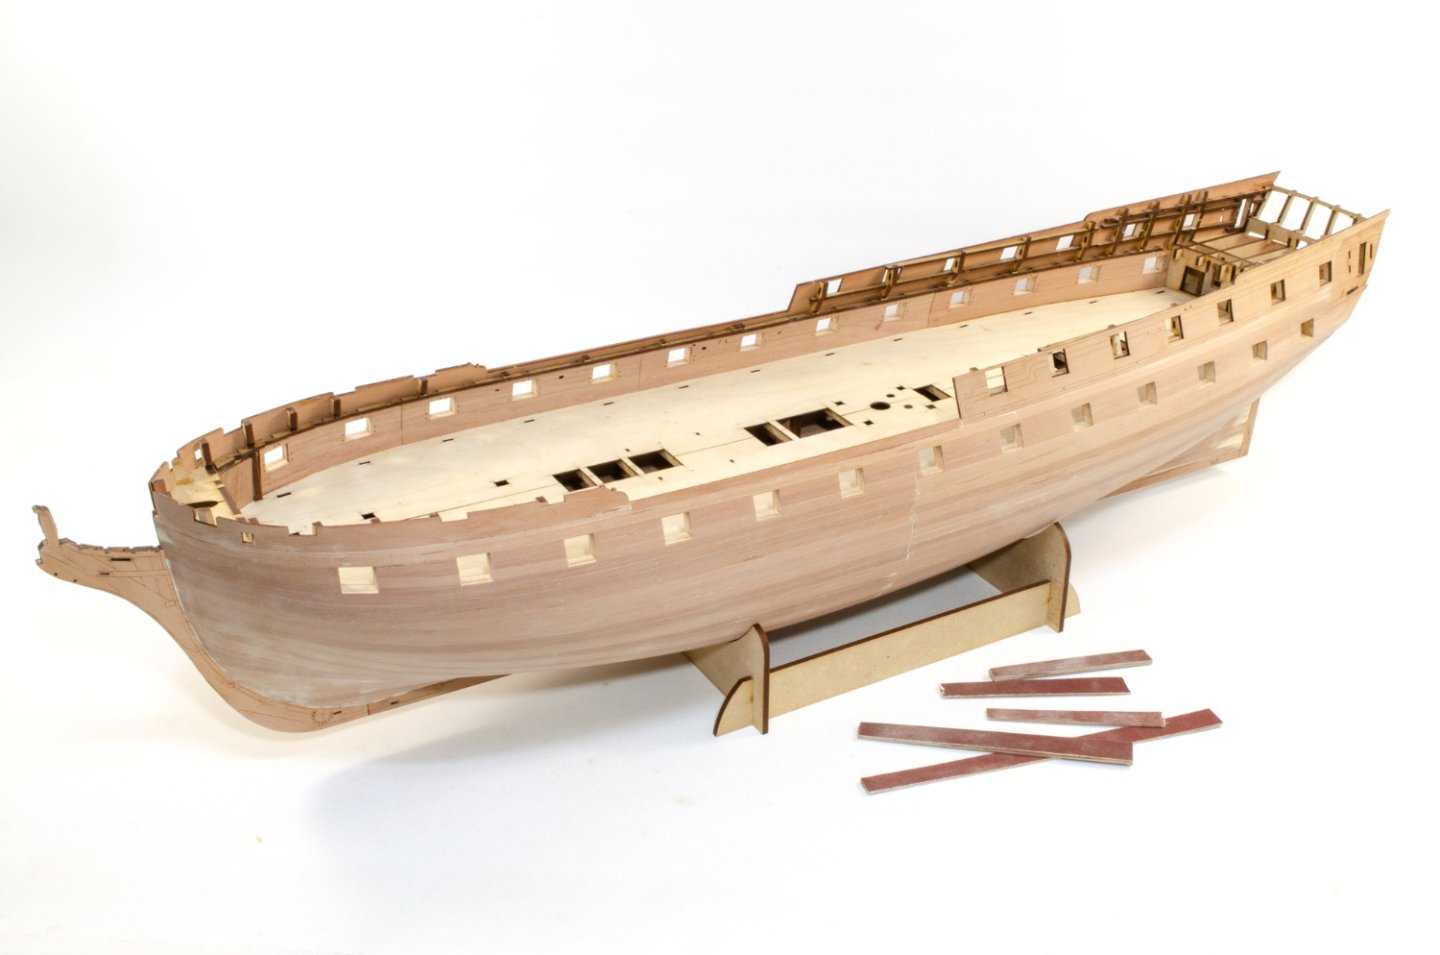
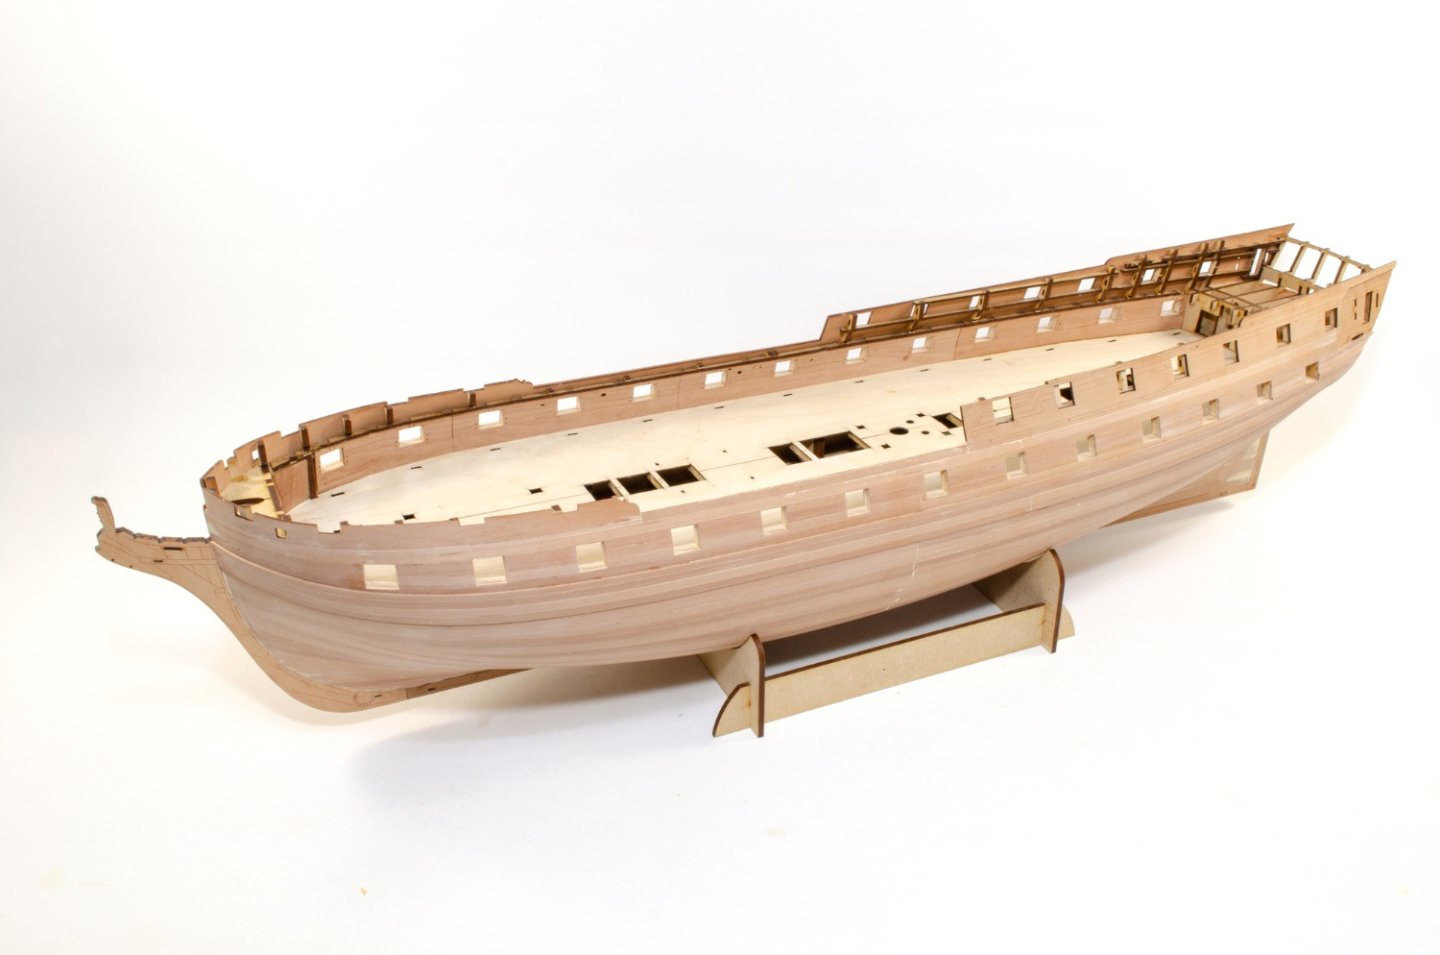
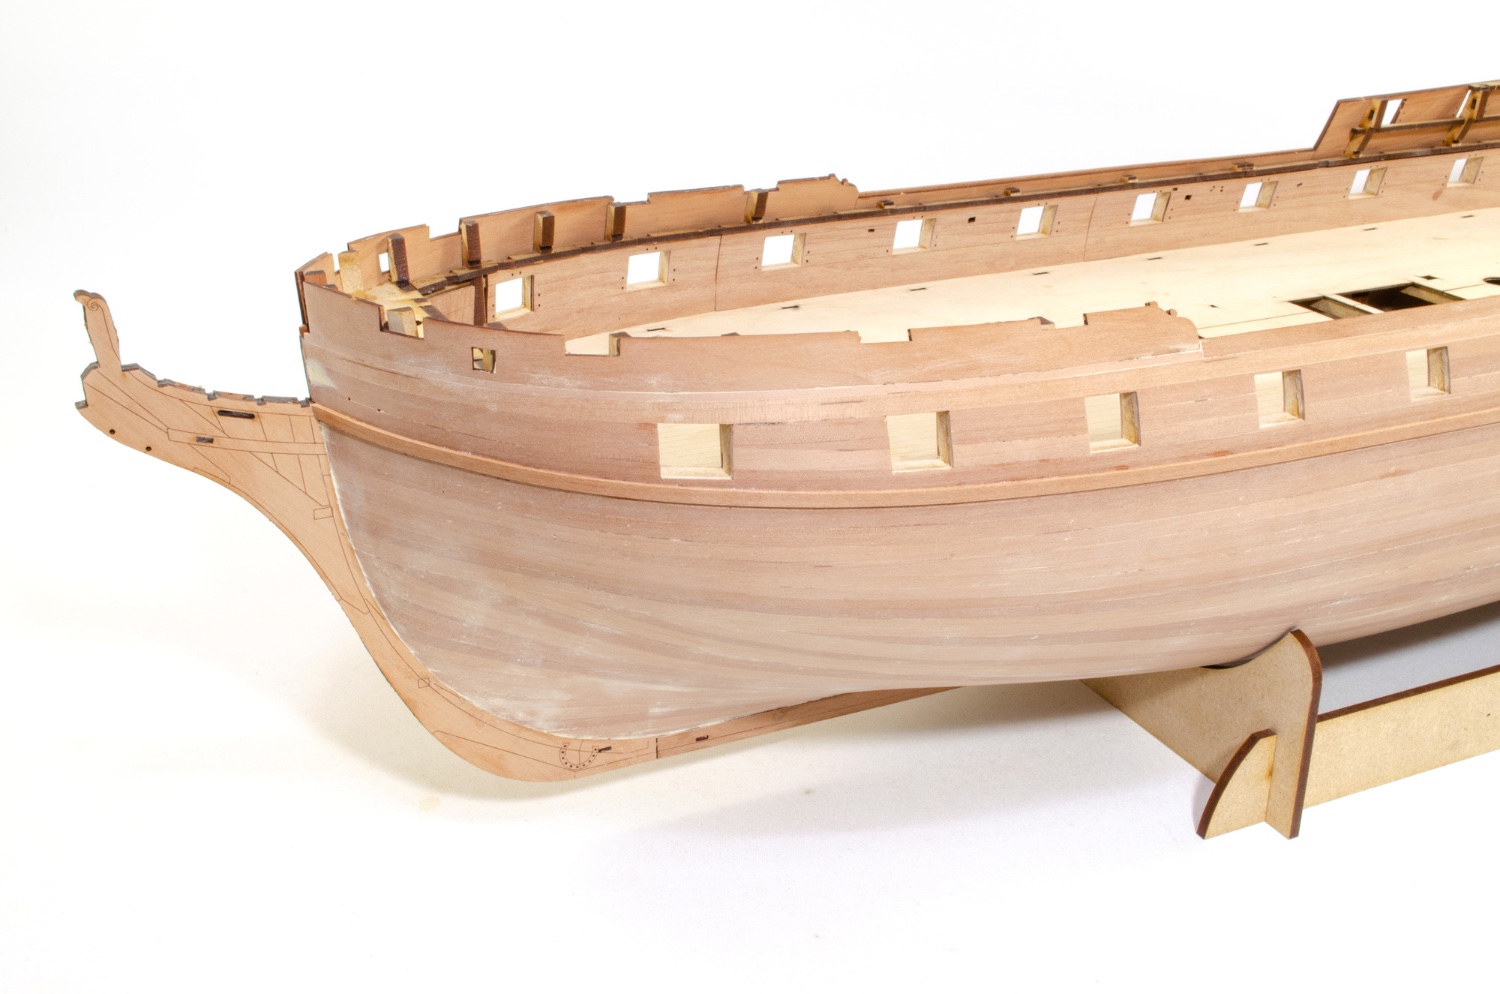
This update shows the basic external finishing of Indefatigable, and at this stage doesn't include the numerous rails etc. that make up the side bulwarks. That's for later in the build.
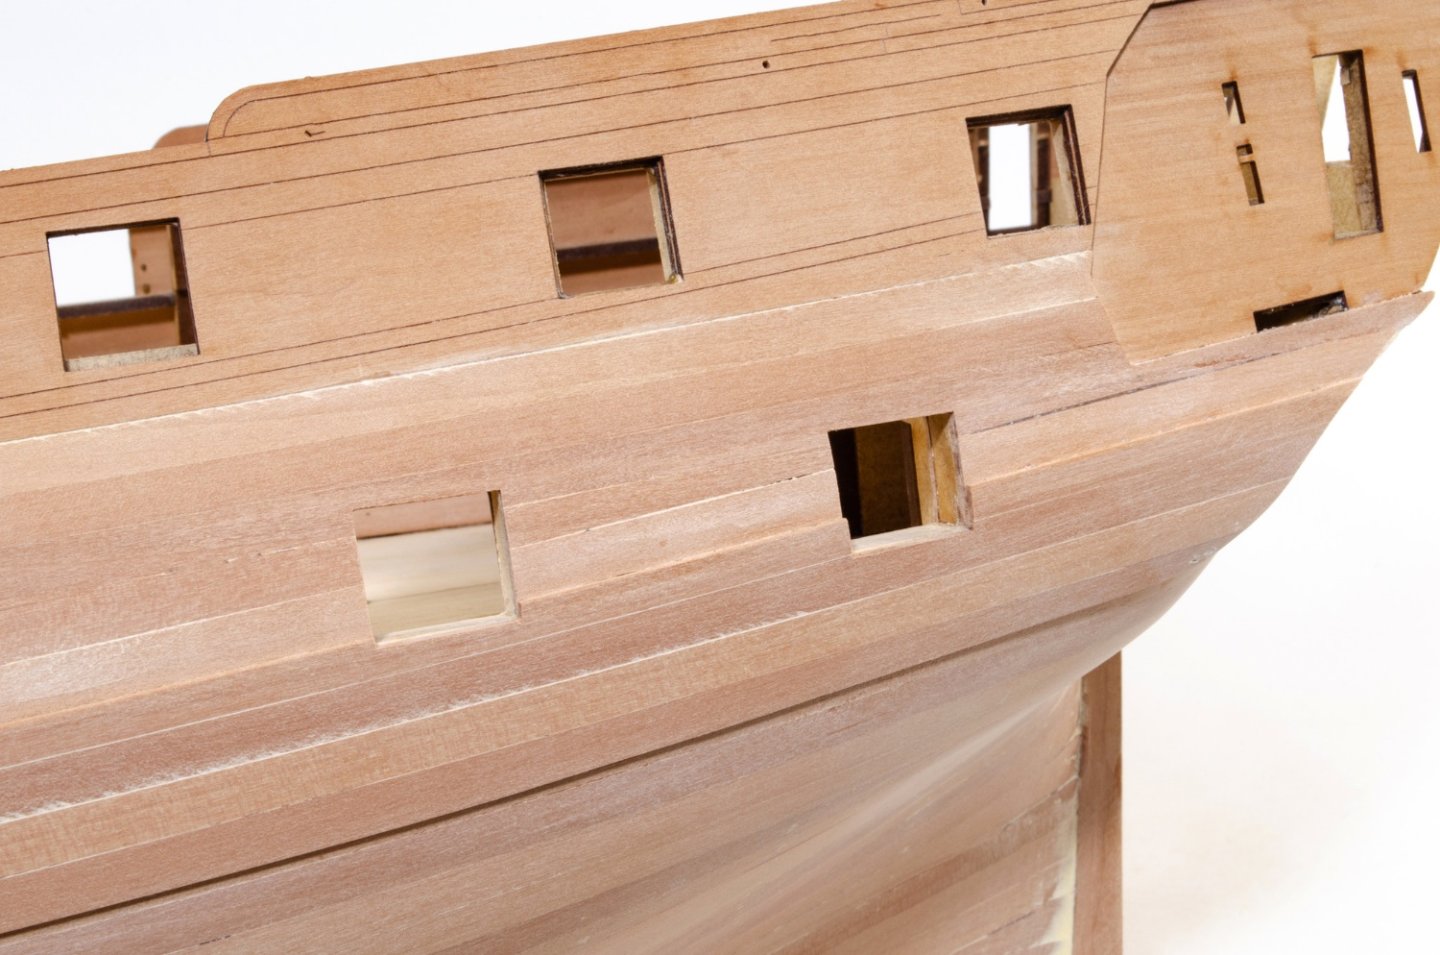
After a LOT of sanding of the second pear planked layer, the gun ports were opened up to their correct size at last. Before using some custom-made sanding sticks for the job, the inner bulwark port openings were trimmed down more or less to the size of the port itself. The sanders were then used to finally clean them up and even out the internal areas. A sharp scalpel was then used to square up any corners properly.
If you remember, the first pear plank was laid to be in the exact same position as the the upper strip of the wales. Here you can see the mark that indicates the flow of the plane at the prow. The top also aligns with the top of the prow, so that makes it easier!
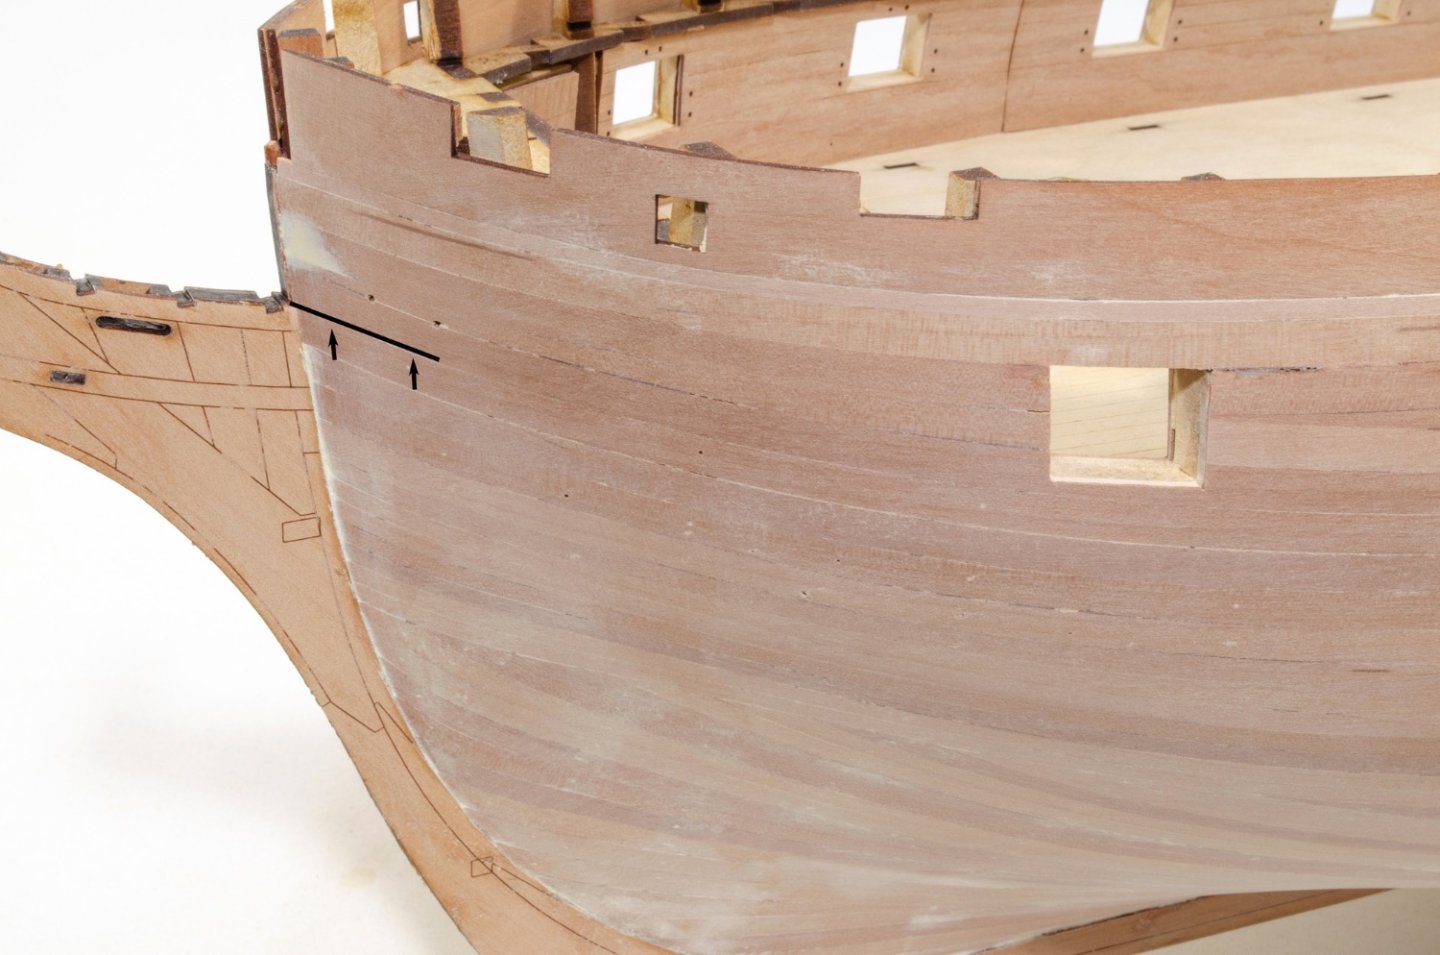
A 4mm wide strip of 1mm pear is now run from the prow to the stern, following that plank line. I used CA gel for this as I didn't want to use any pins on this area. I've left the plank overlong at the rear so you can see where it runs to. The last two gun ports are also partially obscured by the strip.

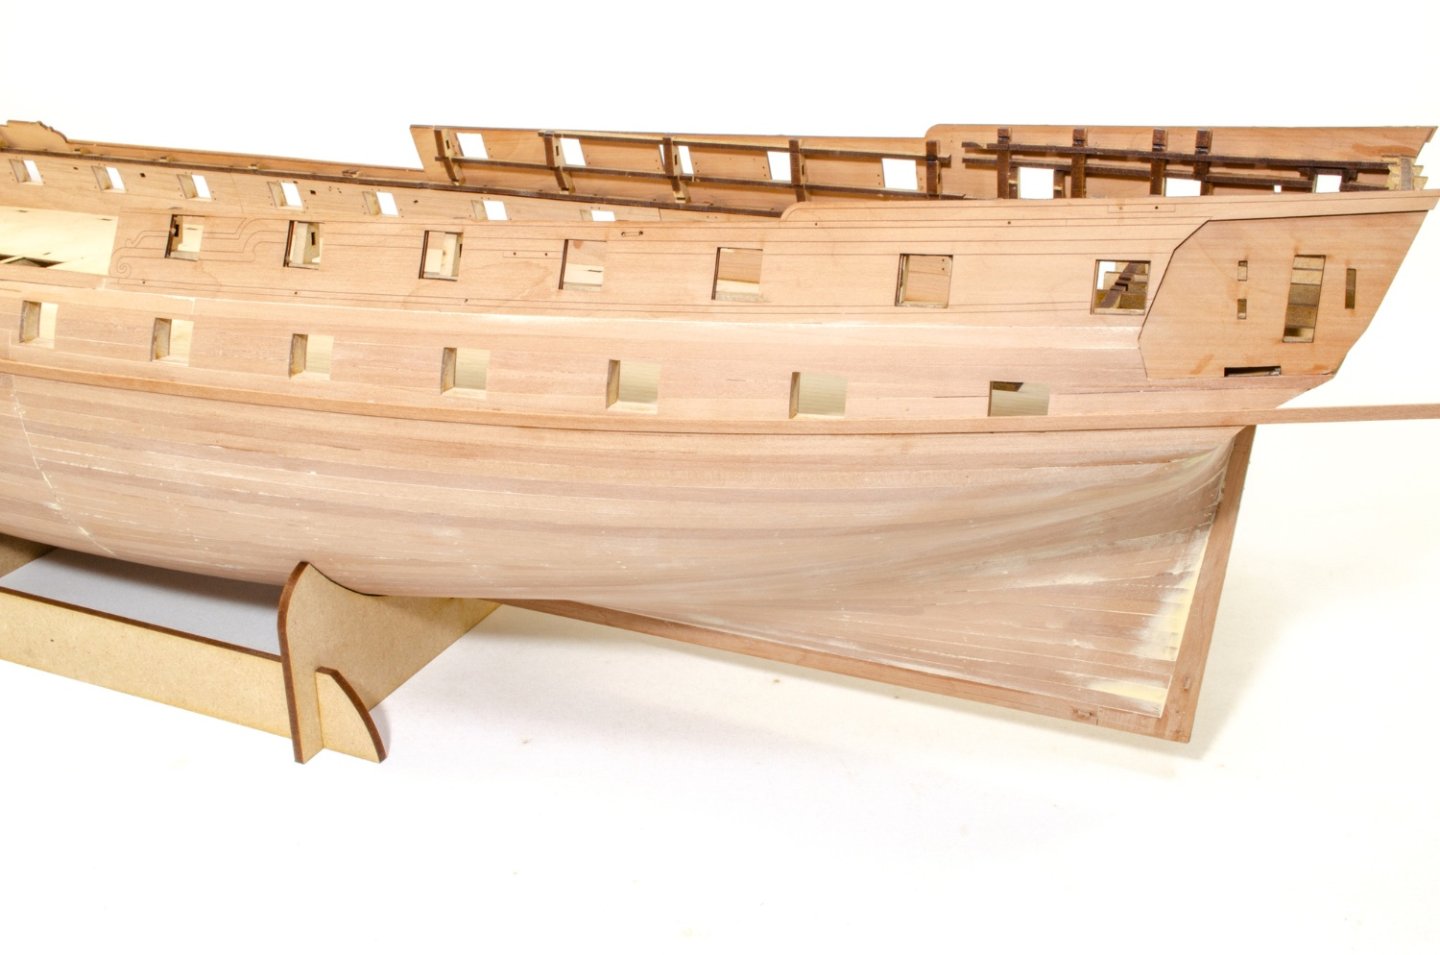
Now, three 5mm wide pear strips of 1mm thickness are run directly underneath the 4mm strip, again with CA gel. Once in place, I masked off the area on both sides of the wales and sanded the wales smooth. You'll note that I tapered the lower two planks towards the bow, and the lower one plank at the stern.

The gun ports are now cut into the wales, and the wales are finally shaped at the stern. These are shaped from the curve of the stern lower counter, and rounded into the underside of the wale.
Indy now looks like this. The next update will show some internal work underway.
-
That is mind-blowing! Thank you VERY much for sharing!!
- Keith Black, Ryland Craze, mtaylor and 2 others
-
5
-
At the moment, I've finished the outer hull with copious sanding, cleaned up the gun ports and trimmed to the correct size (including any excess material from the inner bulwark port openings), added the wales and now in final stages of moving on from there. I'll add some pics in the next days.
- thibaultron, Rustyj, Glenn-UK and 8 others
-
11
-
Outstanding! Ever thought of building a vaporetto too? 😄
I absolutely love Venice and travelling on the waters.

-
18 minutes ago, JDillon said:
Just a quick thank you to all your help, I looked at Vanguard, however they do not show the difficulty level on the website but i will try them for my next build. In love with the Sphinx
I've opted to try a do the Occre Polaris. It seems to have a few other beginners trying it as a first, plus its a nice looking ship and probably a good foundation ship. I have found some good build logs from others and have a good idea of where others have gone wrong.
Just curious to know if the Polaris is based on a real vessel? Cannot find any info and the USS Polaris of that ere was a screw vessel and the other a Liberty ship.
PS really impressed with the members on here, go USA.
All the fisher from Vanguard are designed for pure beginners. That was the premise of their design, but still to have loads of detail you wouldn't see on a beginner model. The materials are also higher quality that you normally see, with pear being standard. I can't help with the Polaris or advise it one way or the other.
-
1 minute ago, Beckmann said:
Superb!! I really like this crew. Will you offer them in 1:72 scale as well?
They were put online last week in 1:72
")
- Canute, AJohnson, thibaultron and 3 others
-
6
-
18 hours ago, ObviousNewbie said:
Hi all,
I hope this is the right place for my request, as I did not see any other category it could fit into.
I've been a member for some time, so nothing new there, but my location is about to change, drastically. The company I work for is sending me to Norway (Oslo area) to lead a project for one year.
As I'm currently building Occre's Endurance (no build log yet, sort, it's been hectic trying to organise everything over the last months) my original thought was to pack up the shipyard and continue in the new destination. Norwegian customers had a different opinion: no import of any wood is allowed.
After some teeth grinding, here's what I want to do: pack the shipyard, put Endurance in storage, leave all the spare wood home and buy a new kit once I'm there. So here's the question: could any members who have experience with buying/building kits in Norway please share the names and addresses of the stores where they buy their supplies?
Thanks a lot in advance!
Would you not be able to buy online and have shipped to you?
I know VM have shipped to Norway with no problems.
- Cathead, ObviousNewbie and mtaylor
-
3
-
-
2 hours ago, Theodosius said:
@James H: your review is great, very detailed, and I'm sure was a ton of work to do! My first comment was not intendet as a critique of your work.
Not at all! I didn't take it as such.
I know the bow castings for this are metal, but those could be omitted and the planking continued to a sharp point, so no need to sand down metal.
- mtdoramike, Bill Morrison, mtaylor and 1 other
-
4
-
Absolutely incredible. 😲
-
6 hours ago, Roger Pellett said:
By buying a kit one avoids extensive research. Supposedly the kit designers have already done this. Model builders who are not privy to comments on the forum are likely to buy the kit in the belief that by assembling the parts in accordance with the instructions they will end up with an accurate model. Such is not the case here. That is why I consider the misshapen stem to be a fatal error.
That does sort of leave me a little confused.
So, if a modeller is aware of the error, then he/she can choose to correct it. Doing so is the simplest sort of correction that a wooden modeller can do.
On the other hand, if a modeller is unaware of the error, and chooses to build it per instructions, then that is a 'fatal error'? If a modeller has built the kit as thus, and to a standard that are happy with, then that is somehow a 'fatal error'? Fatal to whom?
Perhaps I'm misunderstanding the context in which you use that phrase?
A reason I ask this is because I have primarily worked with plastic models, which are extremely difficult to correct if you get an error like this. I would consider that to be a 'fatal error' to a modeller who is knowledgeable about that particular subject, although not to someone ignorant of the error. I also hear some modellers decry any kit which has a flaw in shape etc. which can easily be rectified, and they call it 'unbuildable'. There seems to be a lot of rhetoric/white noise over kits which basic modelling skills can correct.
Did OcCre screw up the bow? Yes they did. Is it easy to correct? Yes, very.
-
1 hour ago, Roger Pellett said:
These European POB kits have been around for over half a century. One would think that by this time the kit manufacturers would understand that the basis for a good model is an accurately shaped hull. A bulbous stem not matching the vessel’s original hull lines is a fatal error.
Roger
It's actually very easy to fix. Agreed, it should not have been like that and someone at OcCre dropped the ball, but a 'fatal error'?
No, I don't think so.
- catopower, Canute, chris watton and 2 others
-
5
-
5 hours ago, Taygz said:
Hey,
My name is Taygan, just starting out, had a question regarding how you guys research a build and how you go about finding or making plans? Are there some good places to start looking? I’m really interested in a ship that has a lot of history down here in Tasmania, but I have no idea how to go about finding more than the general knowledge information on it! I figure there are some gurus here for that sort of thing for sure!
Just a quick note: This forum area is for talk of using MSW's software and features, and not any modelling content.
-
3 minutes ago, Theodosius said:
1. the deck planks are ridiculous out of scale, they make the whole ship to look like a toy! For this price tag I would expect a to scal lasereched wood deck with all the edging for the huge amount of guns/fans/boxes etc.
Perhaps the aftermarket will develop some, but than again: price tag!
That was noted in the review, and I also said the model would benefit from a laser engraved deck.


HMS Indefatigable 1794 (prototype) by James H - Vanguard Models - 1:64 - FINISHED
in - Kit build logs for subjects built from 1751 - 1800
Posted
It's not the lower gun deck, it's the main gun deck. Many contemporary models show the same for that deck. We have plenty in our gallery.