Beef Wellington
-
Posts
2,249 -
Joined
-
Last visited
Content Type
Profiles
Forums
Gallery
Events
Everything posted by Beef Wellington
-
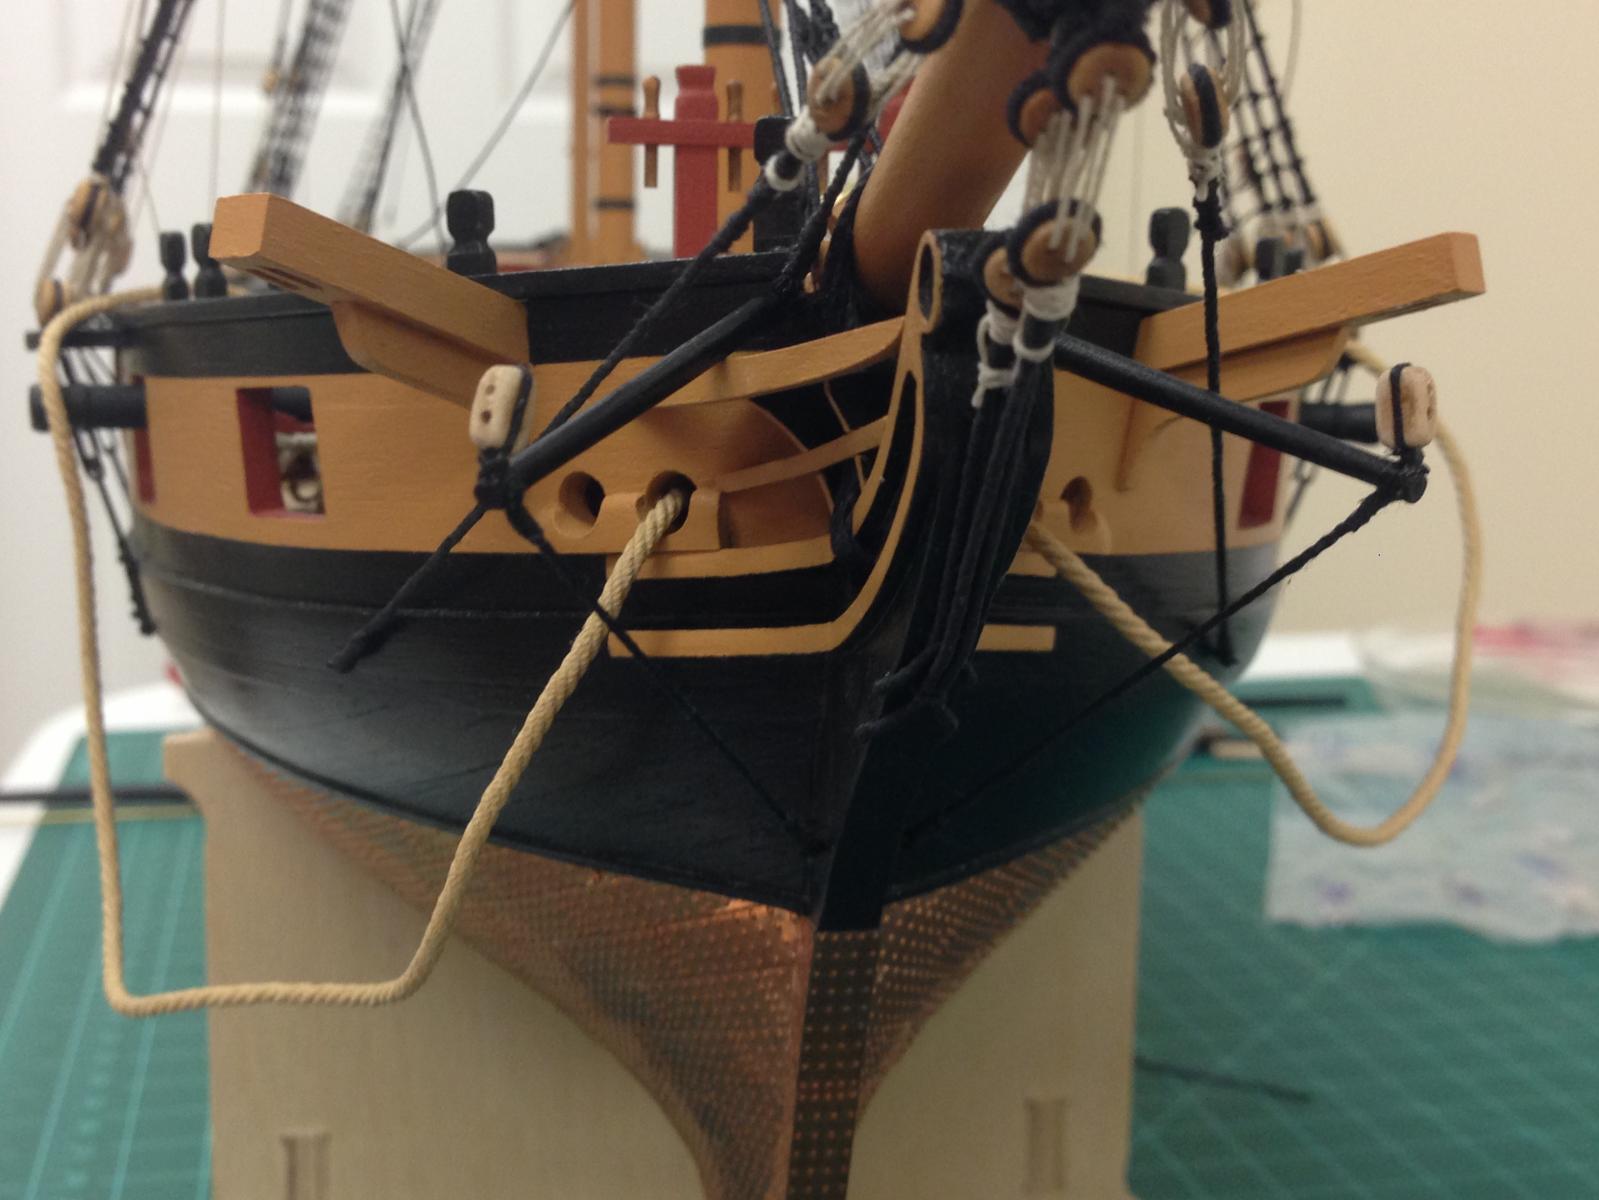
 I'm finally back at it. Very little time for anything for some time, but the break from Snake has brought me back more energized than ever to get her finished. I'll probably continue to provide step by step photo updates on the rigging as reminders for me and maybe something helpful to others. Not much, but evidence of progress. Foretopmast stay completed and belayed, and boomkins installed...

- 800 replies
-
- 15
-

-
- snake
- caldercraft
- (and 1 more)
-
Lou & Brian, thanks for stopping by, appreciate the kind words.
-
LFrank, this looks like a beautiful ship model, am very interested in seeing you progress. Please keep posting updates.
-
Really awesome work Joe, those close up shots really do her and your work justice...yet more to aspire to :-)
- 302 replies
-
- 1
-
-
- granado
- caldercraft
- (and 1 more)
-
Caldercraft now offer an 'Admiralty' stain in ebony...haven't used it yet, but would be an option. Looking great so far.
- 188 replies
-
- 1
-
-
- Sherbourne
- Caldercraft
- (and 2 more)
-
Well, I think that looks great Stergios. Glad you got it sorted.
-
That hatch coaming looks great Dave, especially with the lip. Something to maybe consider for the others is to use a simplified square dovetail joint between the end and side timber. On the plans I've seen manufacturers seem to draw these with 45 degree joints which wasn't the actual method of construction.
-
Not sure if it helps you now Lucas, but I've found that if you seize the breech ropes to the eyelets off the model, you have more control over the end result. The eyelets can then simply be glued into pre-drilled holed once the guns are placed. You did a great job with your second effort, looks so much better.
-
Fantastic, another Diana build. Nice start, will be following closely...
-
Mark - that planking looks great, did you spile any of the planks to get such a tight fit?
-
Interested to follow your progress JP, the Euromodel kits look very nice indeed
-
Interested to see this one develop Simon, you're off to a great start.
- 120 replies
-
- 3
-
-
- mercury
- victory models
- (and 1 more)
-
Stergios, I think you want to have the futtock stave at approximately the same height as the yard (one purpose was to help keep the shrouds from interfering with the yards together with the catharpins). I followed the diagrams in 'rigging period ship models' rather than the plans to get it to 'look right. You want to avoid having them too low.
- 1,144 replies
-
- 1
-
-
- snake
- caldercraft
- (and 1 more)
-
Joe, she looks absolutely stunning, well done! I love the tone of the wood in the open air, shows your wonderful precise work off a treat. You should be very happy.
- 302 replies
-
- 1
-
-
- granado
- caldercraft
- (and 1 more)
-
Mort - I simply marked the top of a plank with a sharpy and ran it along the sheer of the deck so I would have a reference point when it came to marking the gun ports. Photo of the 'before' state is here which I think illustrates it best... http://modelshipworld.com/index.php/topic/7219-hms-diana-built-as-hms-jason-1794-by-beef-wellington-caldercraft-164/page-7#entry270602
-
Mort - yes, the aft edge of port 9 is against bulkhead #11, and the forward edge of port 8 sits next to bulkhead 10. I used these as the anchor points to determine the placement of all the ports forward and aft of these with a 30mm spacing.
-
Glad you're back to it Jim, yards are looking good. See you took the same approach with the boom irons, the supplied cast metal loop around the yard seem way out of scale. The Amati PE fittings seem better than the CC solution. I've decided I need to build a display case before I can get back to my Snake to avoid dust issues. When will you get going onto Diana if that is next?
-
Wes, sadly I'd missed your build up to this now, however, I'll be correcting that! Congrats on taking on such a challenging and I'm sure rewarding project, things look to be shaping up very nicely indeed. Will definitely be watching from here on in.
-
Oh no, I think you may need to remake the rudder Eamonn, that one is all out of focus! Seriously, that rudder has a lovely shape to it, nice job.
- 1,039 replies
-
- 1
-
-
- ballahoo
- caldercraft
- (and 2 more)
-
Beautiful work as always Alexandru.
-
I used a simple overhand knot, but if I were to do it again I'd use a cow hitch.