gjdale
-
Posts
4,894 -
Joined
-
Last visited
Content Type
Profiles
Forums
Gallery
Events
Everything posted by gjdale
-
 Volume 5 is in two parts (ie 6 books altogether) and deals mainly with rigging and the ship's boats. The ship's history is contained in Vol 1.
 -
A fine looking stove Toni, to complement the rest of your very fine build. Best wishes to Sadie for a speedy recovery.
-
Nice to see the hammocks finished Harvey - they look great. Re the ship's boats - you could always scratch build them as I did........
-
Nice work Jerry. Pity about the kit quality disappointment, but you're making a fine job of her regardless.
-
Looking good Jerry.
-
That's quite a milestone Augie! And your model shows the care and effort you put into every single one of those hours. Just beautiful!
- 2,191 replies
-
- 3
-

-
- confederacy
- Model Shipways
- (and 1 more)
-
Well done with the hammock cranes Boyd. The material you refer to is called Tulle. What you have pictured has a 'honeycomb' pattern - I believe a 'diamond' pattern would be more correct. If you have trouble finding some, I have about 50 lifetime's worth of the stuff (used on my Victory). I'd be happy to send some to you if you wish - just PM me with your postal address if you'd like some.
-
That looks pretty good to my eye Mark (though I've been known to be wrong before.........)
-
Great to hear your fix has worked Jesse. Looking forward to the next instalment.
- 1,306 replies
-
- 2
-
-
- syren
- model shipways
- (and 1 more)
-
Fantastic job you've done there Mobbsie, she really does look terrific. I hope you gave the Museum a couple of "before" and "after" photos to show the extent of your work! Well done mate - now get cracking and catch up on your cross-section!!!
- 62 replies
-
- 3
-
-
- harwich bawley
- fishing boat
- (and 2 more)
-
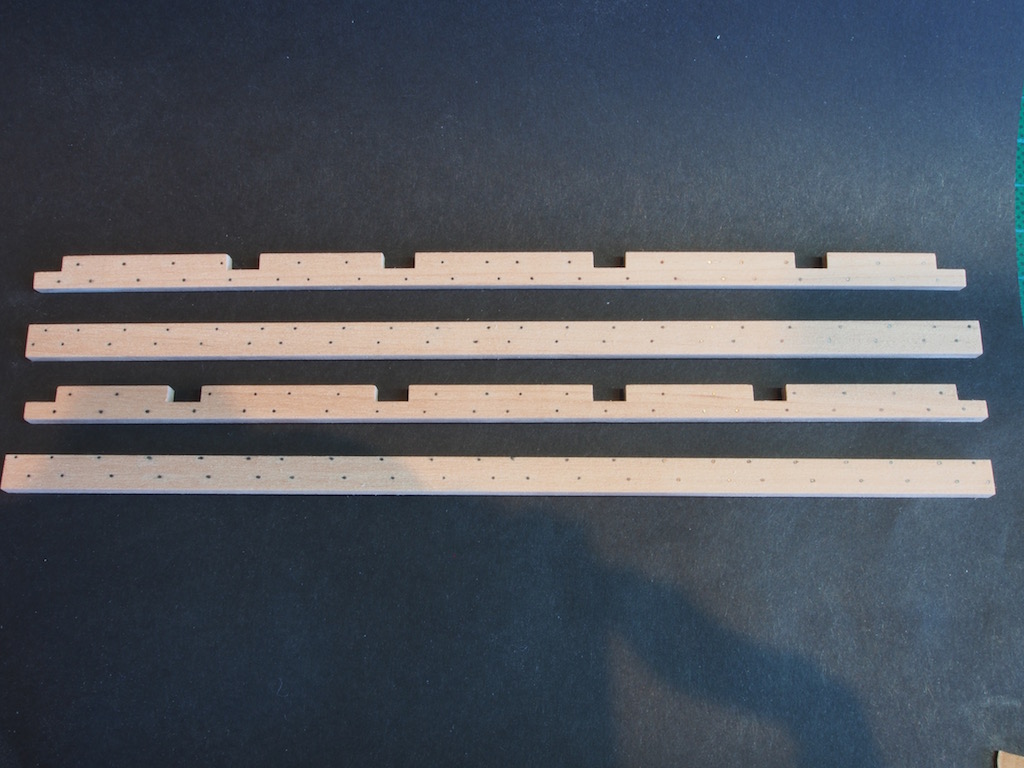
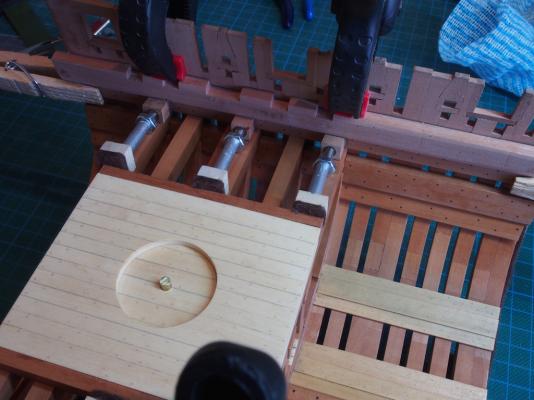
Thanks again folks for all the kind words and the "likes". Just a small update today. I have completed preparations for the Upper Deck framing. The next step was to make the Upper Deck Clamps. These comprise an Upper and a Lower Clamp and I opted to include “iron bolts” using copper wire blackened in situ using Liver of Sulphur. To make life easier, I prepared a card template for the bolting pattern and inserted the bolts prior to installation on the model. Here are the clamps ready for installation (the bolts to the right appear not to be blackened, but this is just a trick of the light in the photo): Clamping them securely was a little tricky and I was grateful for the mini Spales I had made previously: The final preparations prior to moving on to the Upper Deck construction were the Mortar Pit Support Standards (knees) and the Centreline Stanchions. The knees were easily cut on the scroll saw, ensuring the grain was oriented on the diagonal, and then given their final shape using the spindle sander and disc sander. The Centreline Stanchions introduced another timber – Walnut. These were turned on the lathe. My extremely limited turning abilities managed a reasonable approximation to the stepped shape at either end of these. The Walnut is not a particularly good wood for machining, but it was finished up by a series of increasing grit sand paper, to an almost polished finish prior to being coated with Wipe-On Poly. During the turning process, each end of the columns were drilled to take a 1.5mm brass locating pin. Here are the Stanchions and Standards (Knees) in place, along with a view of the completed Deck Clamps. The Stanchions are only temporarily placed for the photo – they will be permanently fixed once the Deck Beams are ready to be permanently fixed in place. I have now started work on the upper deck beams, but have discovered a possible error in the drawings. I have sent a message to Jeff Staudt for confirmation before proceeding.


- 456 replies
-
- 22
-
-
- finished
- bomb ketch
- (and 2 more)
-
scroll saw proxxon ds 460
gjdale replied to michael101's topic in Modeling tools and Workshop Equipment
Would the Dremel Moto Saw meet your needs as a relatively low cost option - it costs about US$100 here in Australia? As you already have onr Dremel tool, I assume you can source them easily in your country. https://www.masters.com.au/product/100882549/dremel-scroll-saw-moto-saw-ms20ne.jsp -
Hey Jack, Good news about the opportortunity for some extra play money! It's a pity that it means a break from the shipyard, but your cross-section will still be there waiting patiently for your return, as will we. In starting work on the upper deck framing, I discovered an error in the plans yesterday (I think), and also in a couple of my spreadsheet dimensions. I'll post a PM to the group later today with the corrections.
- 60 replies
-
- 3
-
-
- granado
- bomb ketch
- (and 1 more)
-
Magnificent Johann!
-
Lovely looking carriages Mark.
-
Thanks Jerry, Isn't it great to have an understanding and supportive Admiral? The Chris Craft is still going, but all modelling paused while I had my hip replacement surgery. Still recovering from that - another two weeks before the Doc will let me go back to work, but am allowed small stints in the shipyard. Focus has been on the Bomb Vessel Cross-Section lately while I waited on some bits and pieces I needed to make mods to the Chris Craft. Expect a return to that build very soon. And perhaps the start of a third project - something completely different!
-
Be grateful that the Admiral didn't have you turned to scrubbing the decks as well Jerry! Adding the crossbars to the deck really makes a difference. Looking good!
-
Very neat work producing that bell Ian. I really do admire your machining skills and especially your ability to think through the "how" of manufacturing new parts like this. It may seem simple to you, but I learn something from every new description you post. If you lived in my neighbourhood, I'd be banging on your door begging for lessons!!! I think you might have some difficulty using walnut for milling the belfry - my experience (albeit very limited) is that it doesn't machine very well. I've got a ton of swiss pear scraps, and possibly even a bit of boxwood scrap you'd be welcome to if you lived a little closer. Come to think of it, Mobbsie also has a ton of scrap pear and he does live a little closer. Maybe you could work out a deal...........
-
Jesse, Bad luck with discovering the warp now rather than earlier. However, as you've used a PVA glue, if your attempted fix hasn't worked, you still have the option of de-bonding all the glued joints using isopropyl alcohol and starting over. I would be careful about soaking the plywood too much in straight water as it may start to delaminate. The alcohol will evaporate quickly, so is less likely to cause this. In the end it's your choice on how to proceed, but speaking from experience, if you take the time to fix something properly now, you will be very glad you did so further down the track. Remember, it's not a race, so take your time and make sure it's to your own satisfaction before moving on.
- 1,306 replies
-
- 11
-
-
- syren
- model shipways
- (and 1 more)
-
Nice progress Jerry.