mtaylor
-
Posts
25,839 -
Joined
-
Last visited
Content Type
Profiles
Forums
Gallery
Events
Everything posted by mtaylor
-
Smoothing sailing all the way, Popeye. She's coming together very well.
- 956 replies
-
- 2
-

-
- andrea gail
- trawler
- (and 1 more)
-
I'll third it.... that's very good news.
-
Anton!!!! Welcome back. I thought this was you but wasn't sure. You're doing a beautiful build of this ship and I'm looking forward to following it.
-
You're off to a fine start and a log is the best way to get help and advice.
-
Andy, The PVA usually does not dry clear. If using the mix, you want the sawdust color to blend. Now if you're painting the whole hull... nevermind and just use filler and sand until smooth. It looks like you might be gluing plank to plank as your refence instead of plank to bulkhead. Hmmmm......
-
My sense is that Steve is right about a mix of guns. The privateers created a market for cannon of all shapes and sizes. As for your cannon questions... You might try asking it here: http://modelshipworld.com/index.php/forum/15-discussion-for-a-ships-deck-furniture-guns-boats-and-other-fittings/ I'm not sure. Are those actual British cannon? or reproductions? Any markings on the trunnions or casabel area?
-
Matt, Measure the bore of the cannon at the fort. That will tell the size... 4 pdr = 3.0" 6 pdr = 3.4 9 pdr = 4" 12 pdr = 4.4" 18 pdr = 5.0" 24 pdr = 5.5" 32 pdr = 6.1"
-
Lon, How much weight are you using?
-
Keith, Is there a gap? If so, save the sawdust and make a slurry of 50/50 white (not PVA) school glue and water and the sawdust. Pack this into the gap and when it drys, sand. Repeat as necessary. If the gap isn't very big, brush some of that 50/50 mix into the gap and sand while wet. The sawdust will stick to the glue and the gap should disappear. However, repeat as needed.
-
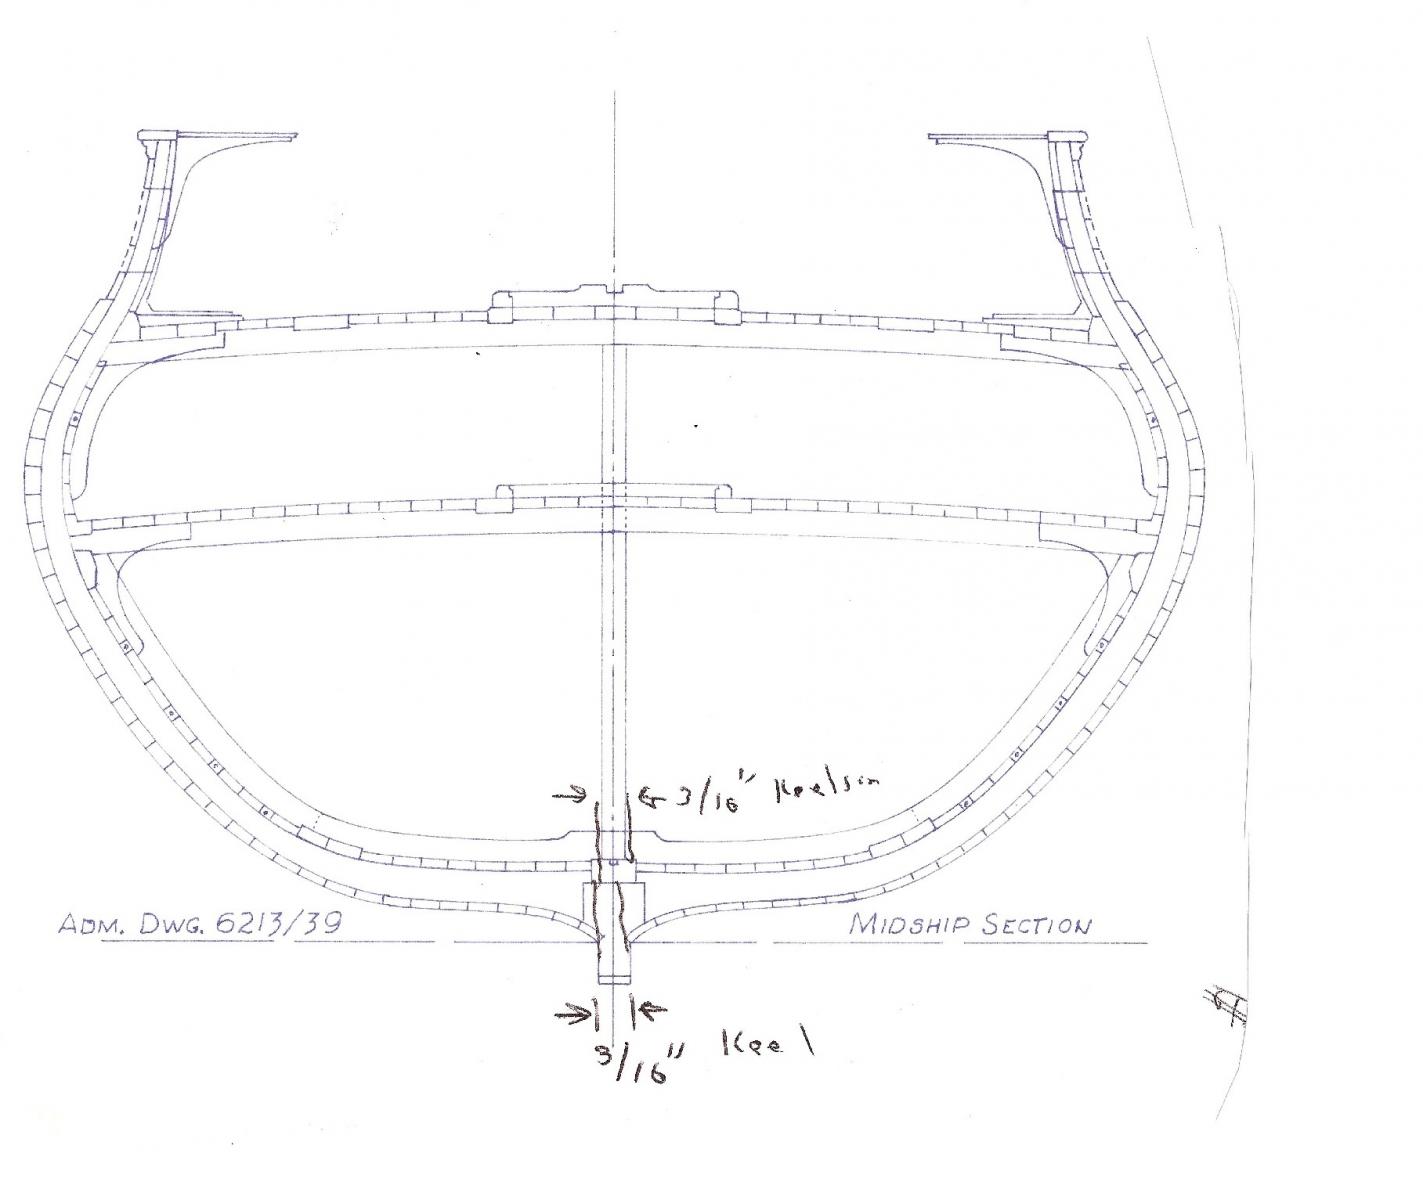
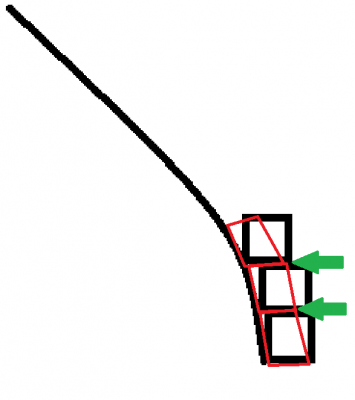
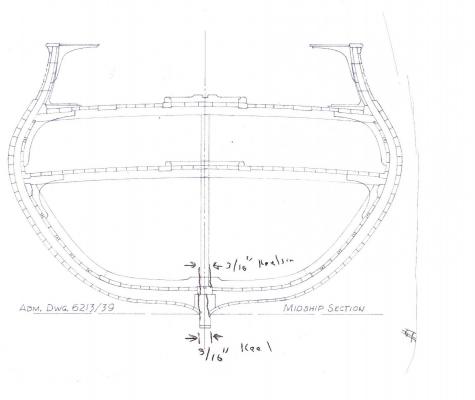
]Andy, Let me see if I can help.... See the attached file....(not to scale). I've not built this vessel so there is somewhat of a guess here.... If I look at the other logs, the wales (they stand proud of the planking) seem to be single strips. So I'm assuming this is the first three strakes of planking. What I've done is overdrawn in red the way the wales (planks) should sit, I believe. 1) Don't worry about the step on the outside... that will disappear when you sand. 2) The inside of the plank should sit on the bulkhead with out any space (not always achievable, but we all try anyway). 3) The green arrows show where you need to bevel the planks Not much there. 4) IF a gap opens up when sanding the exterior, save the sawdust, mix sawdust with a 50/50 solution of white glue (not PVA) and water into a slurry. Fill the gap and when dry, continue sanding. Repeat as needed. There's two ways to do this, sand and bevel what's against the bulkhead or sand and bevel the plank such that it sits flush next to the first one (green arrow area). I think it's easier to lay the plank on the bulkhead and bevel the edges to fit the previously laid plank. There's 3 logs you probably should look at... http://modelshipworld.com/index.php/topic/6794-pride-of-baltimore-ii-by-blue-pilot-model-shipways-scale-164/?hl=Baltimore http://modelshipworld.com/index.php/topic/6631-pride-of-baltimore-2-by-phebe-ms-scale-164/?hl=Baltimore http://modelshipworld.com/index.php/topic/1025-pride-of-baltimore-ii-by-jcoby-model-shipways-scale-164/?hl=Baltimore And also this (there's some good tutorials in there): http://modelshipworldforum.com/ship-model-framing-and-planking-articles.php I'm attaching the cross-section from my current build. If you'll notice the inner and outer are roughly parallel but not completely as sanding the exterior changes that shape. The edges where they touch the next plank are not 90 degrees from the inside or outside of the plank. I hope this helps a bit.....
-
Popeye, You should be pleased. Very nicely done... I love the map! I guess you'll have tell the Admiral to keep pushing you....
- 956 replies
-
- 2
-
-
- andrea gail
- trawler
- (and 1 more)
-
I think breaking frames is part of the ritual.... :D Nicely fixed, I must say.
-
Beautiful work, Augie. Coming along nicely. Don't you know that when it gets hot, some of us get to stay in the air conditioning...and.... SHOP TIME!!!!!!!!
- 2,191 replies
-
- 3
-
-
- confederacy
- Model Shipways
- (and 1 more)
-
I'm hoping it's the matchsticks you want and not the fire.... but one never knows. :D
-
Thanks for the likes and the comments. Gianpiero, You are quite right. I haven't sanded nor shaped the ebony strip and the thick strip above it (in the picture). This will be taken care of next as I want to have the planking at the gunports done and finish applied to protect them on both sides first. Thanks for being another set of eyes... Edit: I've studied it again on the ship. If I can't fix it, I'll rip it off and re-do it but right now, it looks fixable since it's still rough.
-
Excellent work, Popeye. I guess a little down time just makes the next time in the shop better.
- 956 replies
-
- 2
-
-
- andrea gail
- trawler
- (and 1 more)
-
Your best sail cloth and technique
mtaylor replied to steven sturgis's topic in Masting, rigging and sails
Steven, I wouldn't use paper. If you don't want to use cloth, use silkspan from a hobby shop that deals with the RC guys/gals. It comes in various weights and you'd probably need to acquire small amounts of several sizes to find which one works best for you. -
Cutty Sark by NenadM
mtaylor replied to NenadM's topic in - Build logs for subjects built 1851 - 1900
<jaw drops><picks up jaw> Fantastic relief work, Nenad. And all this time, you are telling us you are not an artist.- 4,151 replies
-
- 5
-
-
- cutty sark
- tehnodidakta
- (and 1 more)
-
Interesting furniture... is that BarcaLounger? All kidding aside... nice work.
-
Lovely work, Sjors. The deck furniture is coming along beautifully.
- 1,616 replies
-
- 3
-
-
- caldercraft
- agamemnon
- (and 1 more)
-
Looks good Popeye. Can't even tell you re-did things. As for the ladder... Captain's discretion and without documentation, it's a toss up.
- 956 replies
-
- 1
-
-
- andrea gail
- trawler
- (and 1 more)
-
HMS Victory colors
mtaylor replied to rafterrat_2005's topic in Painting, finishing and weathering products and techniques
I thought the HMS Victory website had a page for modelers including a paint list. Hmm.... I'm not finding it.... And there is this: http://www.model-space.com/gb/paint-set-hms-victory.html I don't know how correct it is.