Beef Wellington
-
Posts
2,249 -
Joined
-
Last visited
Content Type
Profiles
Forums
Gallery
Events
Everything posted by Beef Wellington
-

HMCSS Victoria 1855 by BANYAN - 1:72
Beef Wellington replied to BANYAN's topic in - Build logs for subjects built 1851 - 1900
The rudder looks outstanding - not only the metal work, very impressed with how you've attached those copper plates...looks completely to scale.- 1,018 replies
-
- 4
-

-
- gun dispatch vessel
- victoria
- (and 2 more)
-
Making this simple Mike, I think there are plenty of patination solutions available specifically aimed at a verdigris finish (rather than blackening) if that's the direction you want to go. Have never tried any, but the jewelry market seems big on this. Google search should give you plenty of options.
-
Will follow along with the usual fascination Nils, interesting subject and can't wait to see how she comes together.
- 692 replies
-
- 5
-
-
- eagle of algier
- chebec
- (and 2 more)
-
The position of the figure and look of the oar look good to me BE. Ignorance is wonderful...can only guess that the functional reason for the loom is to provide some counter balance to the outboard weight of the oar and improve handling balance, but its interesting that your modern example (and any that I've seen) do not have this. I would also have thought that the square loom would be beneficial if it extended to the tholes to keep the blade angle constantly perpendicular making it easier to control if there is no need to feather the blade angle (?)
- 156 replies
-
- 2
-
-
- pinnace
- model shipways
- (and 1 more)
-
Really nice Mobbsie, I was not even aware of this kit until your build so nice to see something different, the stand is really subtle and discrete, love it. As for the ensign, think you're good with the red duster as red, white and blue would still have been in use - and I believe the red was used for HM ships under admiralty orders, which I suspect a harbor gun boat would be.... Will look great anyway whichever way you go!
- 129 replies
-
- 7
-
-
- armed launch
- panart
- (and 1 more)
-
Hope this is temporary also, I have had nothing but exceptional service from Crown in the past and hope that nothing serious has occurred.
-
Looking great Tom, I love that open starboard side to show the interior detail, very effective.
-
Ben, planking looks good. You're right that the plans are a little misleading in this respect but you look to have handled that tricky tight curve at the lower counter nicely. As long as you have a good bond between the top plank and the gunport pattern you should be set- nearly all the bulkhead extensions will come off and I know I was concerned with strength, but once the second planking goes on it's remarkably strong.
-
Pat - that is a great suggestion - cheers! I had been mulling over how to reduce the quoin thickness but it seems much more practical and easier to use thinner wood fort the bed as this would probably not be noticed. Will continue to mull this over.
-
Lookin great Peter, somehow missed your start and already you've completed the first planking. This looks like a great kit, shame its not 1:64. Going back a little to the railing question. I think you should feel free to go with what works for you. When she was built I'm sure she would have had the open railings as that was prevalent, these seemed to go out of favour in the last part of the century and would have been built up. I believe those ships where this was done would have simply followed the lines of the rail, i.e. a curved decorative shape at the front, but this was a relatively short lived fashion. On the later ships (very early 19th century), and possibly those that had been rebuilt, these bulkheads would have lost the decorative flourish and simply been square which seems to have been prevalent from that time on until the end of the age of sail.
- 366 replies
-
- 6
-
-
- bellerophon
- victory models
- (and 2 more)
-
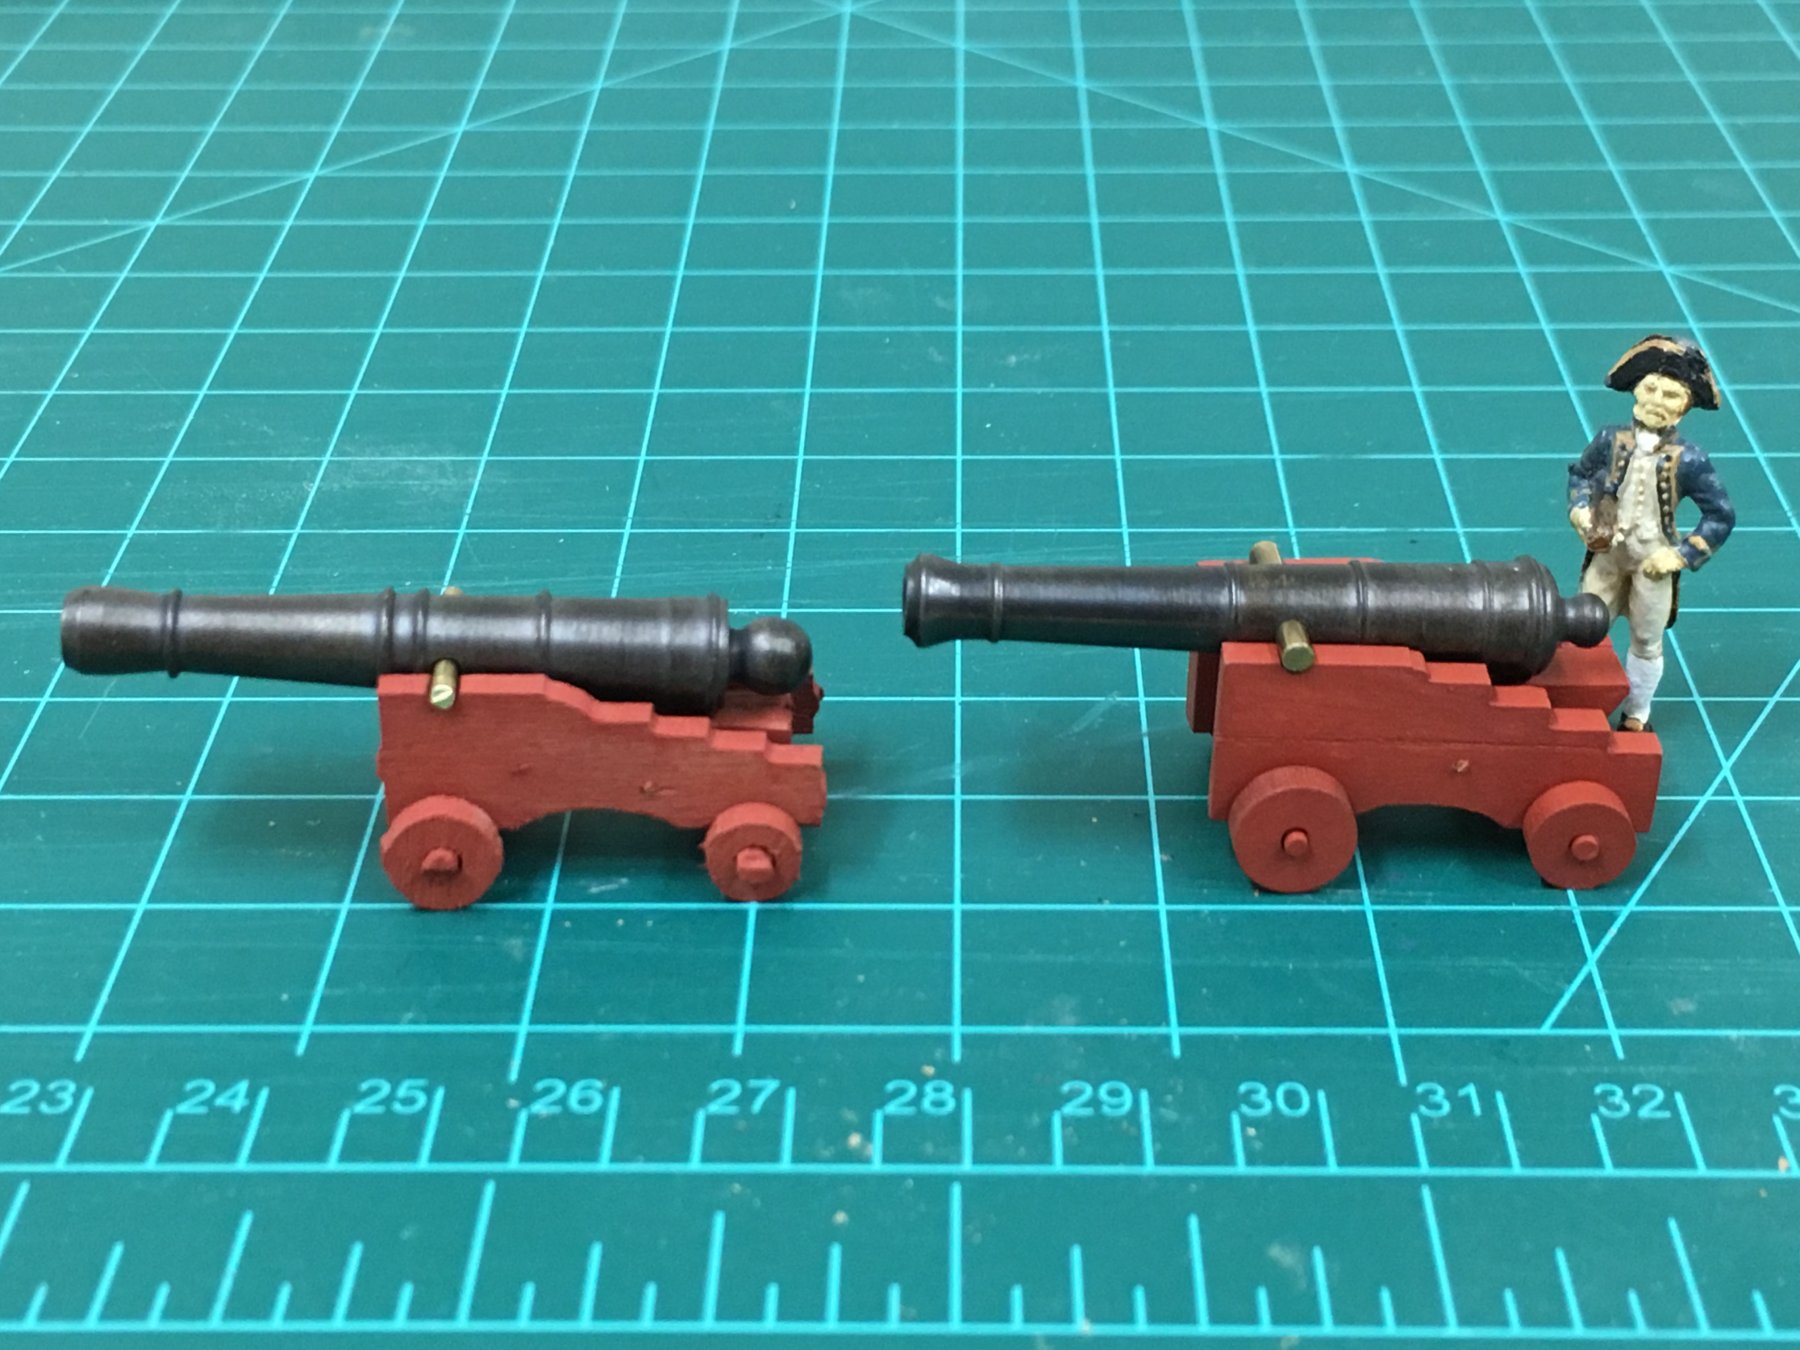
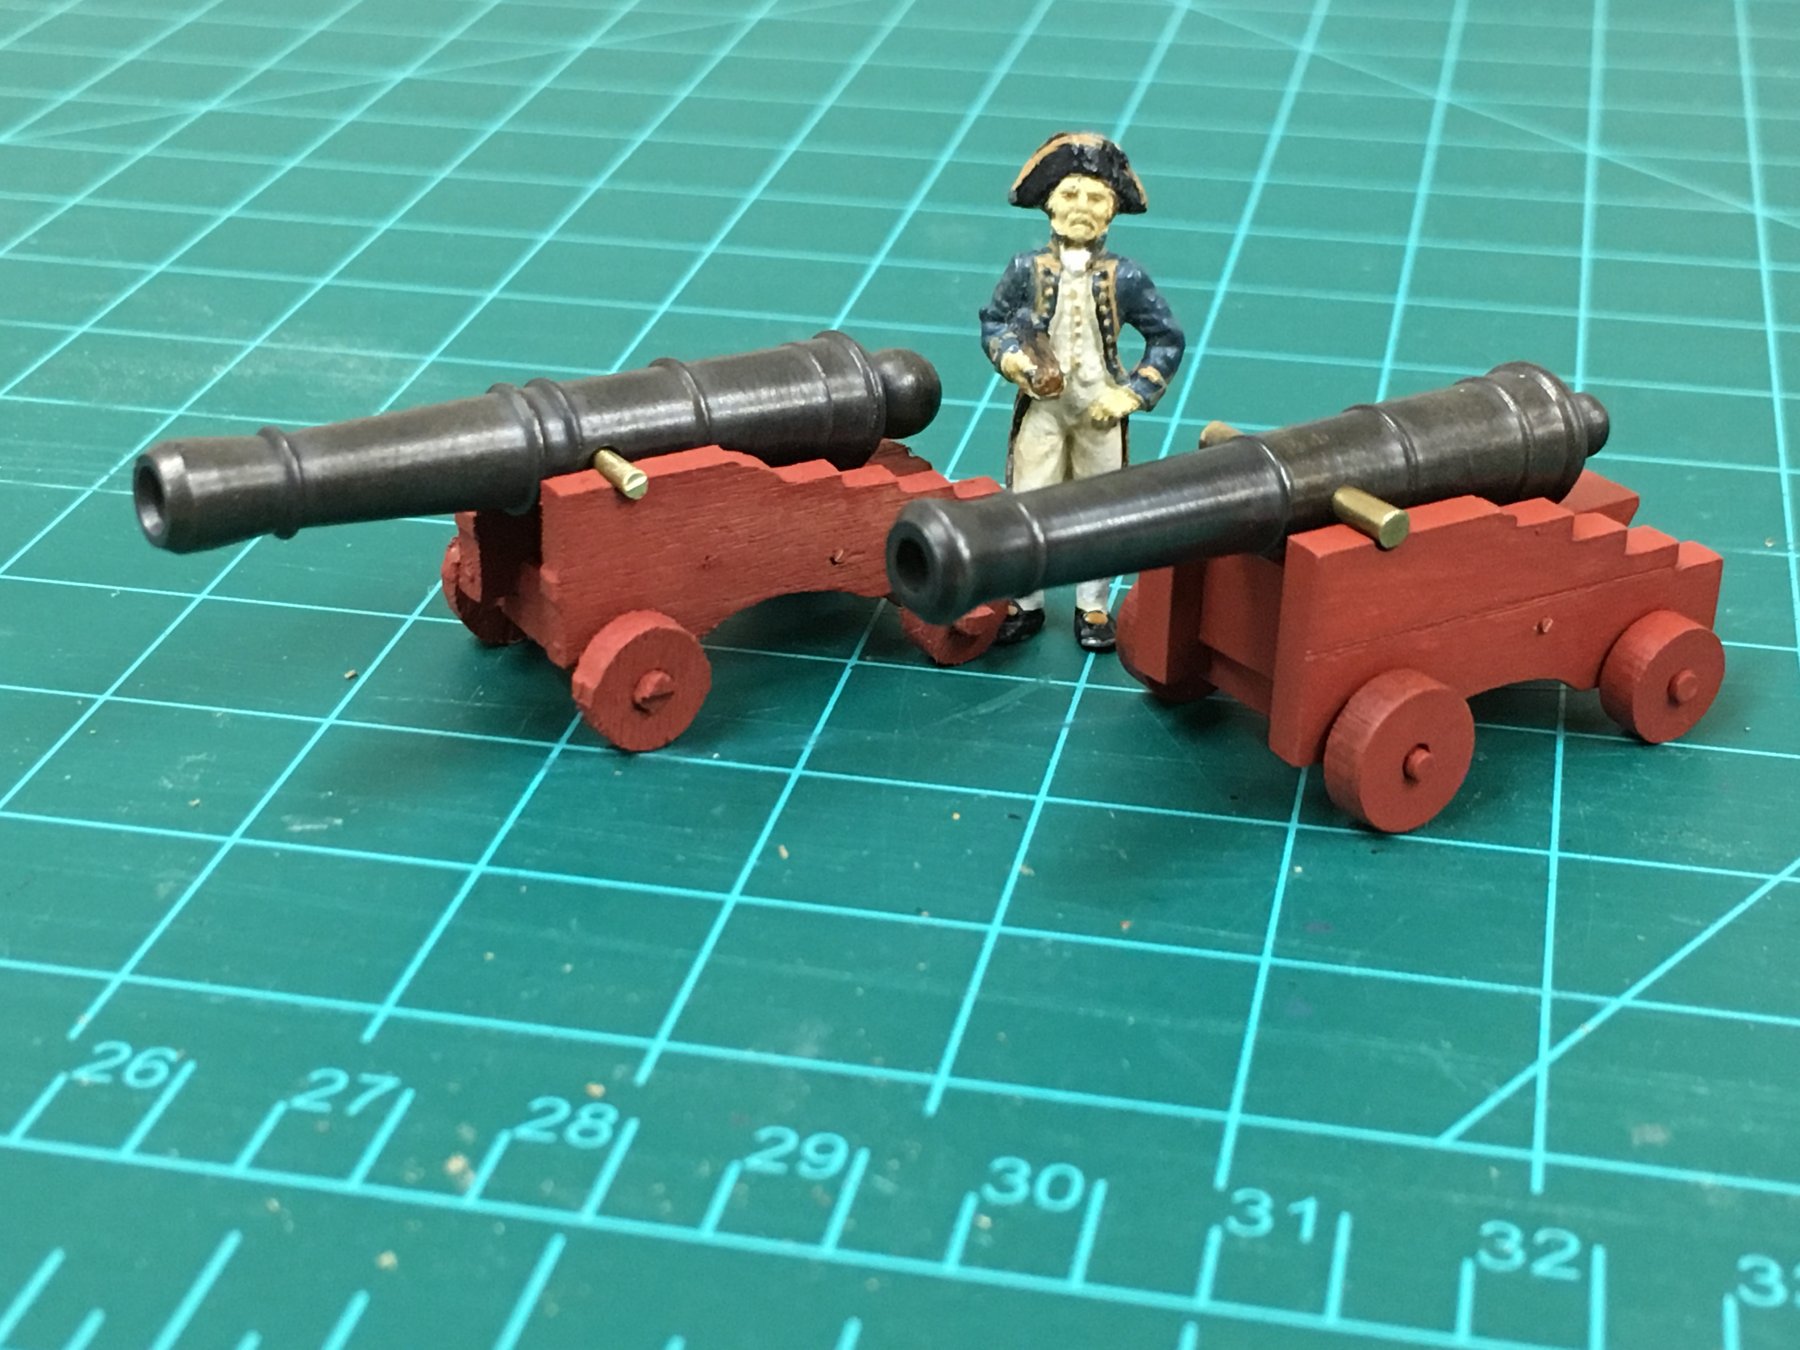
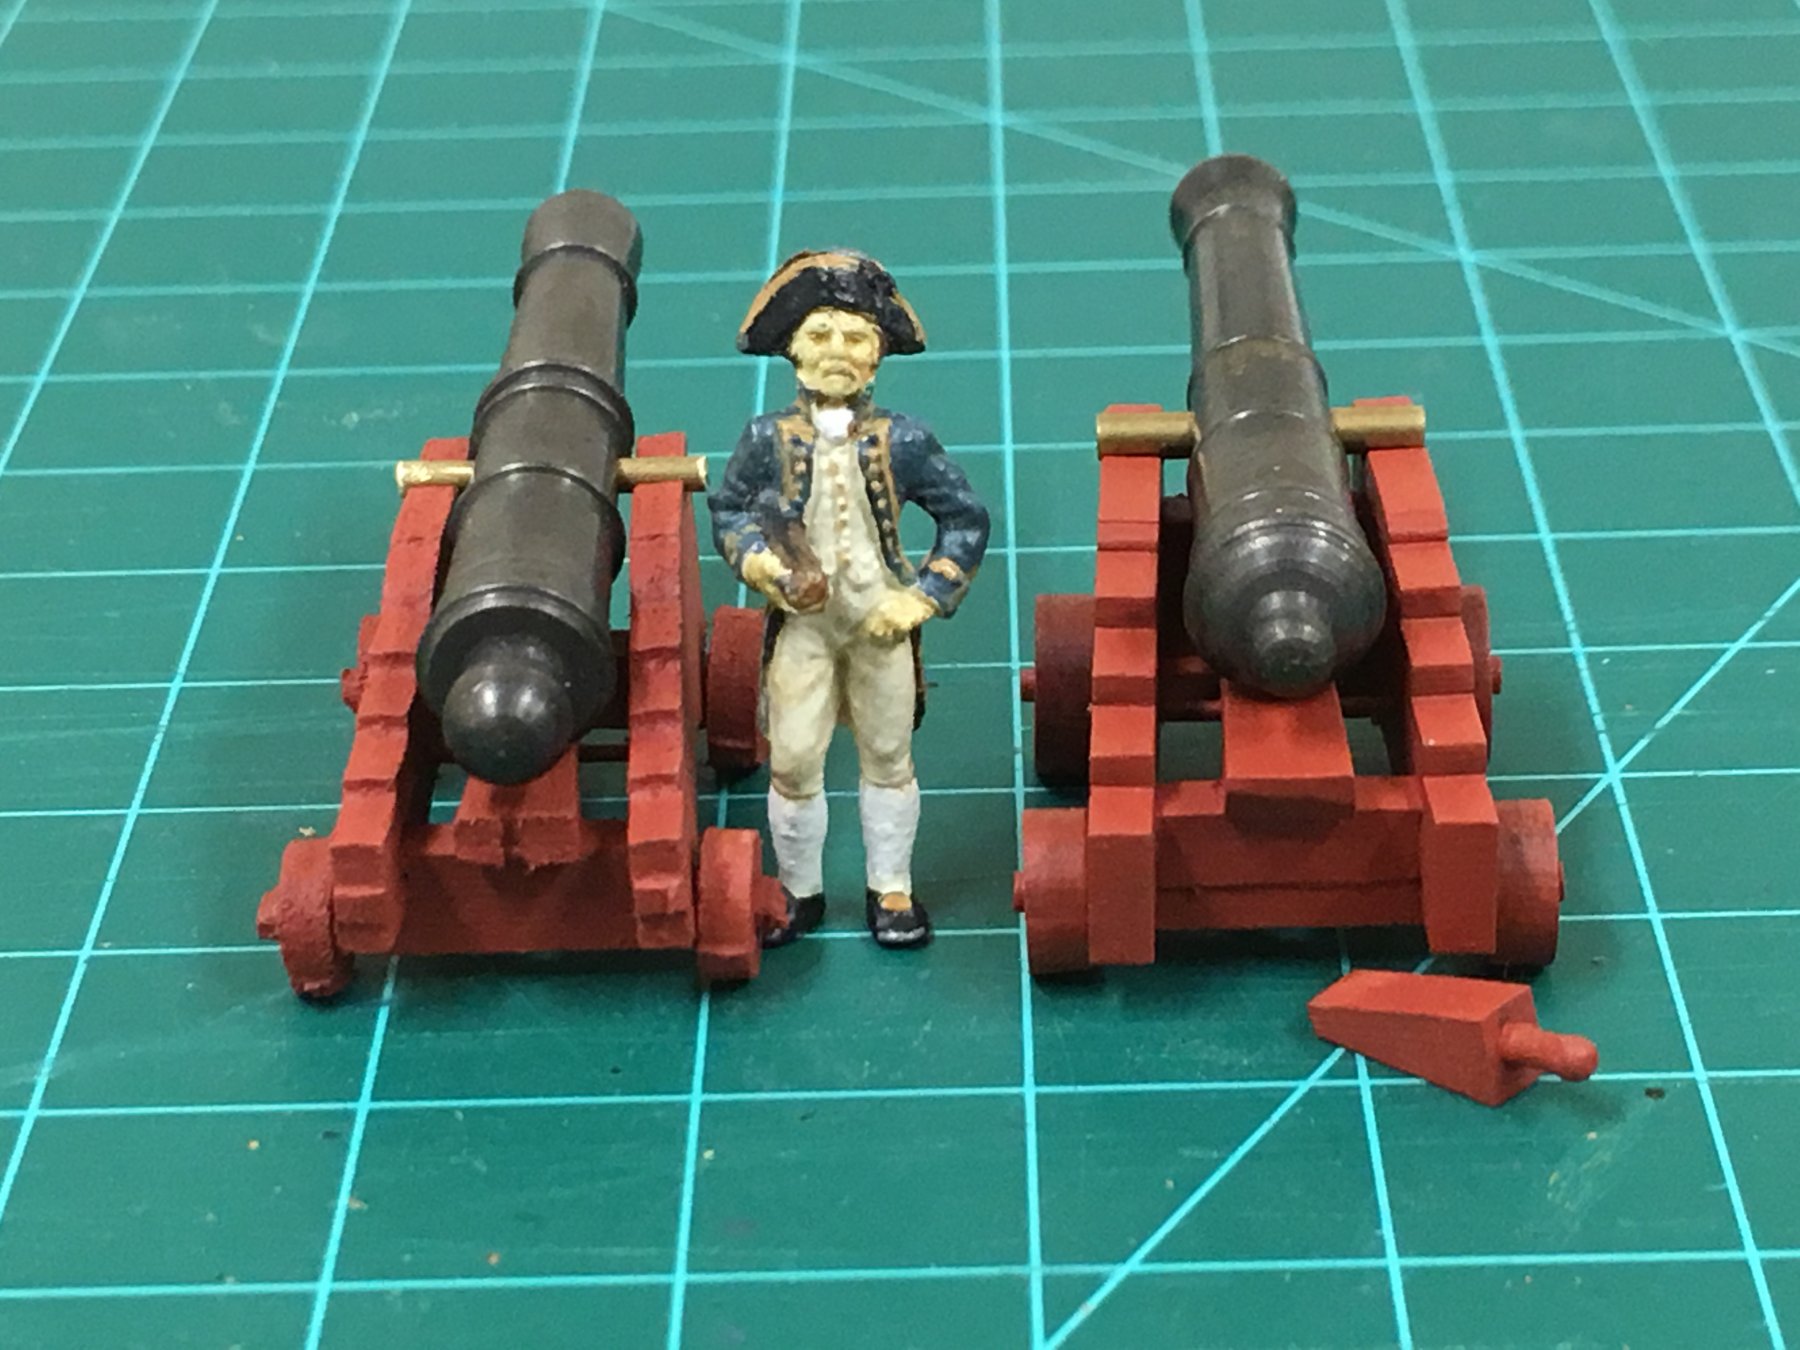
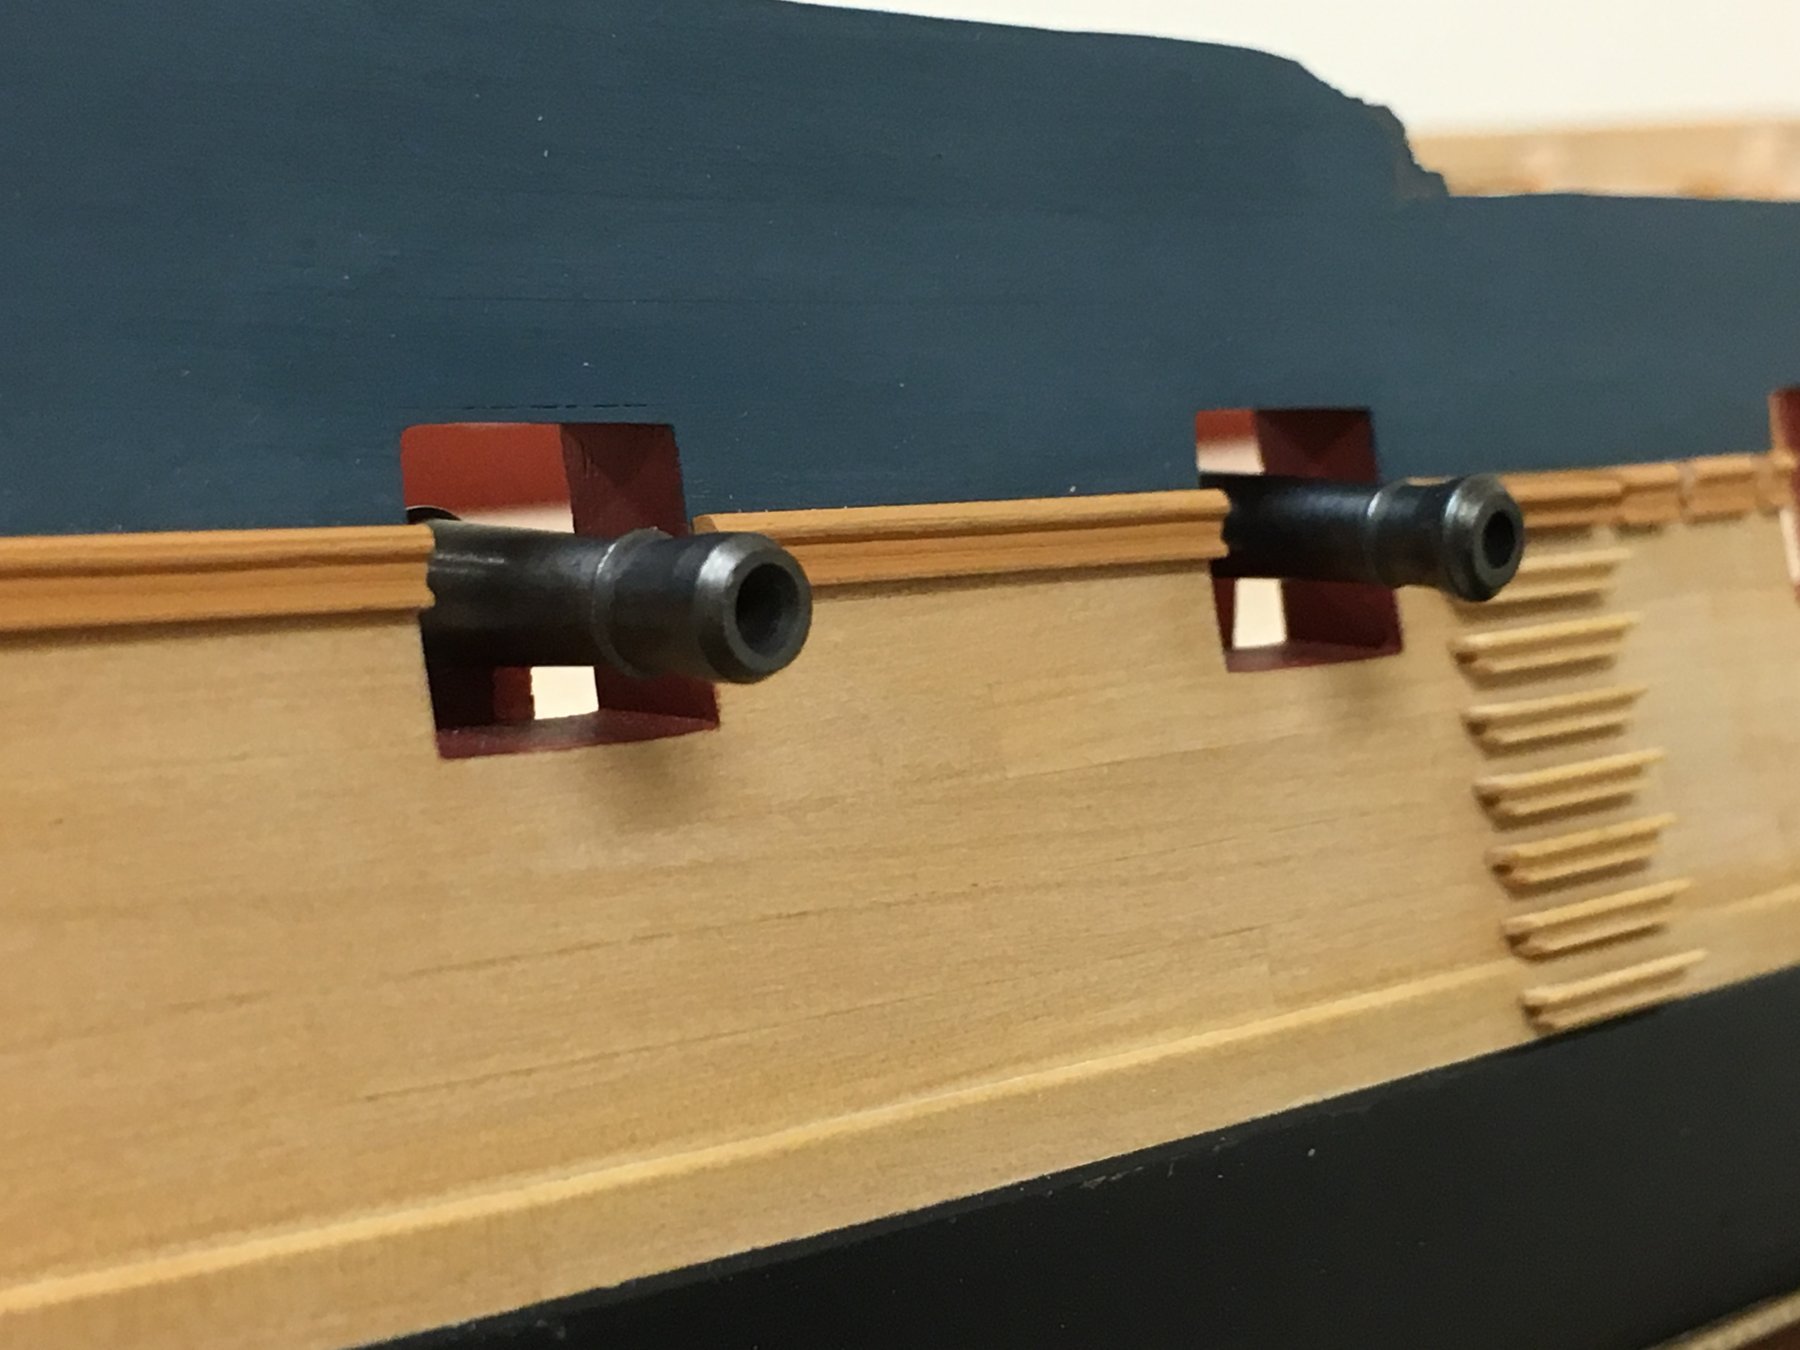
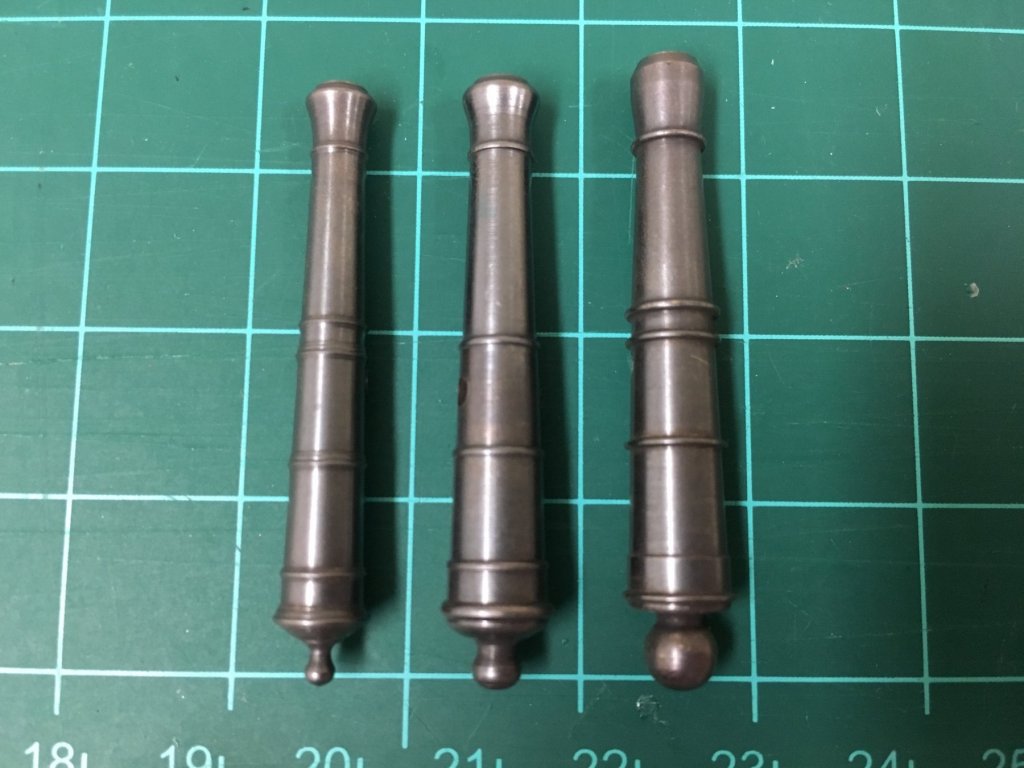
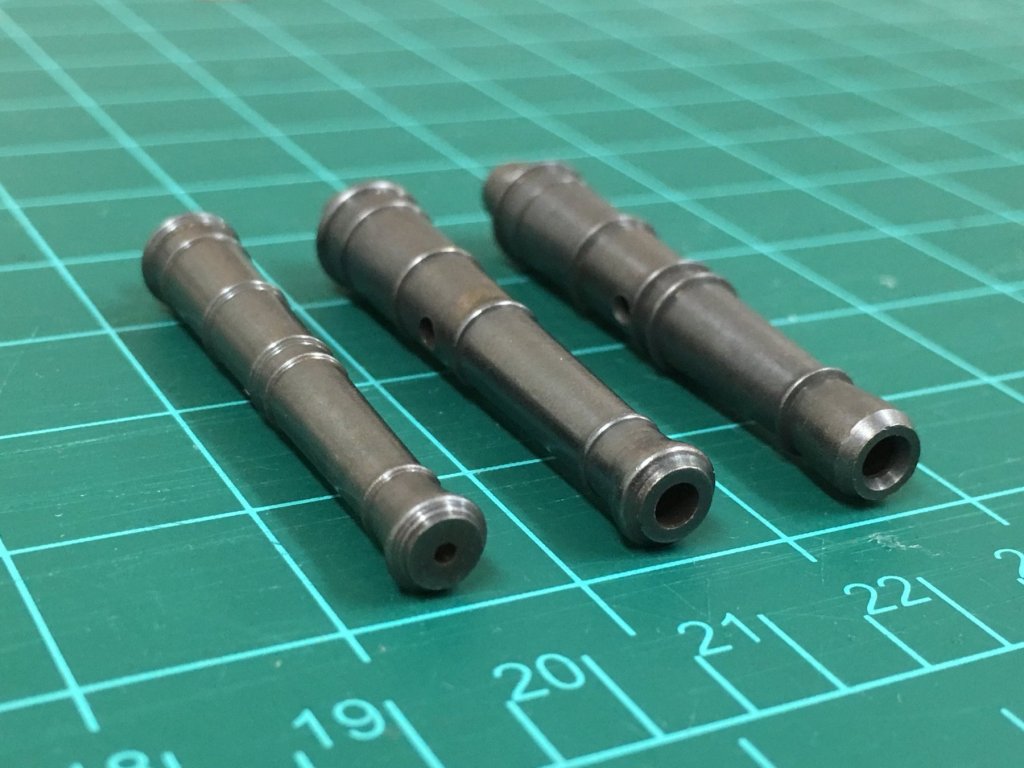
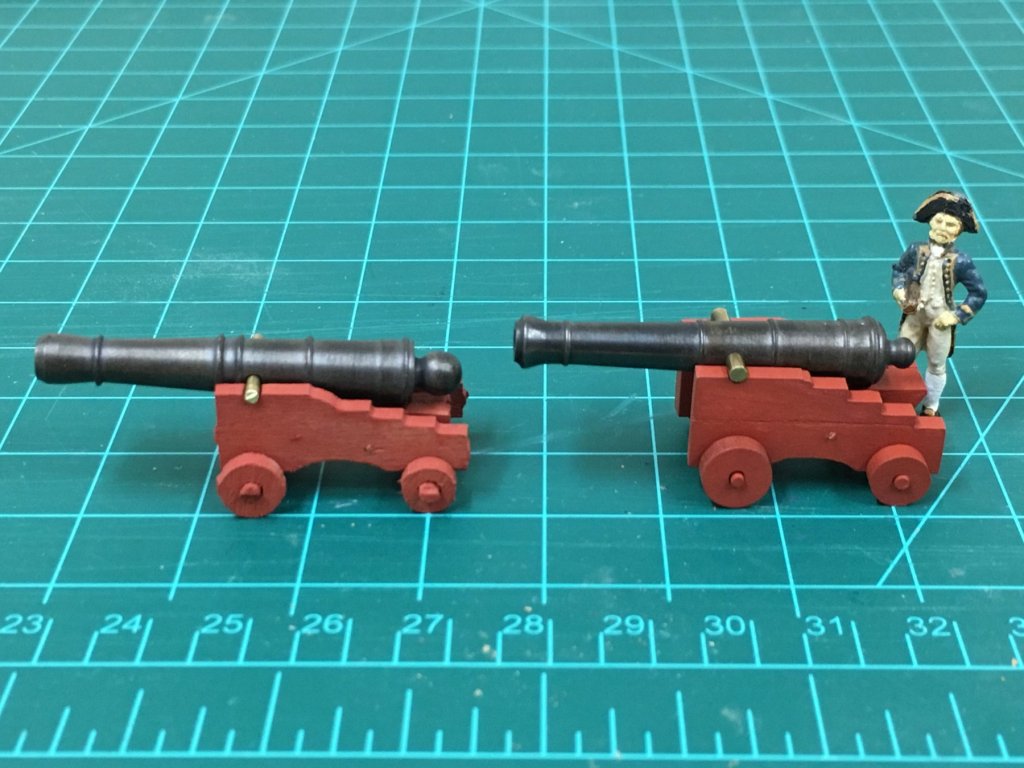
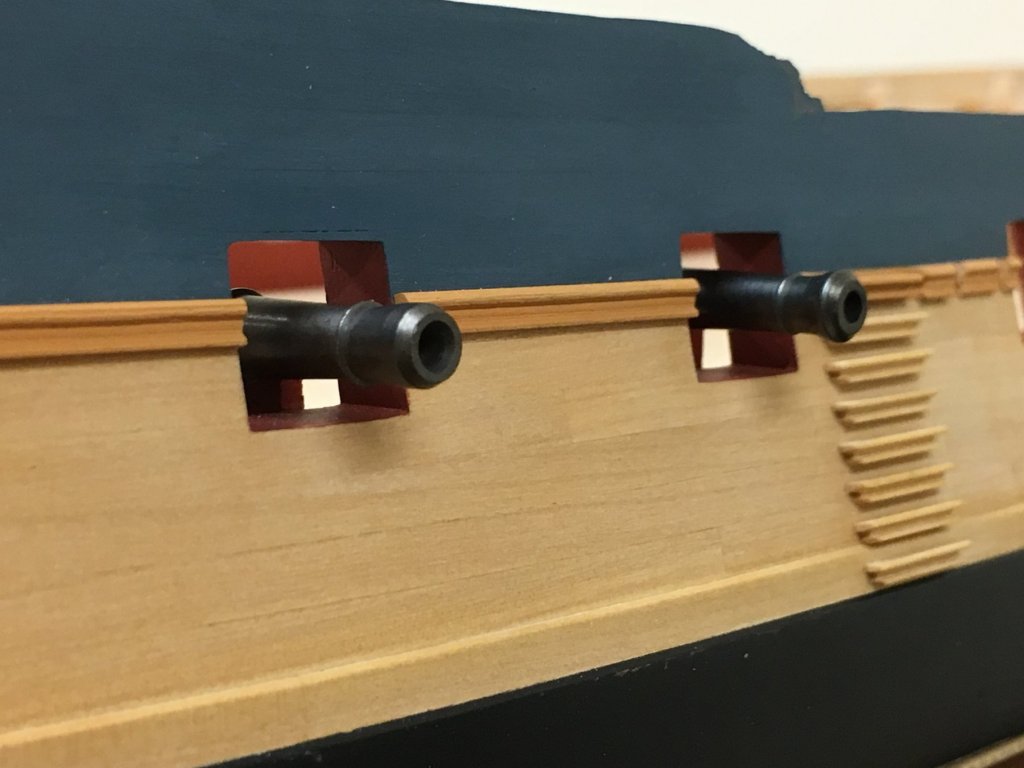
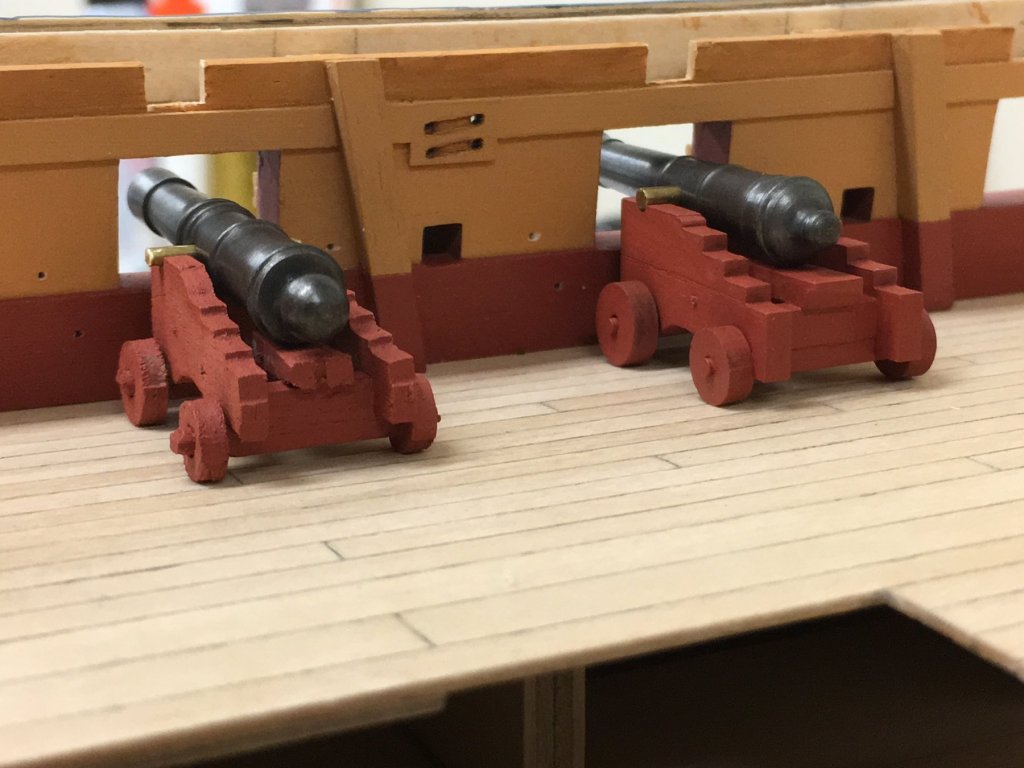
Cheers gents. Christian - I'm being consistent in using the Admiralty paints yellow ochre which I quite like. Constant handling of these parts seems to be no match for any paint and paint rubs off the high spots despite an undercoat. Should not be a problem to get looking OK when the time comes. Cannon Conundrums (or "Armament Angst") I felt I needed a bit of a change of pace while continuing to work slowly on the stern, and decided to get a head start on the cannons as I foresee these being a rather repetitive activity. Psychologically, it feels like I'm getting a head start on things a little by commencing work on these now rather than waiting until I have to do them. The first decision was to finally decide on which barrels to go with. Photos below show 3 options, specifically left to right, Chuck's Syren offering, RB Models and the kit supplied barrels. I know I posted these pics in Andy's Diana log, but can't remember if I did here so pls forgive any repetition! Kit provide barrels - Painful as it is, the kit provided ones just don't cut the mustard with the bore being too large, the muzzle not being the right shape and the pommel just way too big. Chuck's barrels are very nice indeed, while the length certainly works, the bore seems a little small and for a 1:64 18lb'er and overall the barrel is a little dainty to my eye RBs Models (44mm) are also very nicely shaped and to my eye seem to fit the needed proportions best. Each barrel is also supplied with a scale precut trunnion of high quality, so some labour would be saved there. Next up, carriages. I had ordered a set of Chucks Syren carriages a while ago and finally got round to building one up in addition to a kit carriage for comparison. Pictures are self explanatory and show the kit carriage with kit barrel (left) with Syren carriage and RB models barrel (right). Making these up allowed all the possible permutations to be tried, but these are best comparison. Note - these were built over a number of very brief 10 minute sessions when I could escape to the boat yard, i.e. very quick and dirty, with quick paint job and no fittings. Couple of things are apparent: The kit walnut is not great, being very splintery with pronounced grain, and would require a lot of work to get an acceptable finish. The carriage is noticeably a little more squat, and the 2mm thickness of the ply looks less substantial, and the trucks a little on the small side. Similar level of finish work on the Syren laser cut parts gives a much better result. Dimensions all around look a little more pleasing to my eye. The width of the Syren carriage were made slightly wider than the plans indicate to try and better scale to the RB barrel. Final comparison was to place in situ. The RB/Syren combination seemed to sit nicely mid port. Placement of a quoin will need to be thought about as the barrel is probably already at approximately the right elevation. Feel the RB/Syren combo is clear winner, despite the additional investment that will be needed my view is that this will ultimately provide a more enjoyable building experience, especially as 28 of these puppies will need to be made up...


-
Nice update...and nice view! I've not had a chance to make coils myself yet, but I have a suspicion I'll not like them either. Looking good to me Christian, and I'm sure these will all blend in nicely. At least you'll have the option to easily change if there are any that you feel you are not happy with.
-
Missed a lot it seems Greg, top drawer stuff as usual! Will certainly be following closely from here on in.
-
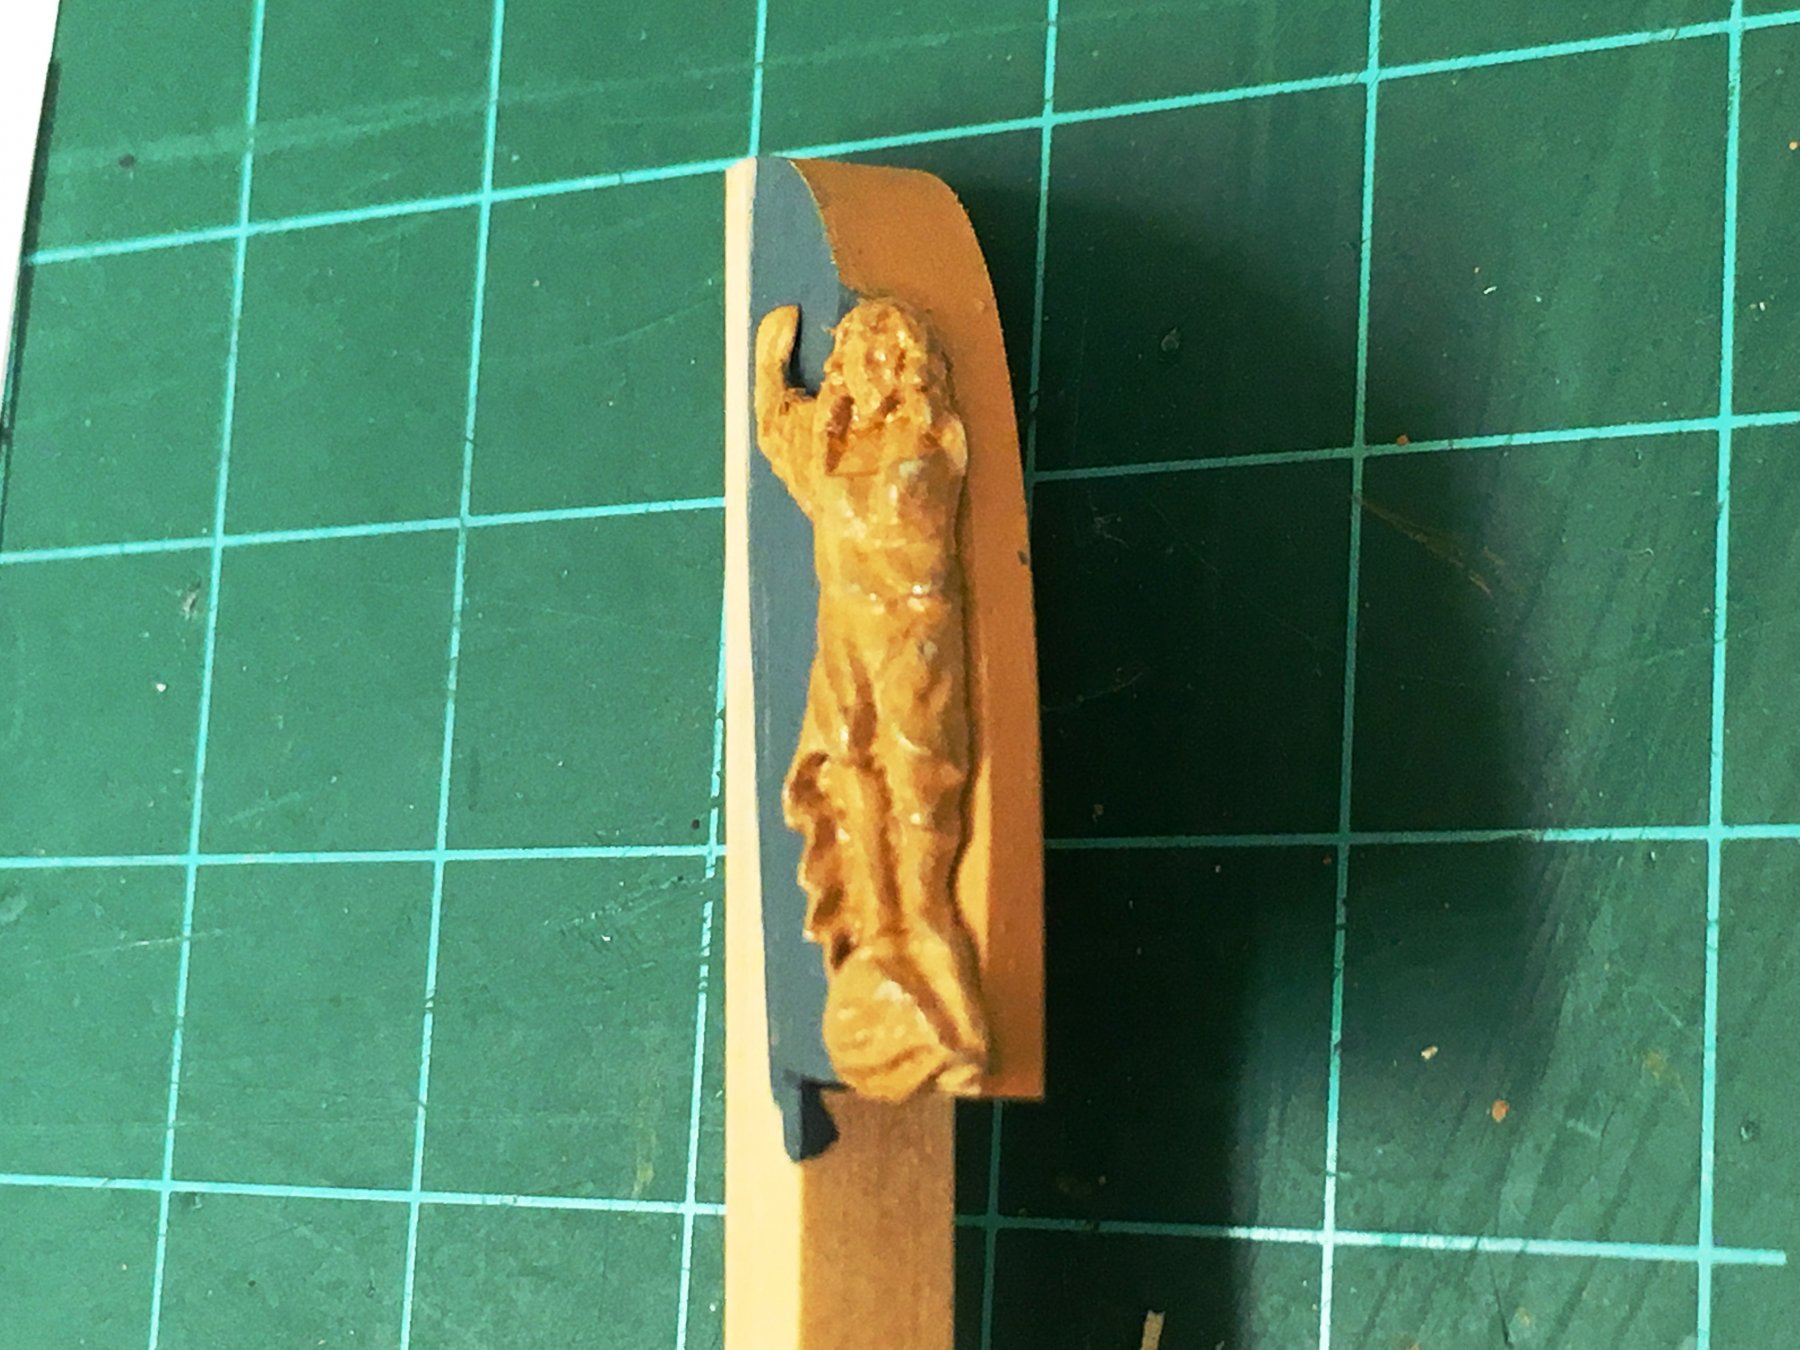
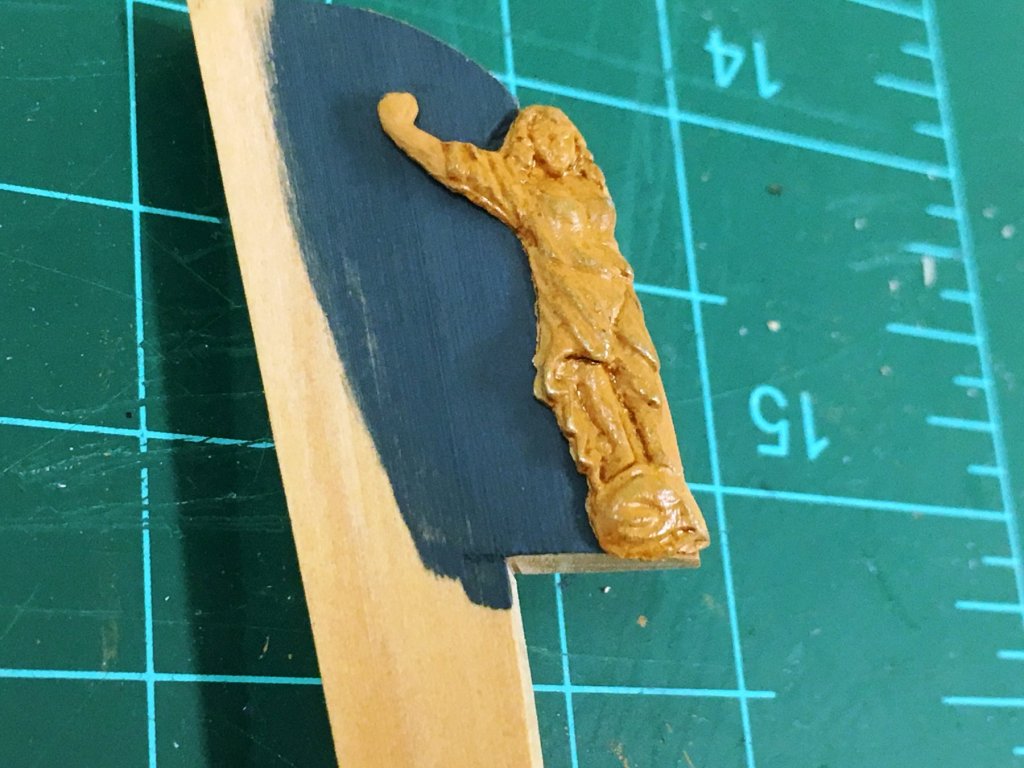
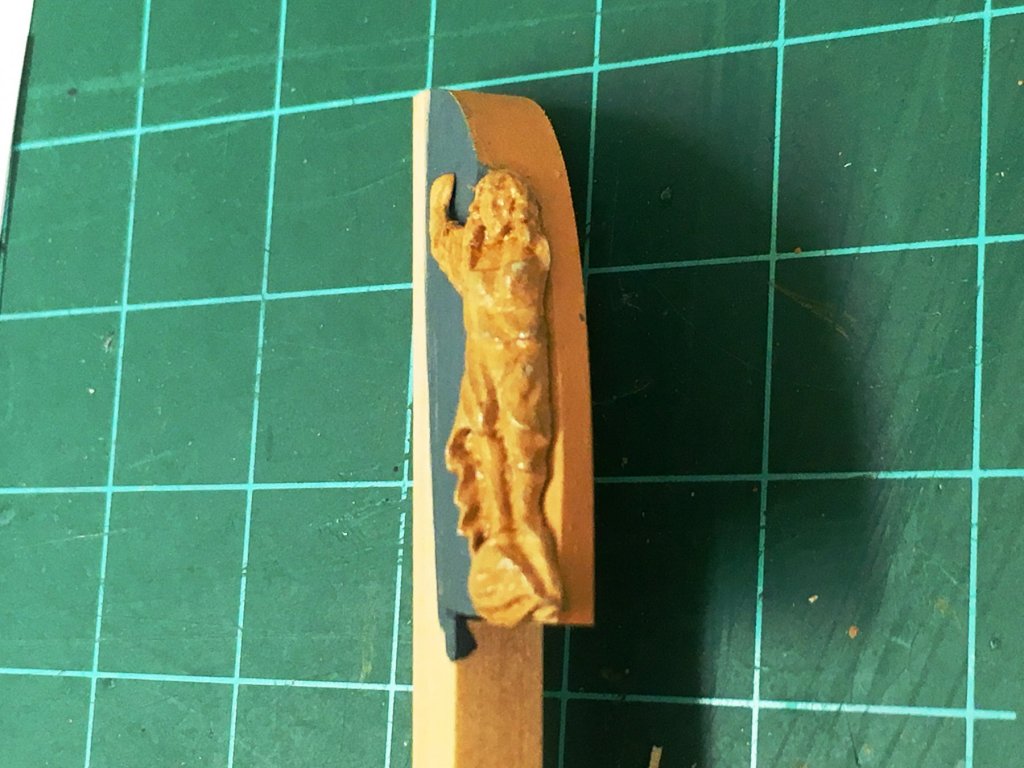
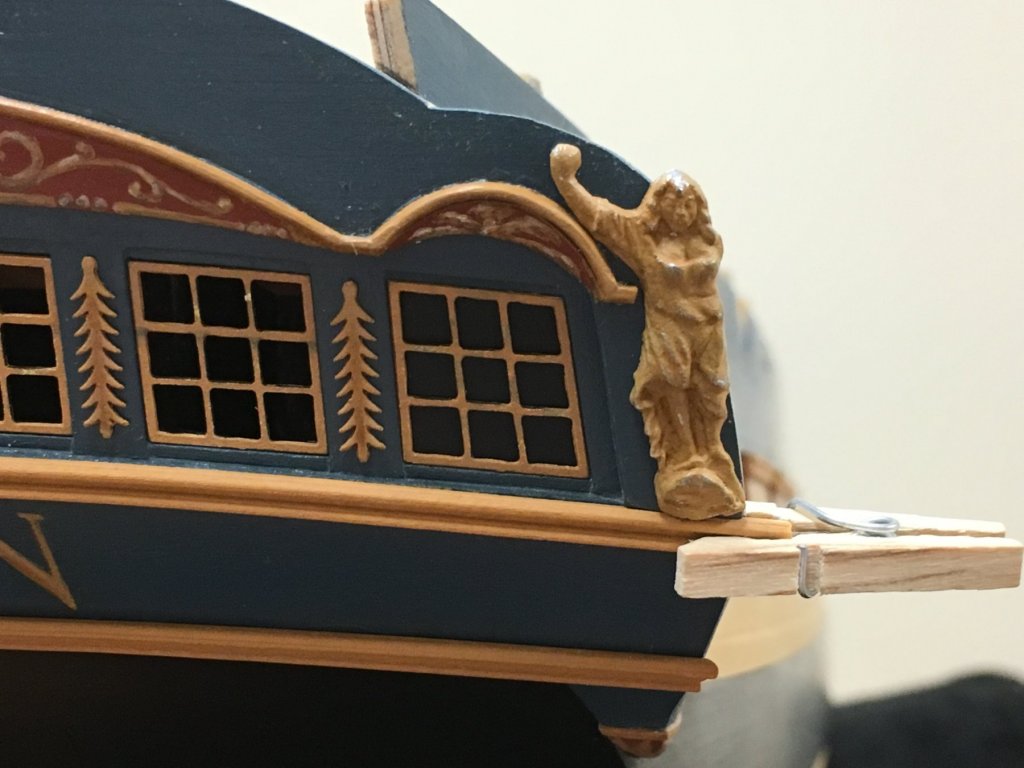
Gents - this is why this site is so great, everything has suddenly become clear (or at least clearer), so thank you! Carl - All beautiful, but maybe a little fancy for the late 18th century and undoubtedly beyond my ability to carve! Dirk - I see you had the exact same 'problem'. Despite being an avid follower of your beautiful Confederacy I somehow missed that, so shame on me! That shows the situation very clearly and was a huge help in thinking this through. B.E. - You raise a good potential issue with the arm, I think the casting is sufficiently soft to allow that to be bent, but experimentation will be needed. In photos below you can see I've bent the arm tentatively, will need more attention but I want to wait until final profile is known to reduce the risk of it breakage due to repeated bending. BTW, I repeatedly admire your custom Pegasus stern and added figures - much better than the kit provided knights - but maybe a little too ornate for these later frigates (I may be wrong, but I believe the Artois class may have been among the last 5th rates with full figureheads) Photos of a quick-and-dirty proof of concept, so think I know where I'm going with this...trying to ignore the horrible paint finish on the casting but there is no point in making it look good at this point...
-
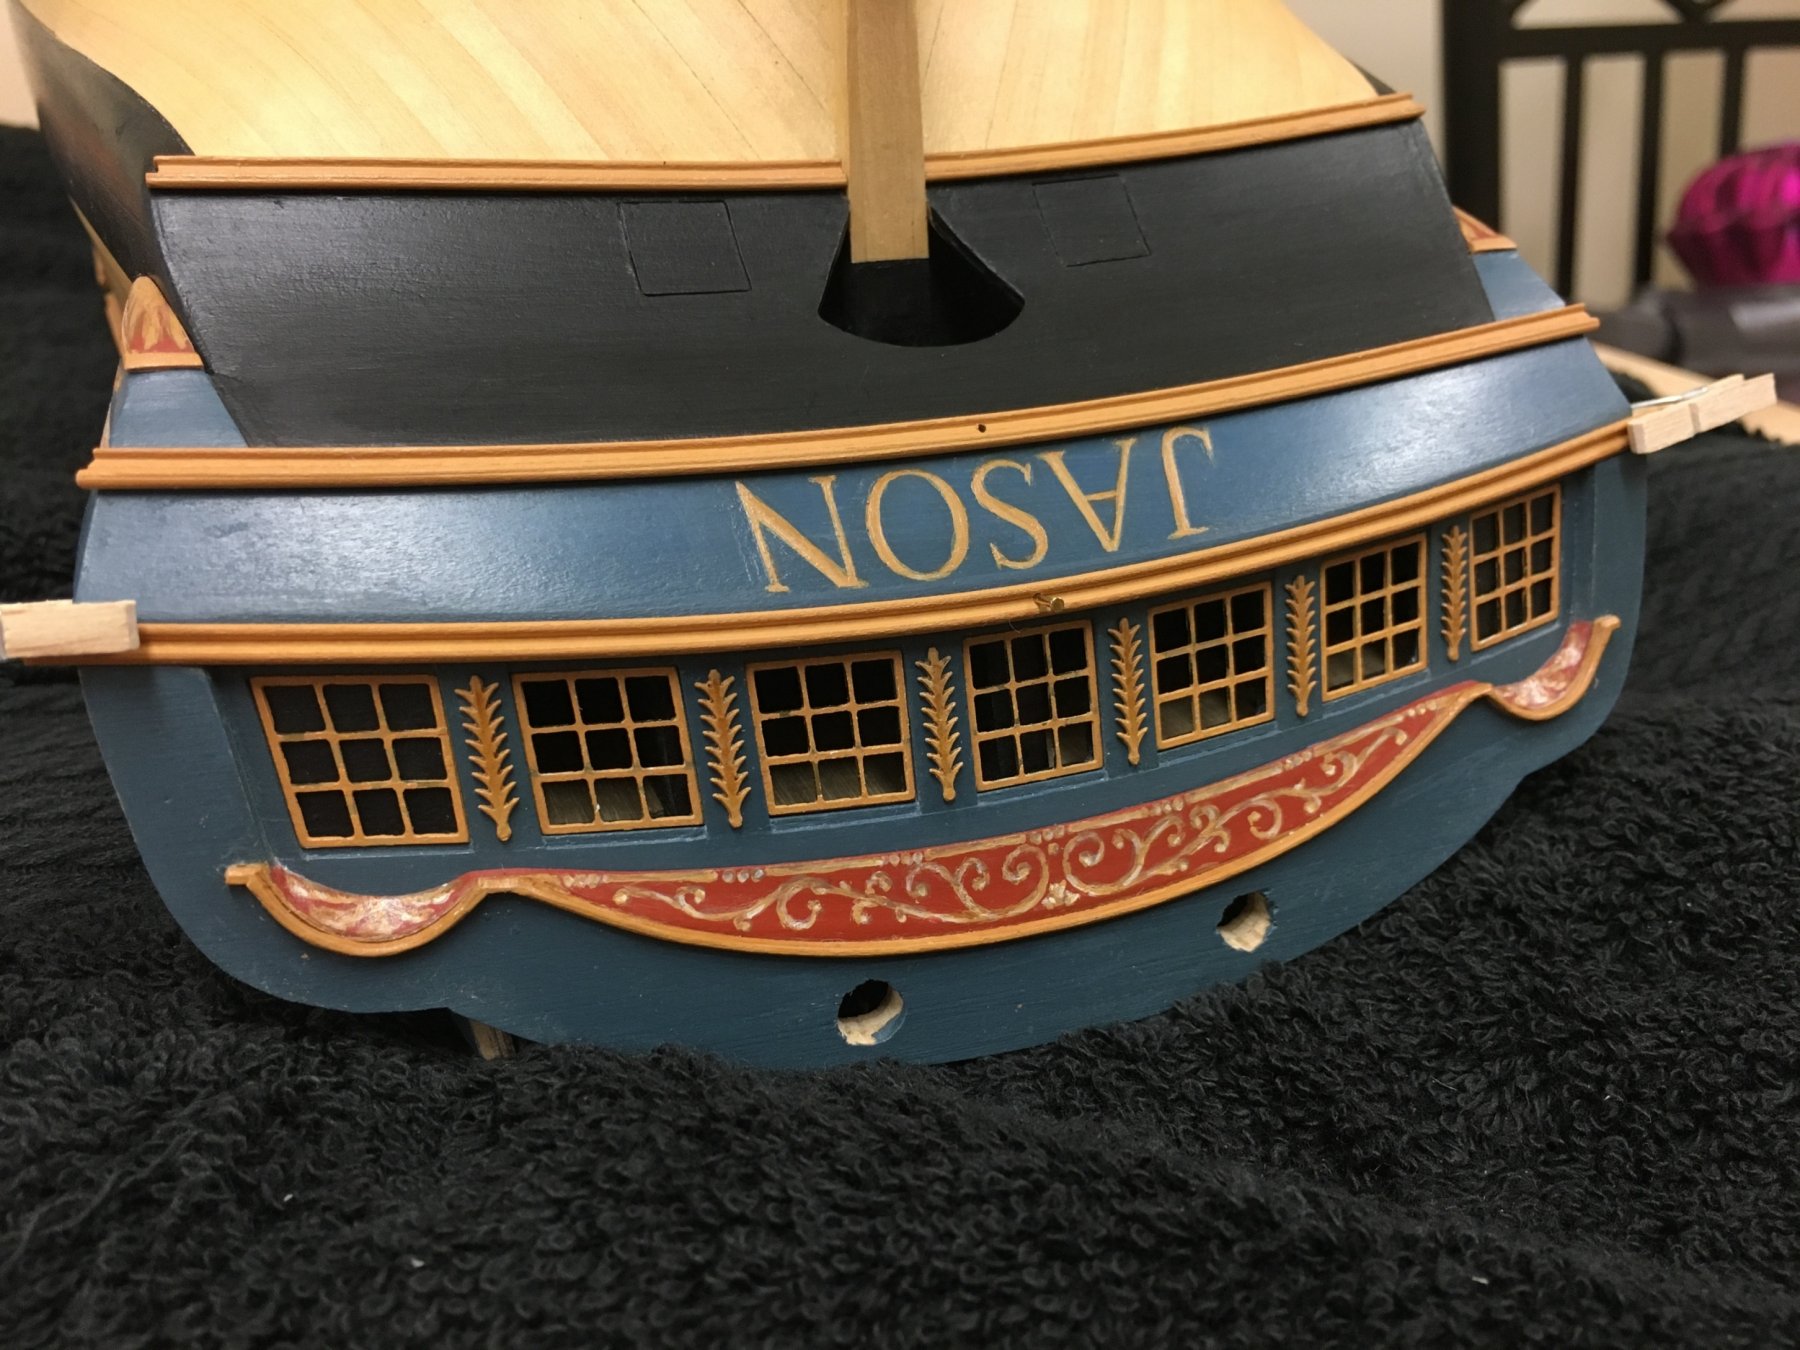
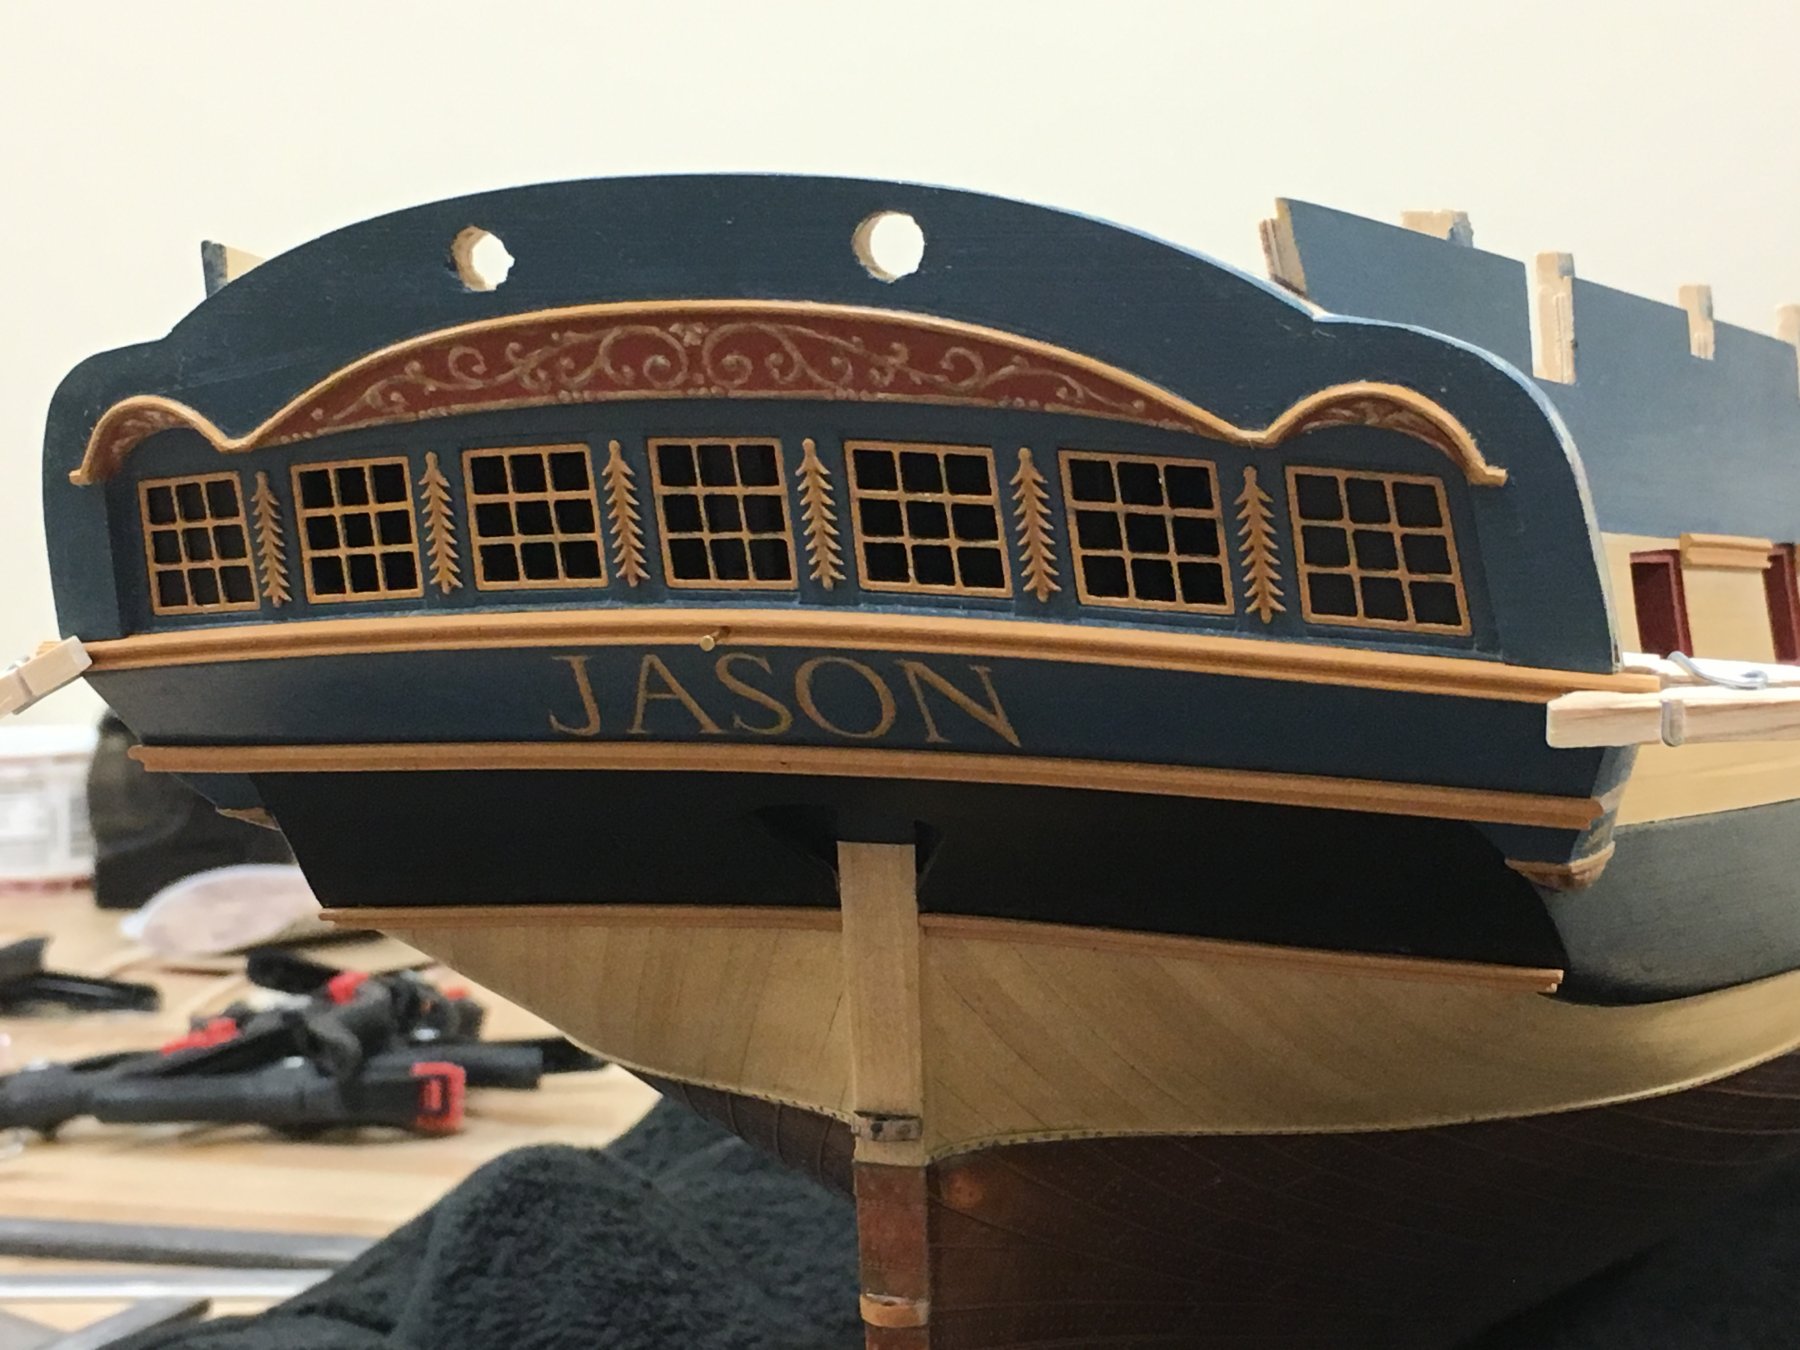
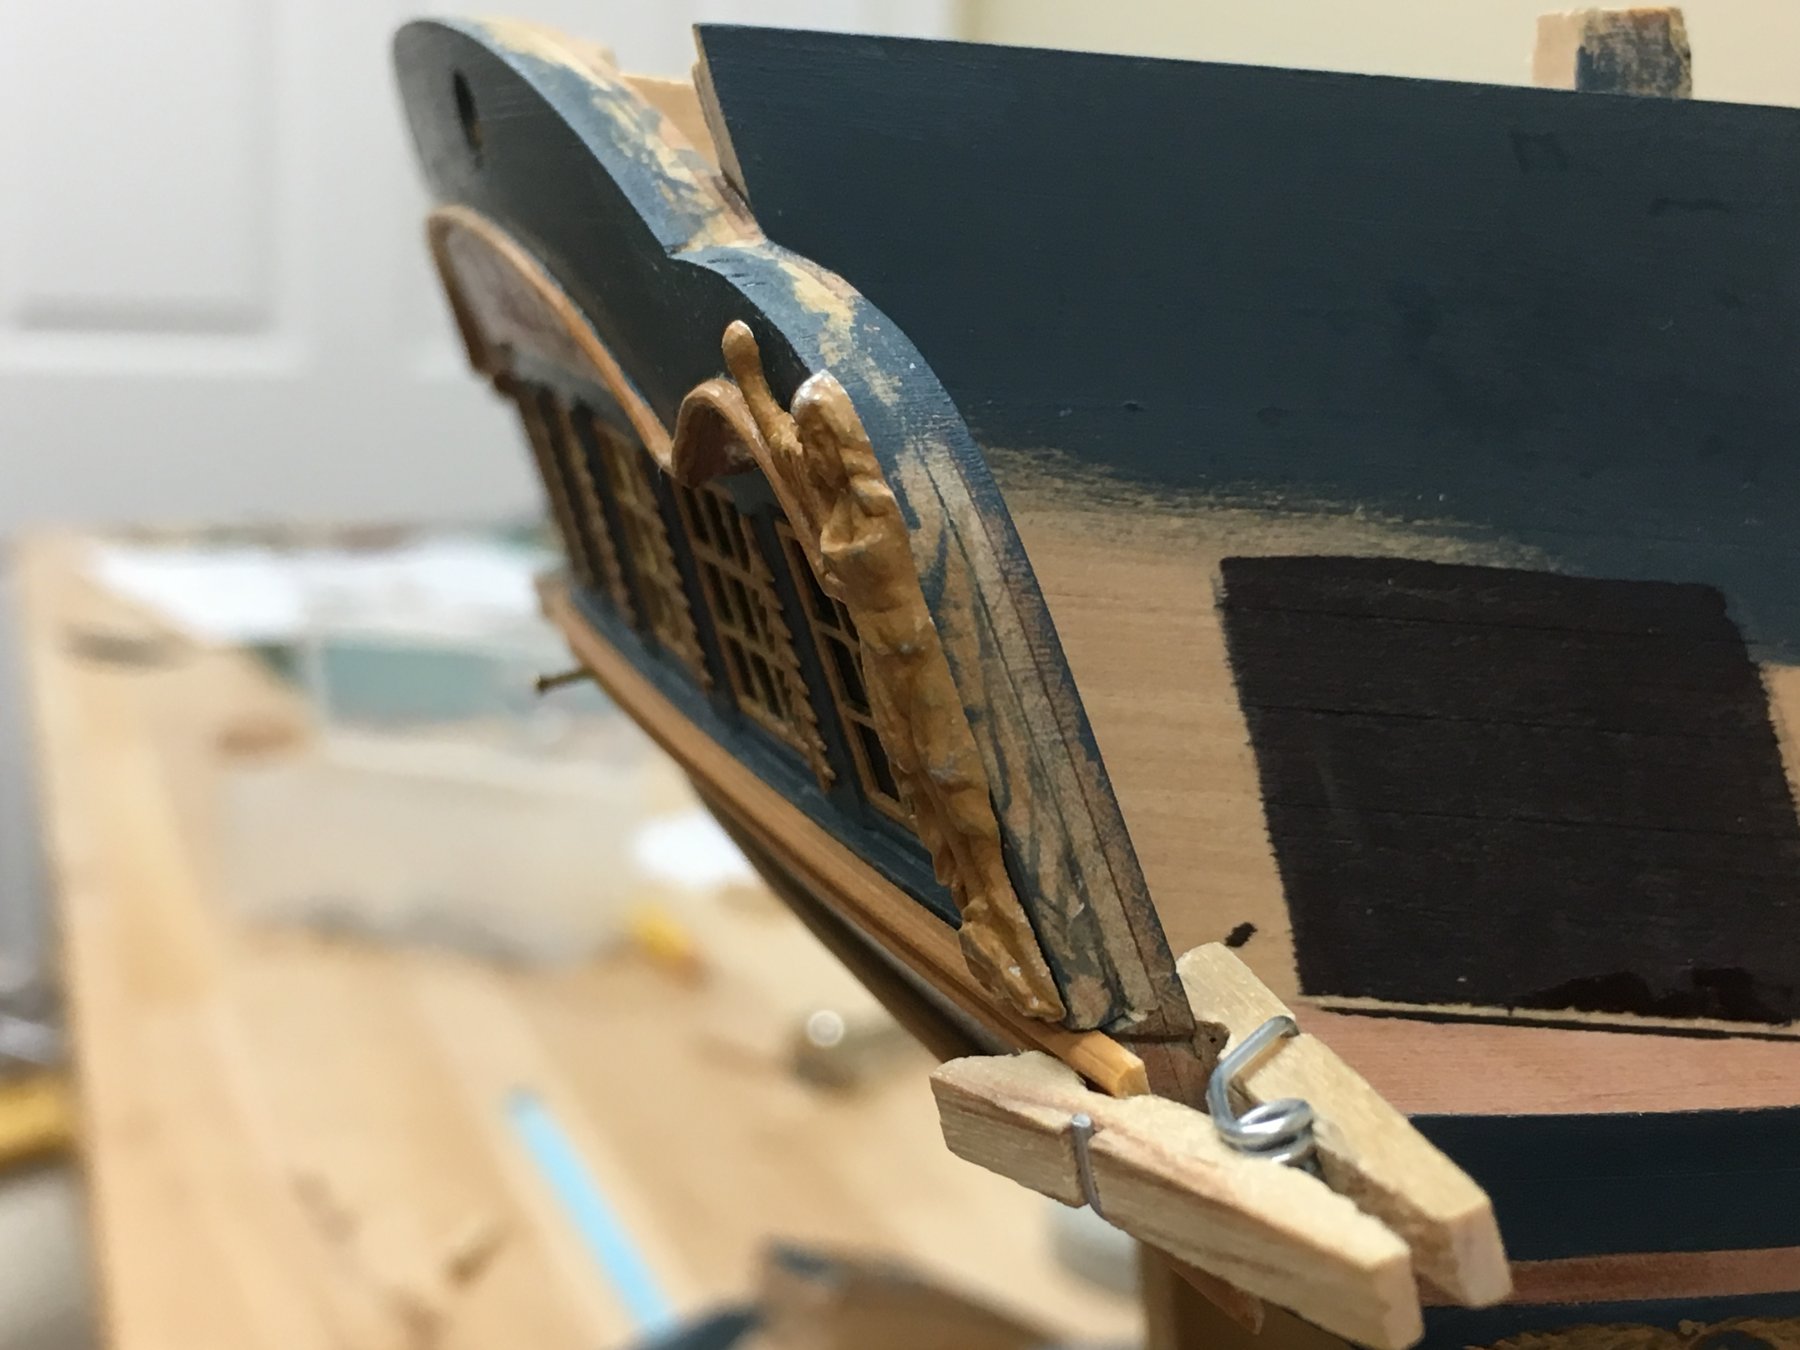
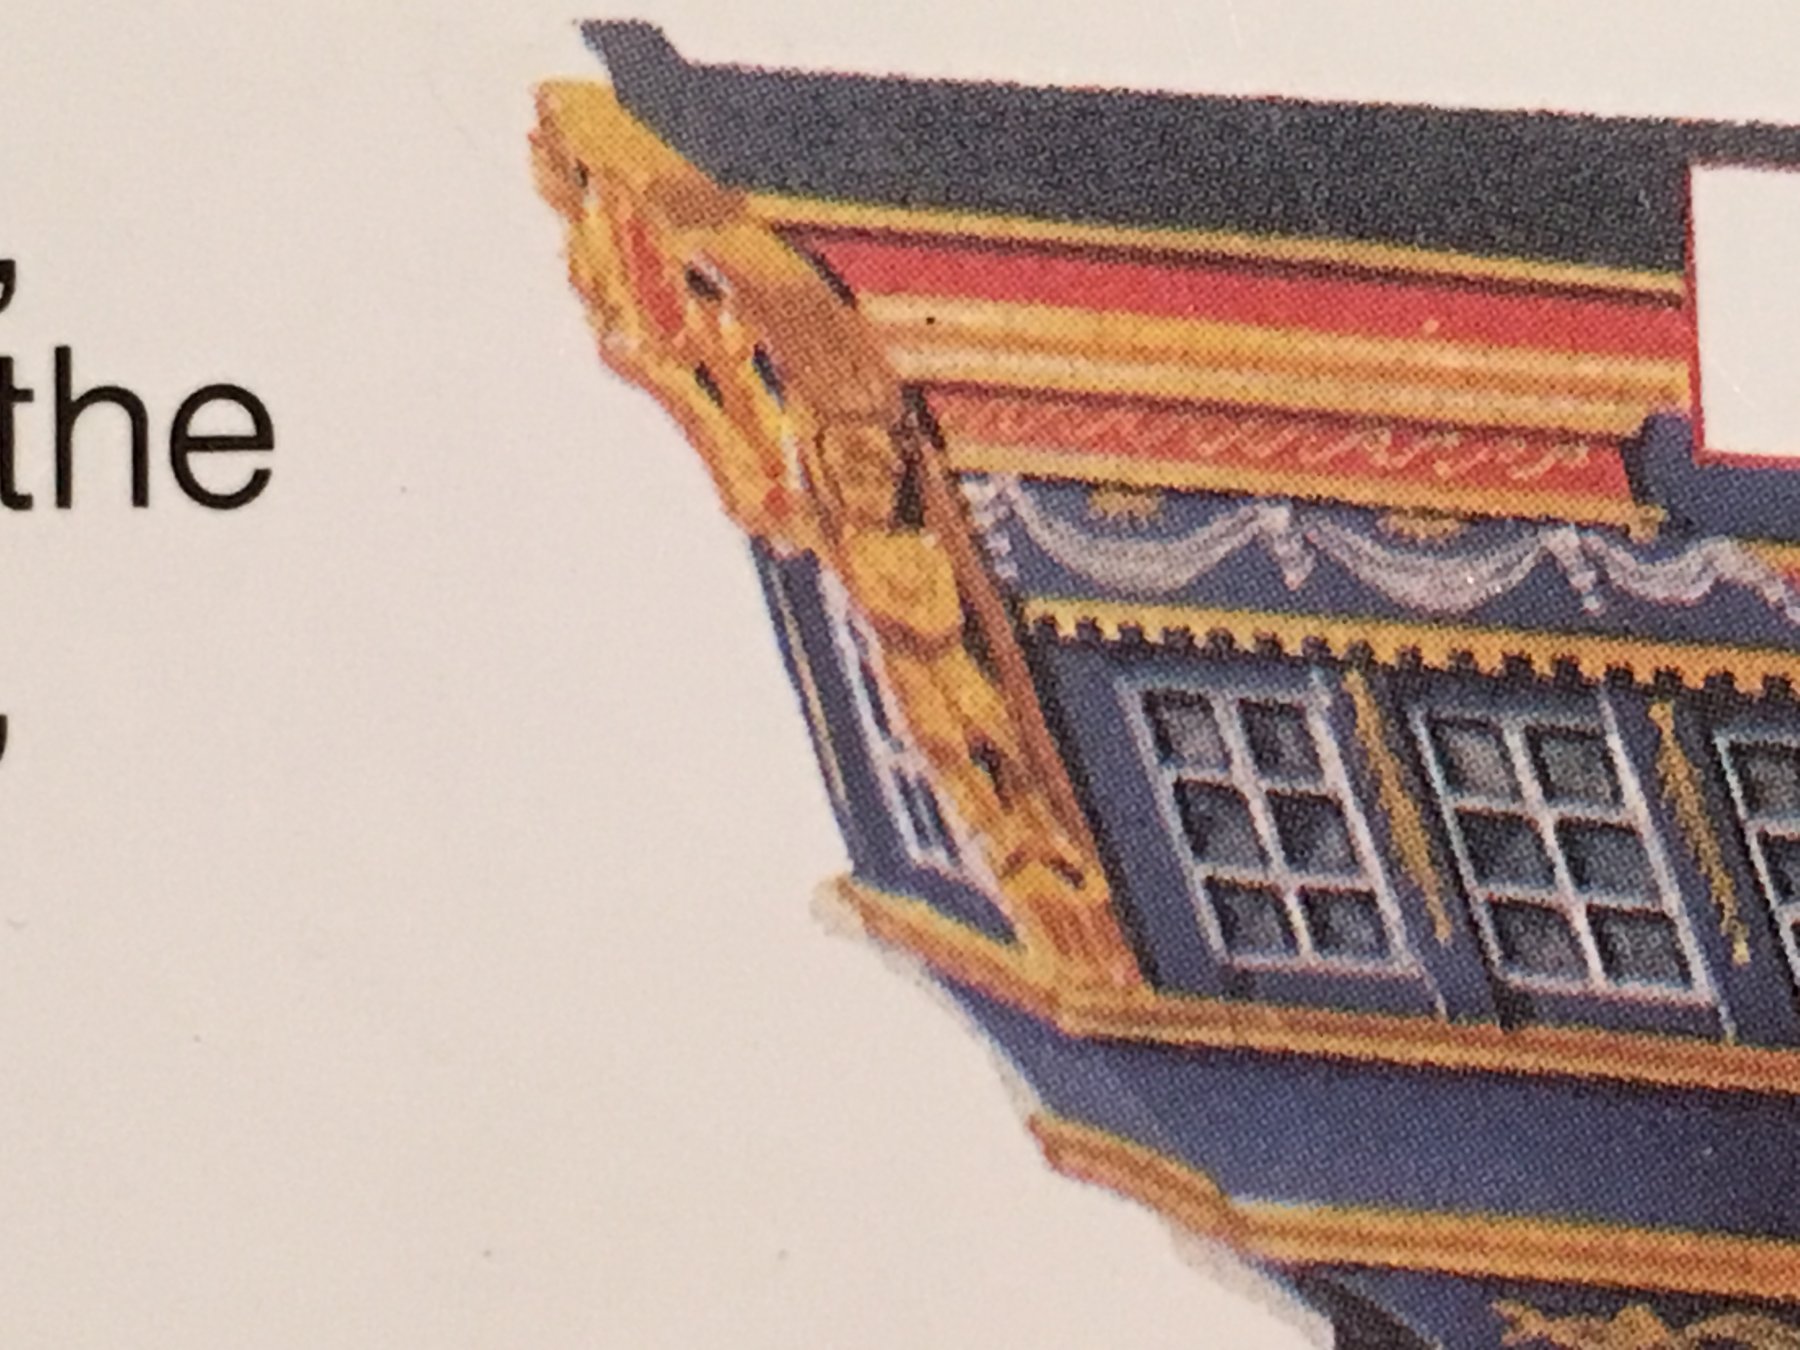
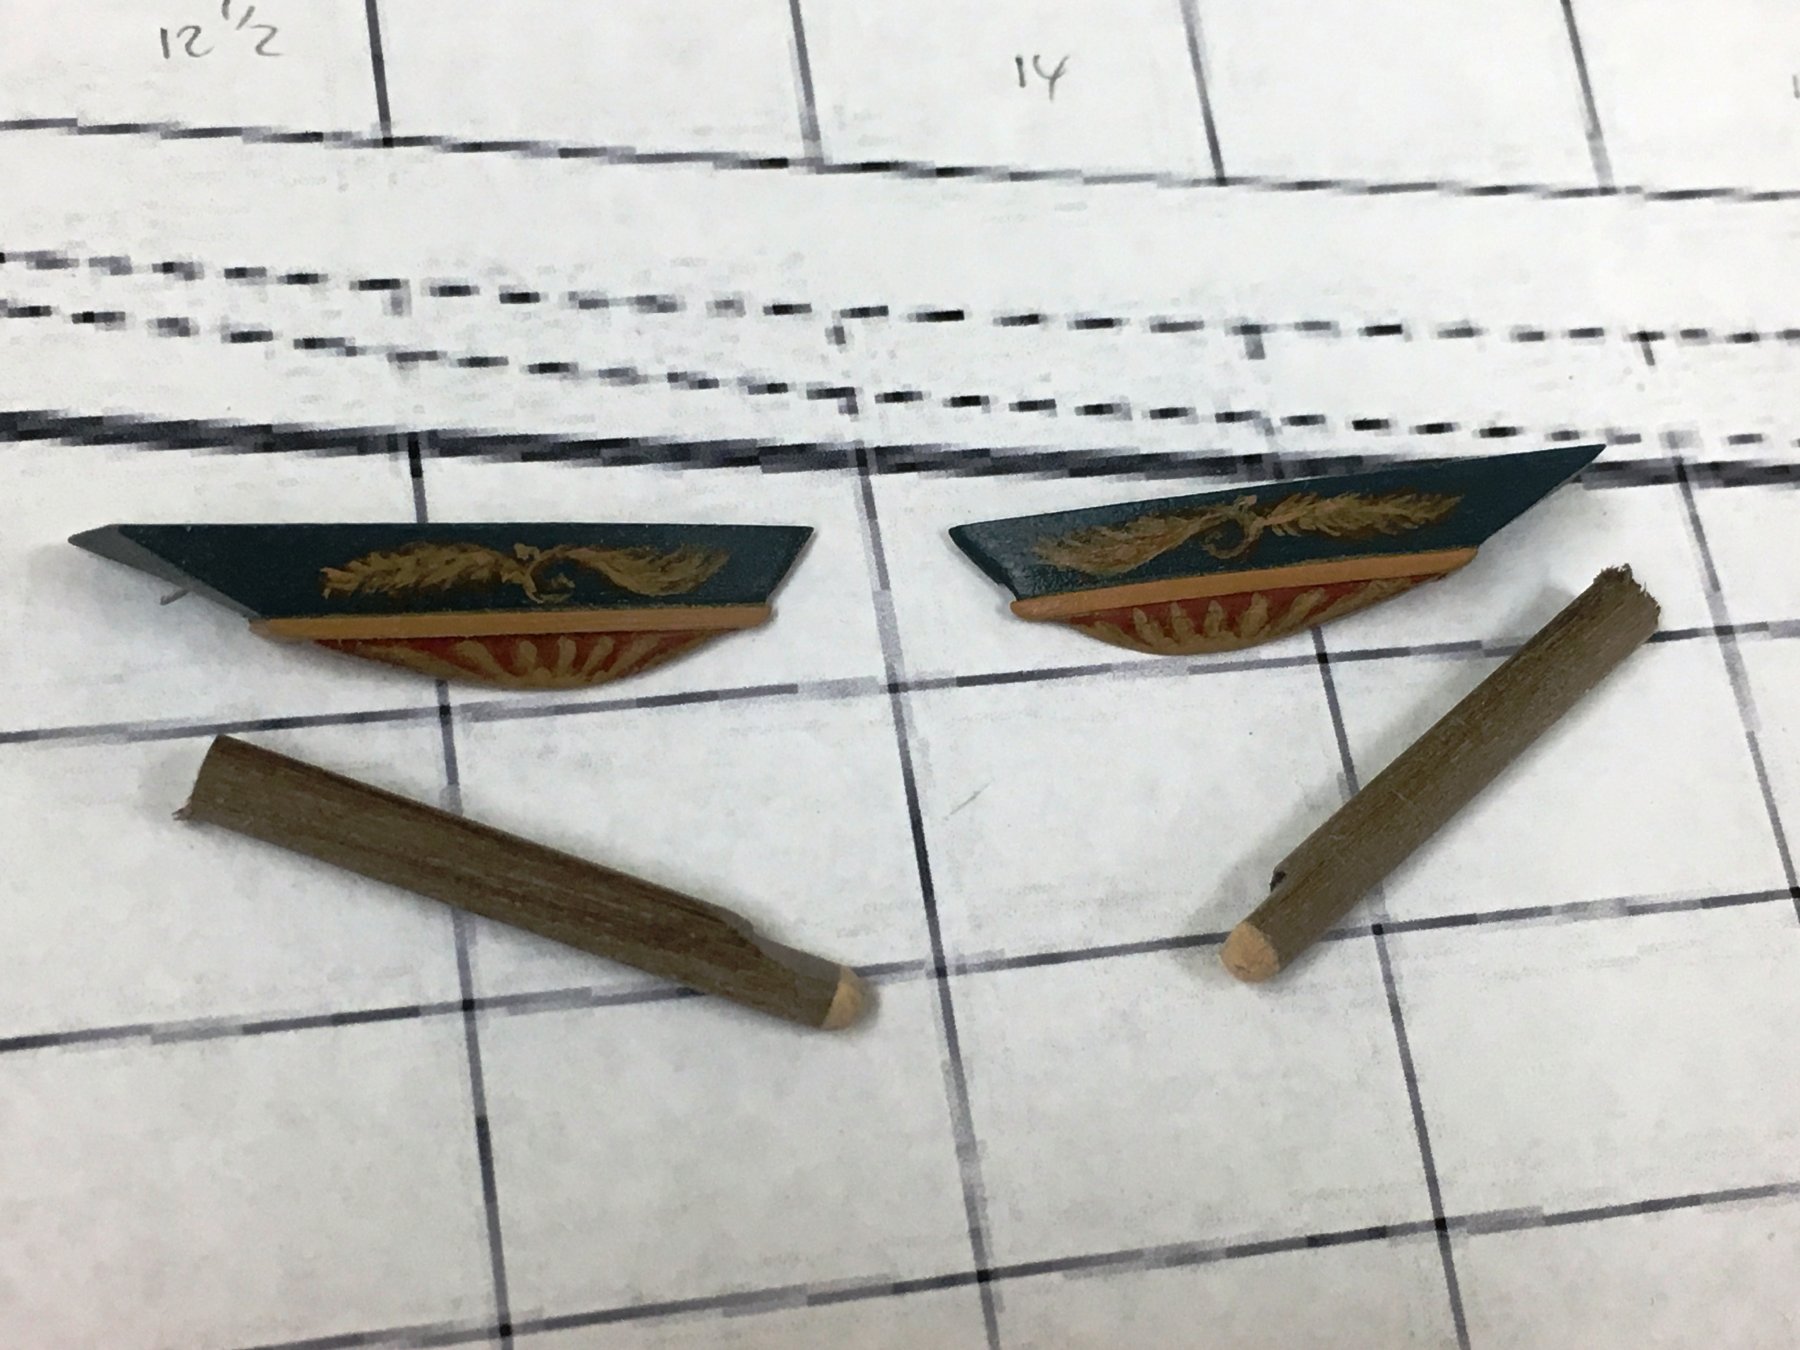
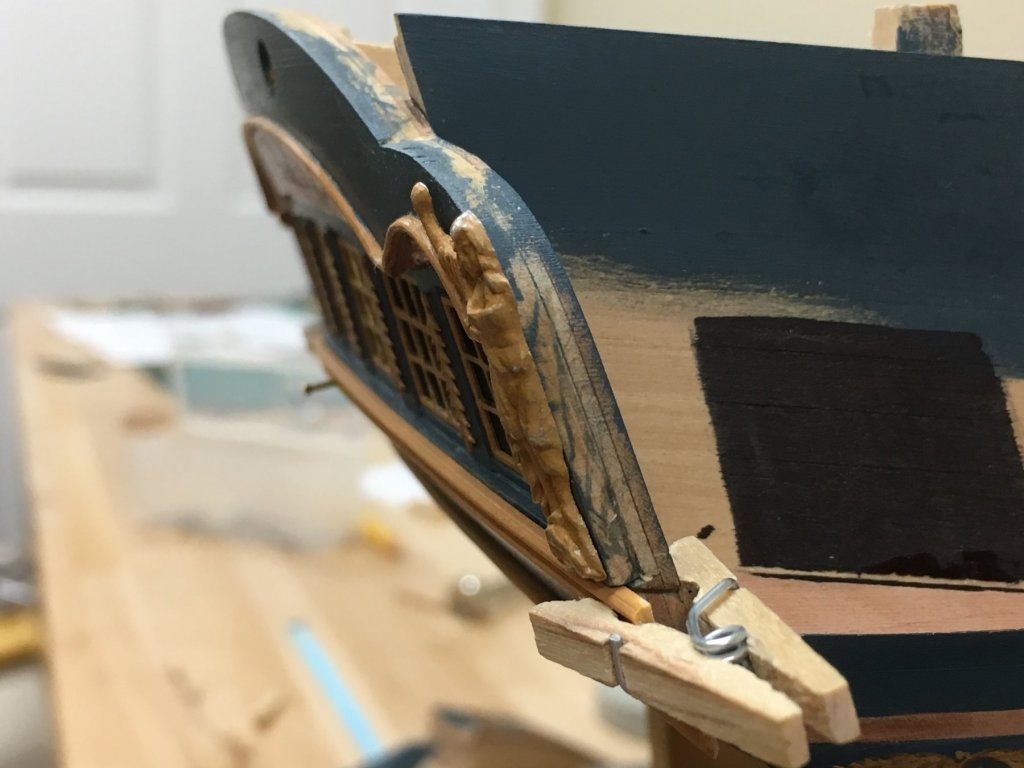
Not much progress, but I want to ask a question, so felt obliged to post a few photos Progress made on the upper and lower counter rail. These need to follow quite a curve, more so than they appear, and were pre-bent to shape using a failed counter template I had kept. Seems very important visually to get a smooth curve. The ends of these rails will need to butt up against the side gallery rails and so were angled to approximately 45% in preparation. Using a single pin amidships proved to be the ticket here ensuring that the rail could be consistently placed while the ends were fine tuned - the small hole should be pretty easy to mask afterwards with filler. The top rail is not glued in place yet, but its possible to get a feel for the run of these rails. Overall, I'm rather relieved and pleased with how this turned out with the name placement. So, to my question. The Diana kit provides two 'ladies' at either side of the stern fascia which are pretty good castings (represent the goddesses Hera and Athena from Jason's story) which I'd like to use. The tafferal is quite thick, and when compared to the AOTS diagram, the female figures appear to have some depth. I thought that by this time, complex carvings in the round would not be in vogue for economic reasons, so I'm wondering if what is illustrated is a simpler relief carving on an angled corner. If so, then the approach could be to simply angle the corner. The hesitation here is that after so much work on the stern, I'm wary of making a mistake...but I do like the more 'fitted' look in the AOTS picture as it seems to gradually transition the thickness of the tafferal in a visually pleasing way. Angling the corner would be easier with the upper counter rail off, but until that's decided its a roadblock to moving forward with the rest. Opinions, thoughts and recommendations sought...


-
Wonderfully precise skilled work and a beautiful ship model in the making. Look forward to following along and learning more from you Tiz!
-
Very interested to learn how you progress with this Alan, you have some lovely lines already.
-
Somehow completely missed this Hamilton, despite all the challenges to get to this point you should feel good that the first planking looks to be going so well. Looking great.
-
Martin, those steps look fantastic, those twisting steps look very pretty but must be a real challenge. Its almost as if the ship builders were deliberately making it hard by placing the curve in the gangboards where they did.
- 467 replies
-
- 2
-
-
- fly
- victory models
- (and 1 more)
-
Hi Hennie, really nice progress. Question on the kit, it looks like the planking is stopping at the level of the decks, especially at the stern. Are there no bulwarks there or do they go on later? I'm not that familiar with this style of ship so sorry of its a silly question.
- 192 replies
-
- 2
-
-
- sovereign of the seas
- sergal
- (and 1 more)
-
I'd suggest checking out the Soleil Royal build logs, there is extensive discussion on this in many of them.
- 1 reply
-
- 4
-
-
Ingenious solution BE and top quality results on the profiling of those trim pieces. Looks wonderful with everything in place, such very clean work as always.
- 156 replies
-
- 3
-
-
- pinnace
- model shipways
- (and 1 more)
-
All, thanks for the support, kind words and likes from such an accomplished group. I noticed that I'm just past my 3yr anniversary for this model...I'm hoping things can start accelerating a little from here now all the foundations are in place. @ Michal - its a simple solution I learned from others, the batten is simply a 1x1mm strip glued to the waterline. Given that the hull shape requires this to bend through a number of convex and concave surfaces, especially at the stern, my experience was that it is easiest to thin by sanding to around 0.5mm or less and then glue in position with PVA glue. The moisture in the glue adds to flexibility of the woods and sets quickly so fingers can be used to hold in place. This was done in manageable strip lengths rather than trying to do the whole waterline with one piece. Once this had dried fully, I then reduced the thickness a little more by careful sanding until it looked to be at the appropriate scale.
-
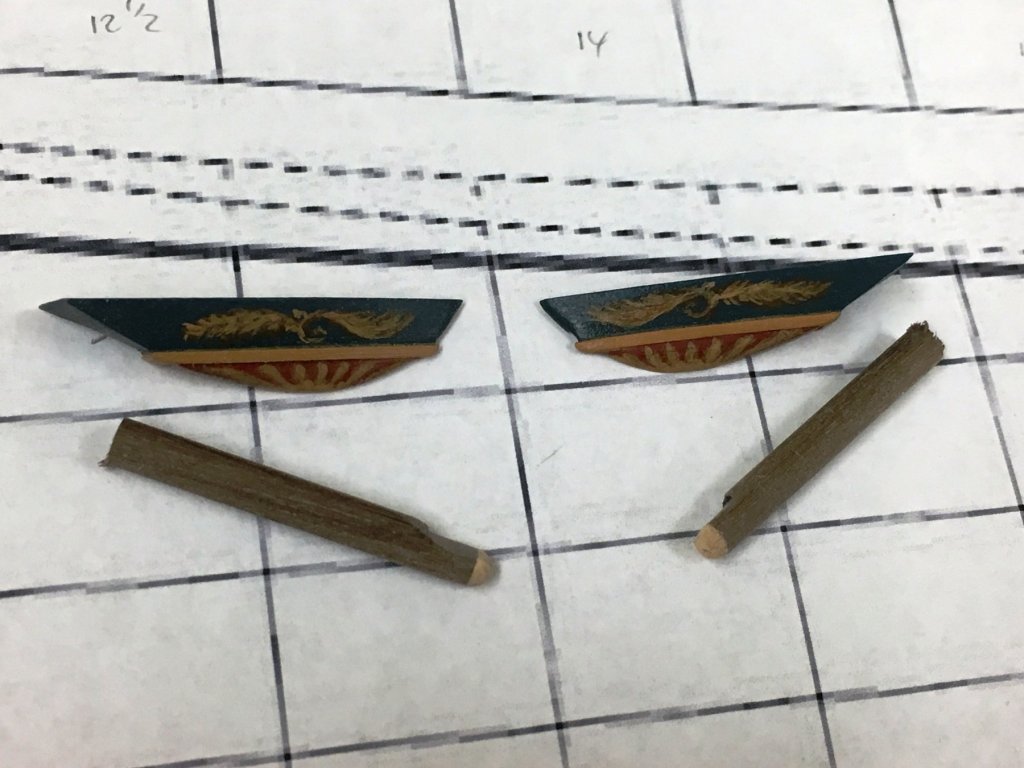
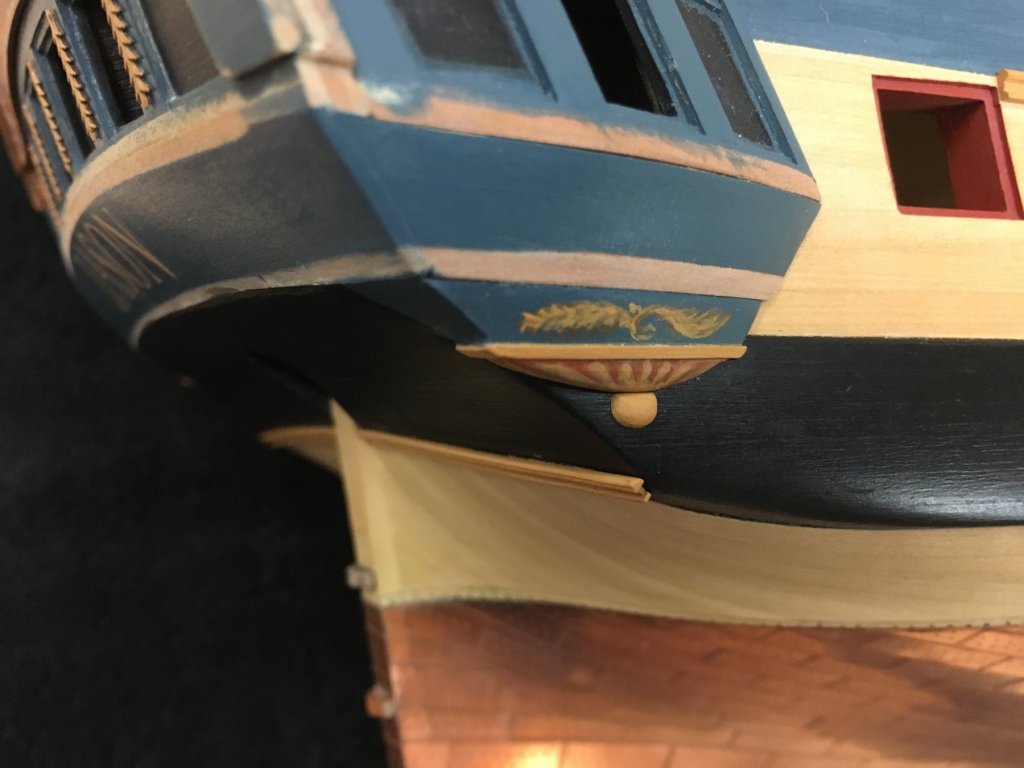
Hi all, trying to get the shipyard going again. Decided to put some additional paint friezes on the lower finishing pieces which are all now glued in place and touched up. Tried to make these a bit subdued, and mirrored a design appearing in one of the moldings at the stem. Also made up what I think is technically the 'drop' proper, or alternatively the "round thing" which I'd been pondering for a while after committing to not to use the kit white metal parts. The technique devised proved to be pretty easy to execute by simply gluing some 2mm think spare stock onto the end of some 4mm dowel. Using that as a guide to shape to be round and domed - these were then soaked in rubbing alcohol to separate again. I'm waiting to glue these on as I suspect they will be too easy to knock off with the other work remaining to do at the stern. Next up, I think I'm in a position to start getting some trim on and find out if there are any issues with the placement of the painted letters...