Beef Wellington
-
Posts
2,249 -
Joined
-
Last visited
Content Type
Profiles
Forums
Gallery
Events
Everything posted by Beef Wellington
-
 Beautiful work Nils as always. Best of the season's wishes to you and yours.
- 692 replies
-
- 5
-

-
- eagle of algier
- chebec
- (and 2 more)
-
Good to see Jim, must be a bit of a weight off your mind. Must ask, what was the structure pre-demolition?
-
Hi Stergios, nice to see an update! I can't quite tell what you are showing in the picture. Are you using wire for the stirrups, looks like rope in bottom picture (?)
-
Looking really nice Rob, waterline looks just right. I'm not sure there's much in it size wise between Diana and the Agamemnon so she should feel a sense of accomplishment. The blue colour looks really nice, what colour is it?
-
Really nice work Lucas, the work on the bow is subtle but definitely noticeable. Good decision on the revised cannons.
-
Bob, BE, Pat, Michael, Carl and the likes, thanks for sticking in there, and the kind words. Joe - Not my idea at all on the channels, its laid out like that in the FFM which I've been referring to. More work but seems a more elegant solution but grounded in reality than the kit solutions of just attaching to the outside face which doesn't quite look right when you have the curves at the ends. One thing I realized I didn't do was to angle the slots according to the expected angle of the chains but hopefully that's not going to be too big a deal. May still have some wiggle room to something there but no need to worry about that yet.
-
Nice updates Bob, such clean work on the masts and rigging. Pleasure to watch and learn.
- 682 replies
-
- 6
-
-
- halifax
- lumberyard
- (and 1 more)
-
Looks great Mark, nice to see some progress again. Looks to be lots of interesting (i.e. challenging) angles at the bow there.
-
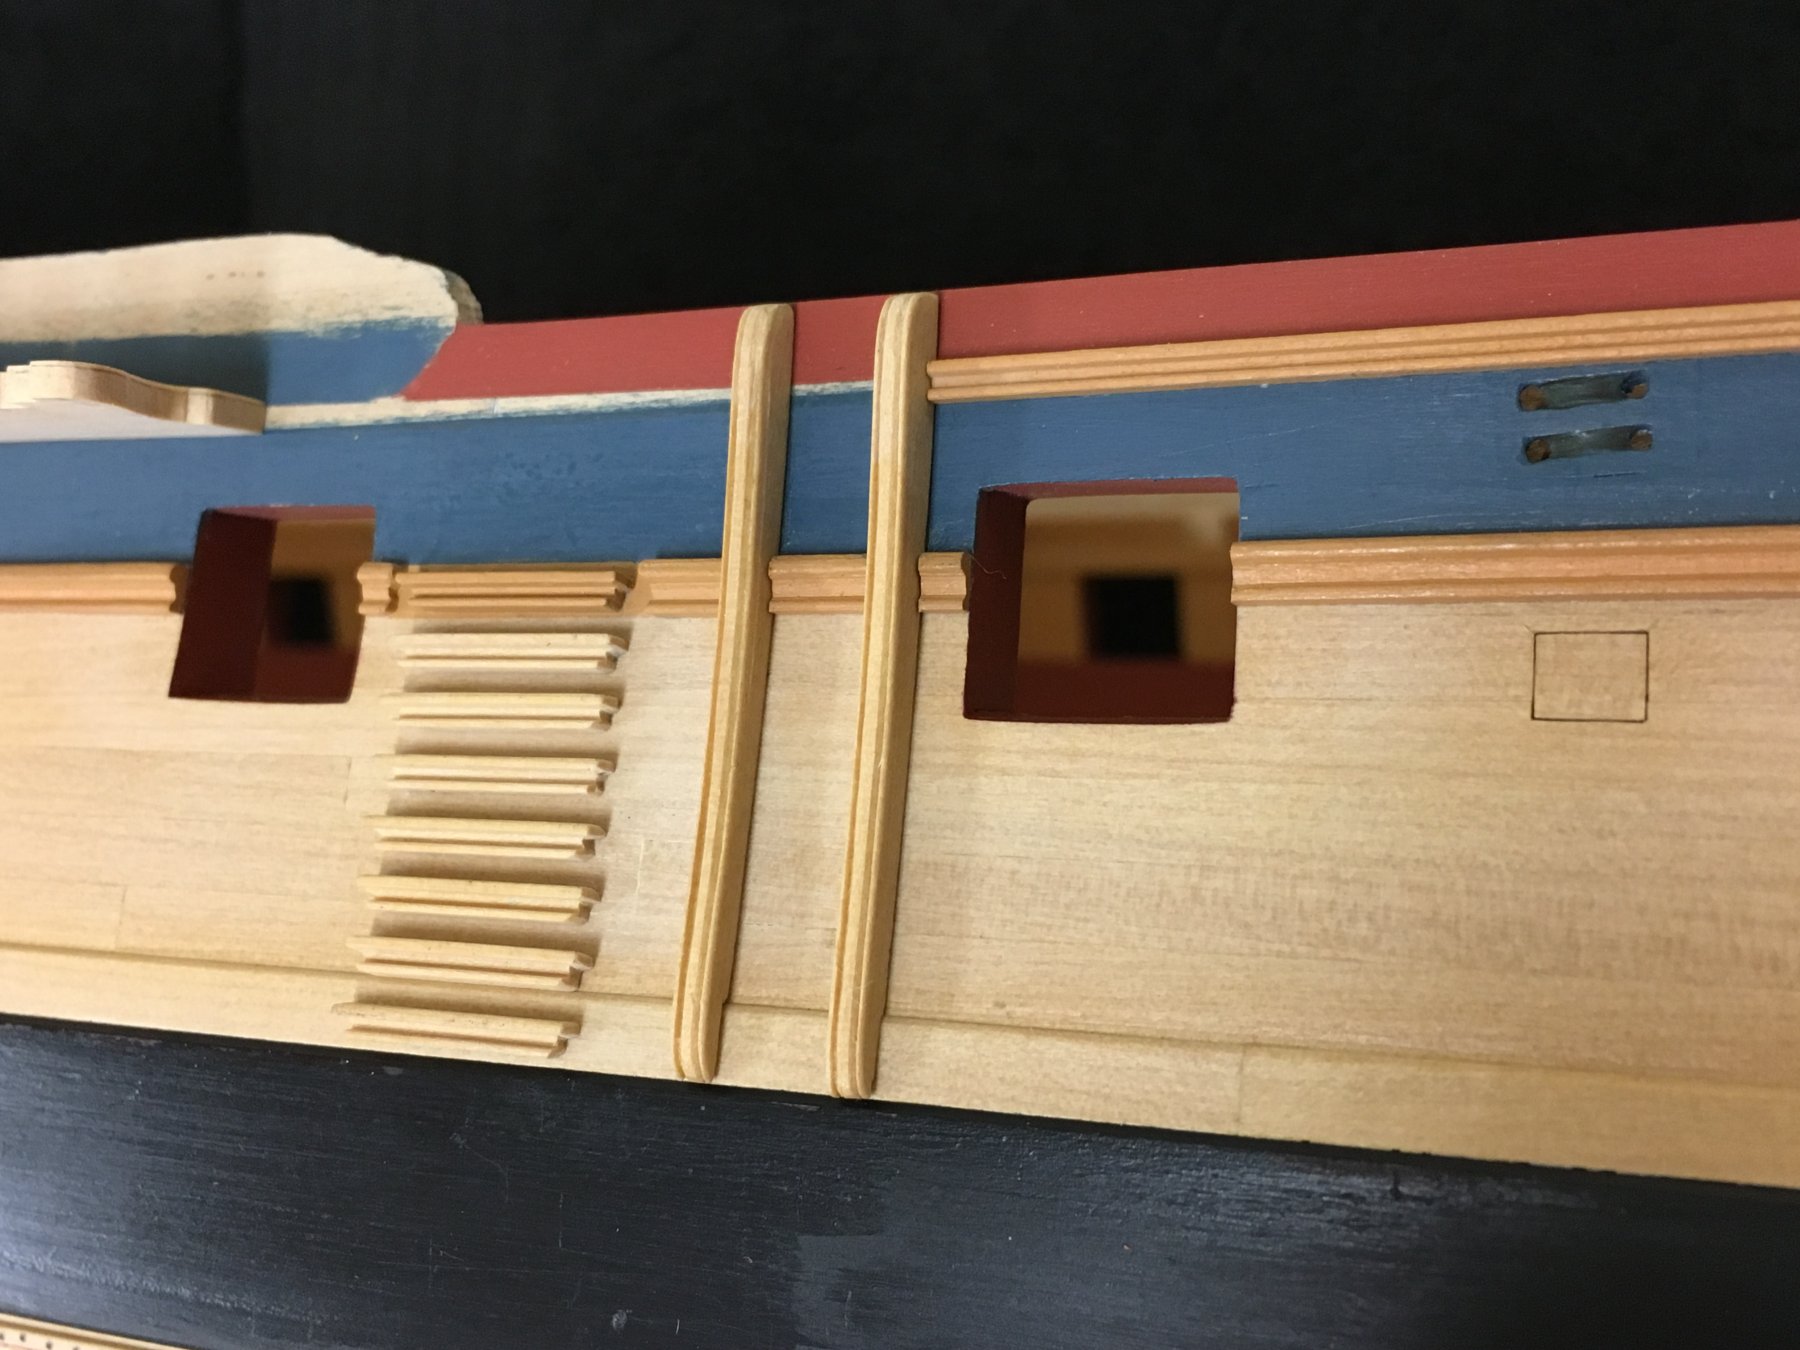
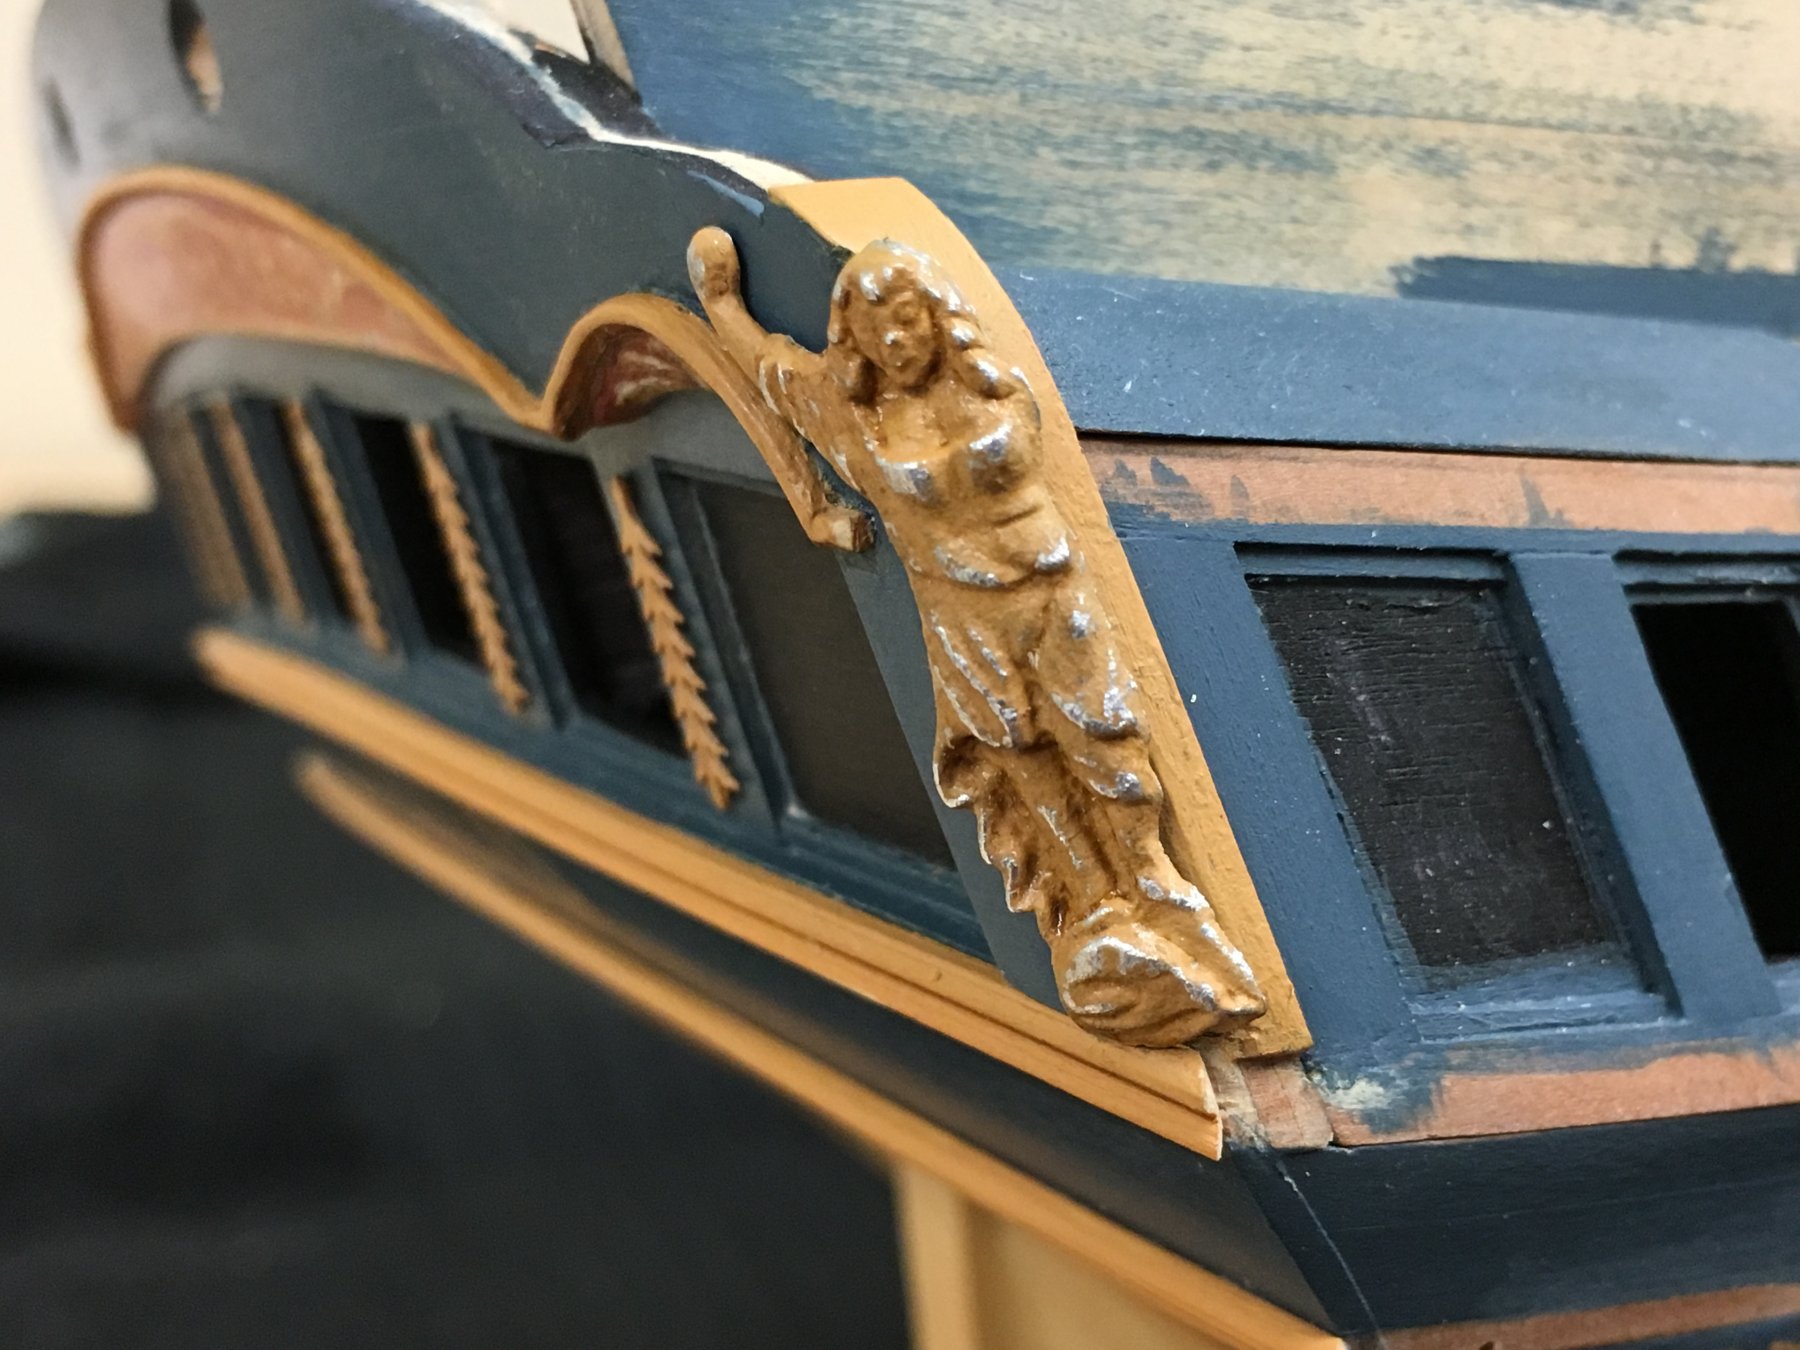
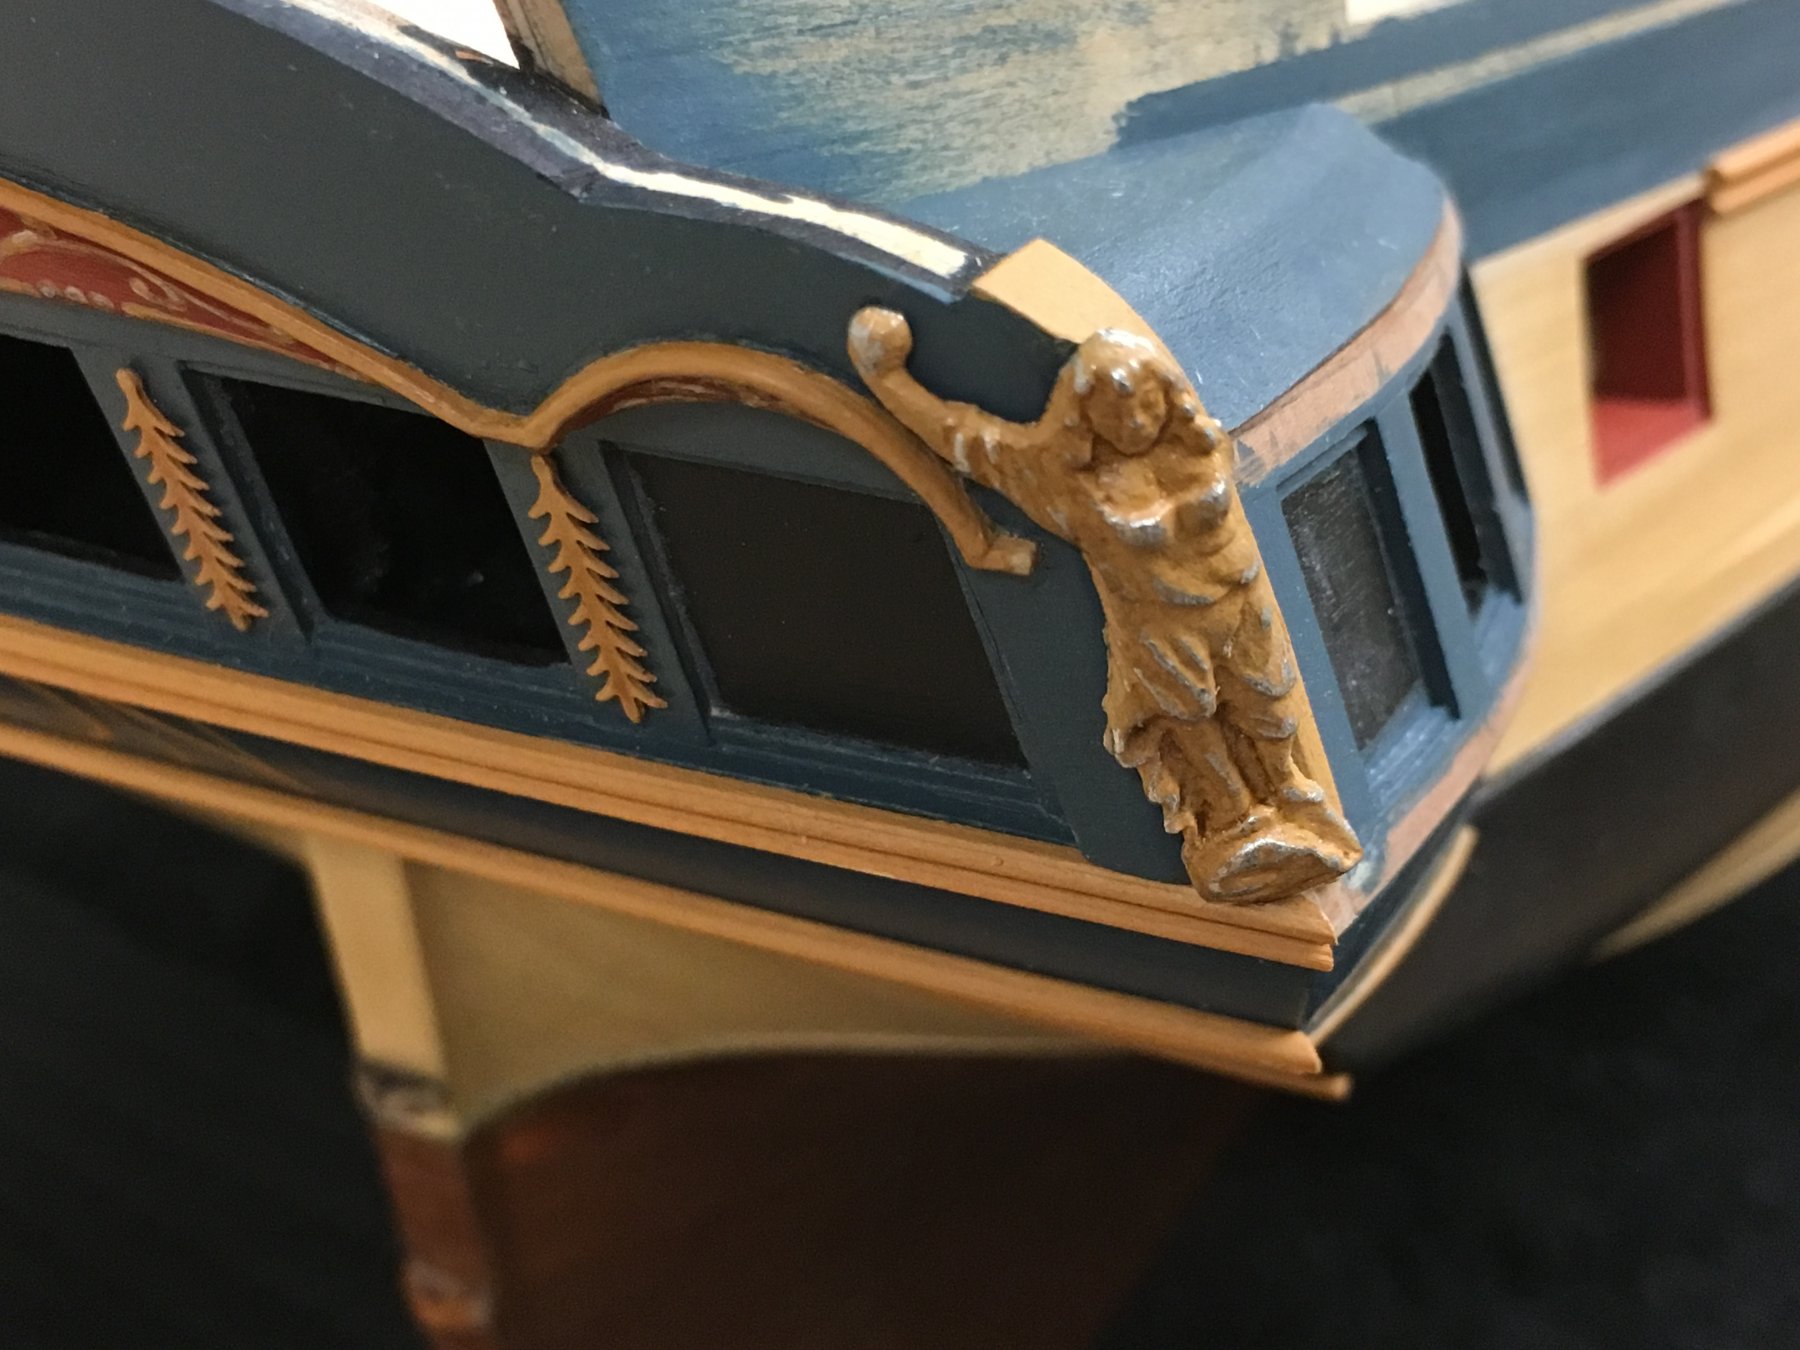
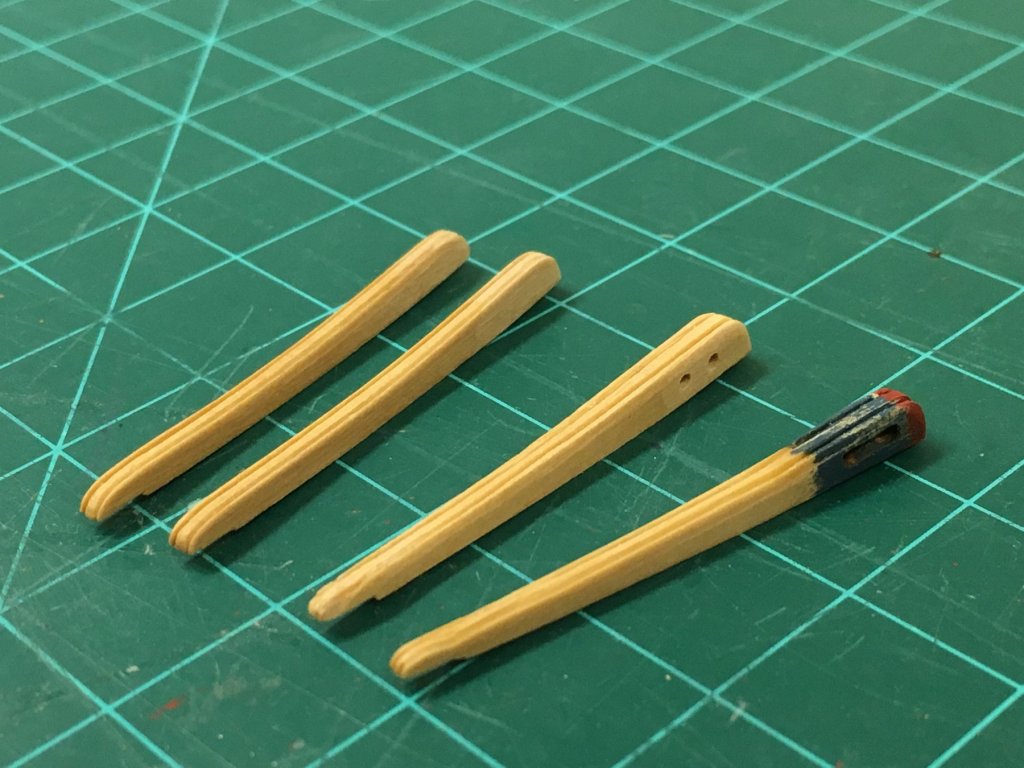
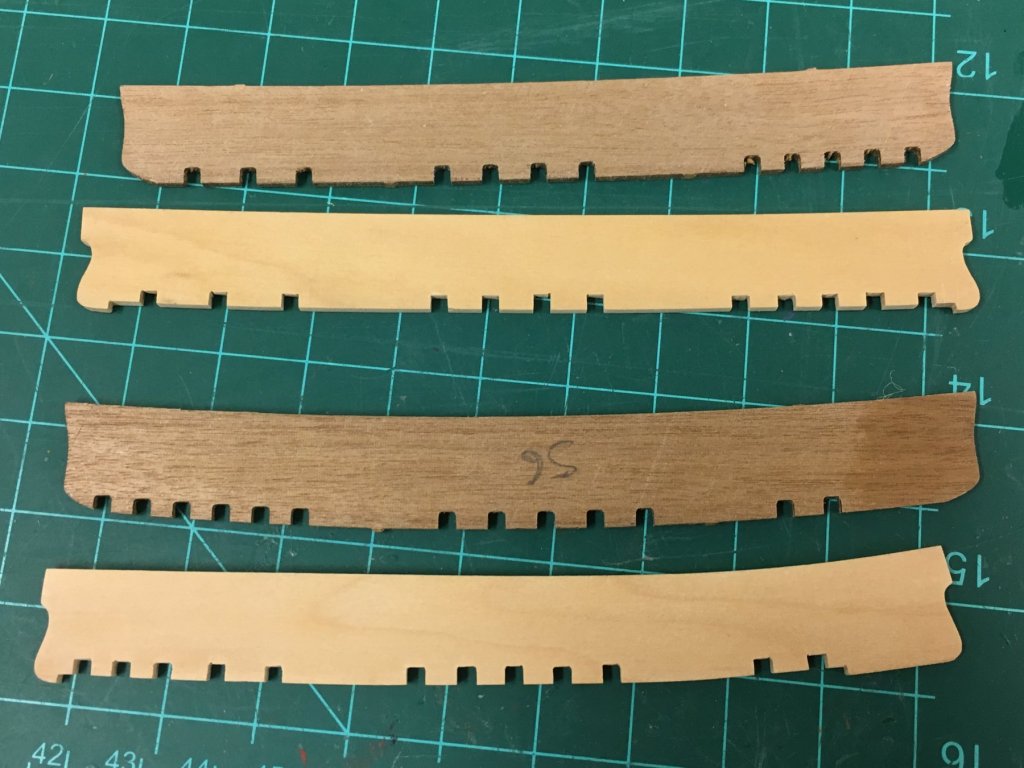
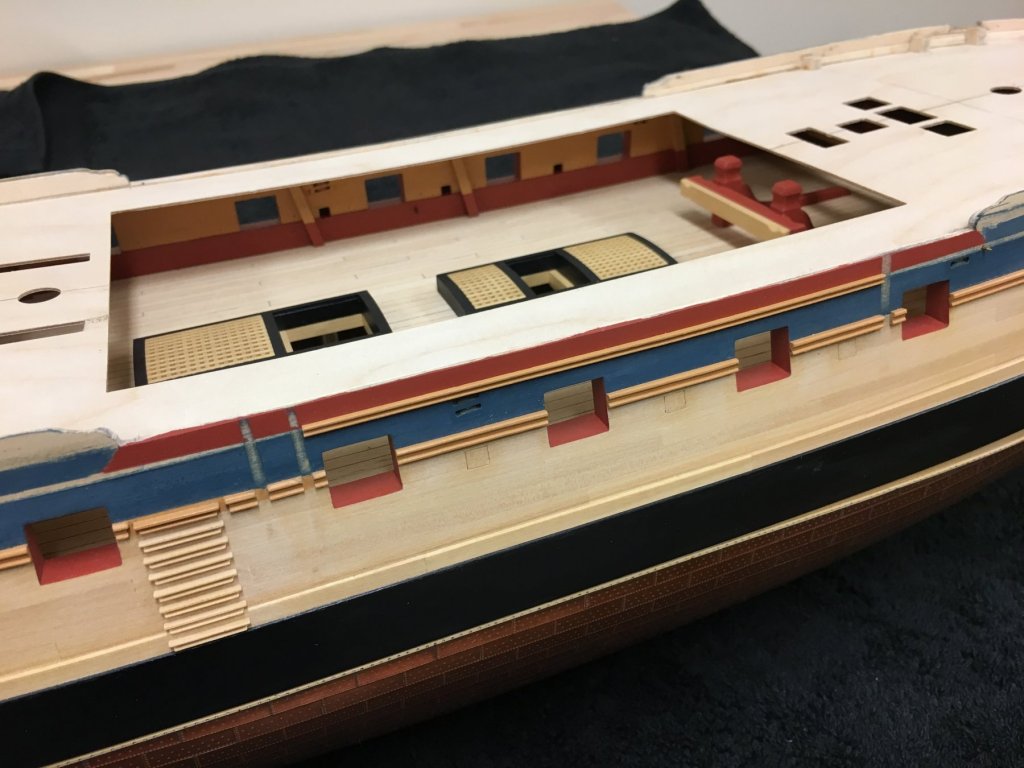
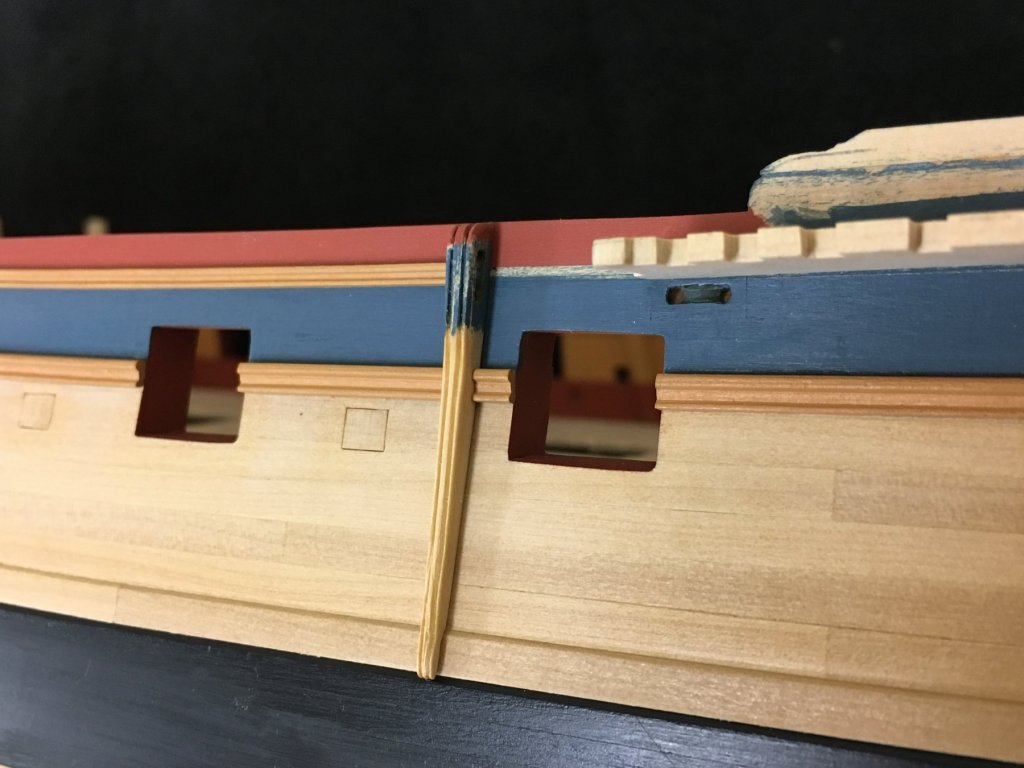
Been a while since posting and felt like I needed to get up to date, and thanks all for the continued interest - and yes Carl, Mobbsie, simply making slightly wider transoms is the solution. Rather tedious which is why my fingers have been distracted as you'll see. I feel like I should start with a "forgive me father its been 700 days since I've looked at the instructions or used a kit part" Haven't been completely idle but have got a decent start on couple of visually small but meaningful tasks that should allow of this to come together relatively quickly when the time comes. Main goal is to get items in place to allow me to give the sides a coat of wipe on poly for protection after gluing items in place but prior to touchup which will definitely be needed. I've decided that my next model will only have one side Chesstree and fenders: These were made up to allow the sheer rail to be positioned and were cut from 3mm and 2mm sheet respectively. The Chesstree has a notable thinning in width as it goes down the hull which I tried to reflect. Felt these looked rather boring when shaped so decided to try and put a profile in these as is so apparent when looking at those on Trincomalee and Victory. These seem to ne features often missing on contemporary models...think I now appreciate why A scraper profile was made for each, the fenders proved much easier to do despite being smaller because of the constant width, the chesstrees much more challenging due to the steady reduction in width. Things are a little messy at the bottom but to the naked eye the defects are much less noticeable and these will not be redone. Chesstree sheaves will be simulated. Photos below also show a slight miscalculation from way back nearly coming back to bite me. The sheaves for the sheets and tacks were placed a little too high and these nearly interfered with positioning the sheer rail. Fore and Main Channels: The channels need to be placed at the same height as the sheer rail, so even though its not necessary to attach these until much later, its necessary know where these will be positioned before the sheer rail can be applied. I've decided to go with natural castello channel rather than painted black finish - the latter would at least have given me the option to use the kit part. Making my own allowed me to follow TFFM styling a little bit which is a bit more curvaceous and pleasing to the eye, it also allowed me to position the slots for the chains to reflect the positions of the gun ports - you can see small but noticeable differences in the comparison below. (Interestingly the kit fore-channel has 6 slots at the rear, where-as the AOTS plans show only 5). Holes to allow the pinning of the channels have been drilled so these just need final attachment. Waist: As previously mentioned, I've been leaving the final position of the upper hull to be tweaked later. To be comfortable that the sheer rail was correctly positioned I needed to trim the waist height back to anticipate the position of the top deck, and allowing for a layer of planking. This was also necessary to finalise the height of the fenders and chesstrees. Quarterpieces: These have been beveled to allow the placement of the figures, and also the quarterpieces were built up slightly to allow me more easily place and but up the top finishing molding for the taffarel when I get there. The figures with bent arms sit quite pleasingly now and there is a definite sense of depth rather than just plain bas-relief. Obviously lots of fine finishing and touch up still needed....curse you macro gods!


-
Mark, been a while since I've been able to appreciate your work, just outstanding results, love the overall shots. Really well done.
-
Looking really good Rob, you'll be overtaking me soon. Ah the coppering, best of luck and patience! I had always thought for some reason that the lower counter ports would have been used as an access point for hawsers if there was a need to run an anchor astern or access to rudder head- these would have opened up into the gunroom (wardroom on a frigate) and the shape of the hull would make mounting a cannon impractical. I'm not sure how these hawsers would have been secured though. There are also concealed gun ports in the stern fascia of the great cabin if you look closely which could have been used when cleared for action and the lights removed.
-
Looking great Hennie, still can't believe you did all this work without damaging the upper works, well done indeed, you must have a very delicate touch :-)
- 192 replies
-
- 5
-
-
- sovereign of the seas
- sergal
- (and 1 more)
-
Hi, know very little about the subject matter so have been following but not commenting. Good to see things have worked out as well as they have, well done! You were certainly brave to tackle the bow the way that you did. Now that I've seen what you had been intending, I wonder gluing the grey hawse hole pieces into the 'extended bow' position initially would have made the alignment of the bow extension pieces to be a little easier? - of course theses would need a filling piece at rear in that case.
- 2,699 replies
-
- 3
-
-
- heller
- soleil royal
- (and 9 more)
-
Beautiful results as to be expected, really nice to see the side by side comparison.
- 91 replies
-
- 2
-
-
- 18th century longboat
- model shipways
- (and 1 more)
-
Really nice Jim, once again I love the atmosphere. Your Borei made me shiver I also didn't get a chance to comment on your minseweepers in the Forth, the skyline looks very familiar - used to spend quite a bit of time running up and down the firth in the more recent (but defunct) River class minesweepers (Spey and Helmsdale) but still have the views of Berwick Law and Bass Rock etched into my brain. Also had the opportunity to live for a time in Seattle in the Pac Northwest - you really captured the spirit of the place which has such beautiful scenery,and yes, you are right to put orca's in as they show themselves not infrequently. (@ Nils if you're reading this, the mountain range in the background are the Cascades, not the Rockies which are further inland)
-
Such beautiful work.
-
Swan class 3D model in progress
Beef Wellington replied to dvm27's topic in CAD and 3D Modelling/Drafting Plans with Software
Just amazing - I think it would have been amusing to not reveal that this was actually a CGI build and see the comments of incredulity on the 'build'.- 141 replies
-
- 6
-
-
- pof swan series
- swan
- (and 1 more)
-
The ship is looking really nice on the stand Nils. Looking at the lines, did you find the planking more straightforward on this hull shape? The planks look to lie very nicely along the hull lines.
- 692 replies
-
- 5
-
-
- eagle of algier
- chebec
- (and 2 more)
-
Hope to see some more progress Don, really nice start you have here.
-
All could be correct as it would have come down to which division the Admiral belonged to, or on independent command under Admiralty orders, the red ensign. Remember though to use the correct union flag in the canton, without cross of St Patrick before 1801, and with after. So pick your date and takes your choice 🙂
-
I think it fits vey nicely Christian, nice precise work - now you can truly go places!
-
Looking mighty fine Bob. The stern lanterns turned out great despite your challenges. I really appreciate you showing your pictures of the anchor serving, it turned out well. I had tried to do this on already rounded wire and found it pretty impossible - I hadn't considered doing it before and then bending, an approach I'll steal if you don't mind.
-
Really nice work on the rigging, the footropes came out great. Nice technique!
- 652 replies
-
- 1
-
-
- royal william
- euromodel
- (and 1 more)
-
Hi Dafi, I don't remember you saying how you were ultimately going to be 'finishing' the overall model. Are you going to leave some part of the decks open, or will the live action scenes be lost to photographic record? Looking awesome, but that goes without saying :-)
-
Hi Pat, the issue doesn't impact the axles as they work just fine, it only impacts the width of the interior dimension between the carriage walls - the impact being the provided part for at the front of the carriage (no idea what its called) is then too small. If you look at the 3rd photo you can see how it is too small. No big issue to make my own when I get there. I'm just glad I saw it, because if I had mixed up all of the carriage walls, I would probably have mixed the different thicknesses and I think it would not have been noticeable until all of them were glued up. At least I can now ensure the sides match to minimize and discrepancies.