Beef Wellington
-
Posts
2,249 -
Joined
-
Last visited
Content Type
Profiles
Forums
Gallery
Events
Everything posted by Beef Wellington
-
 David, wlecome to the ever growing Diana/Artois club! Great stat to your planking, those treenails looks very nice. This is definitely a challenging, but fun and rewarding kit to grapple with. I'm sure you've already looked at many of the build logs which highlight some of the unique challenges. You cannot think too far ahead with this build, especially if you plan to make modifications! You already point out probably one of the biggest initial challenges which is the astern alignment, so expect to have to make some adjustments there. Establishing the position and alignment of the quarter galleries based on the run of the upper/gun deck will allow you to then establish the placement of the stern fascia.
 -
Hi Andy, that looks frustrating. It seems to be that the kit curt part did not adequately account for the curvature of the hull. The good part is when you make your own parts, there are never mistakes....not 🙂
-
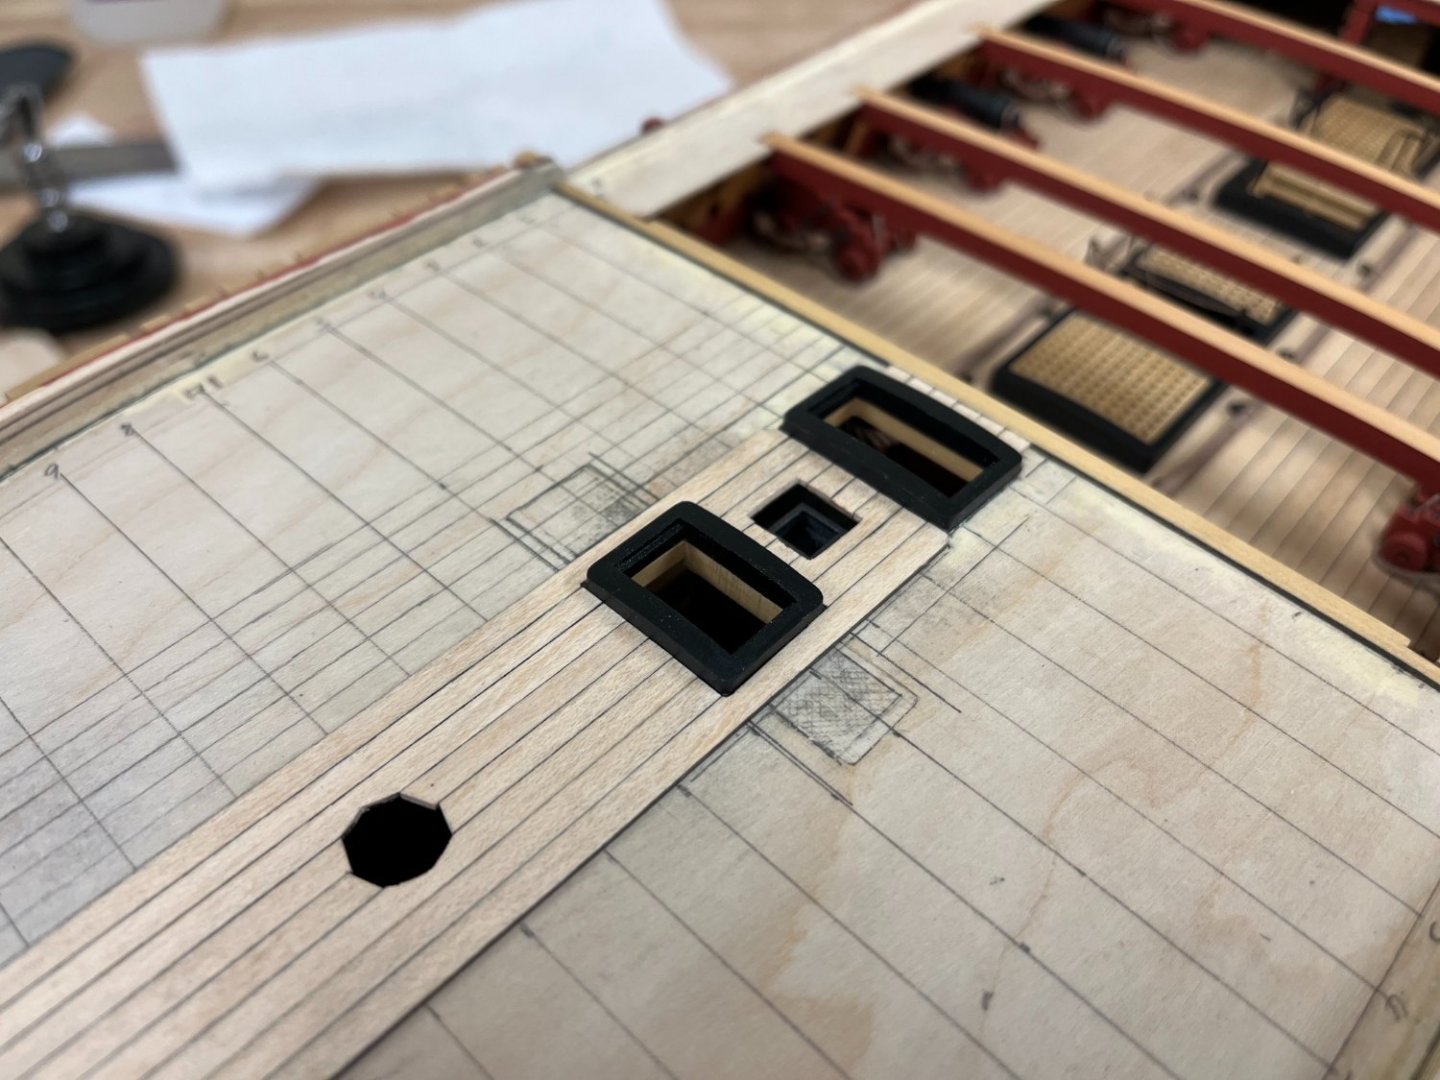
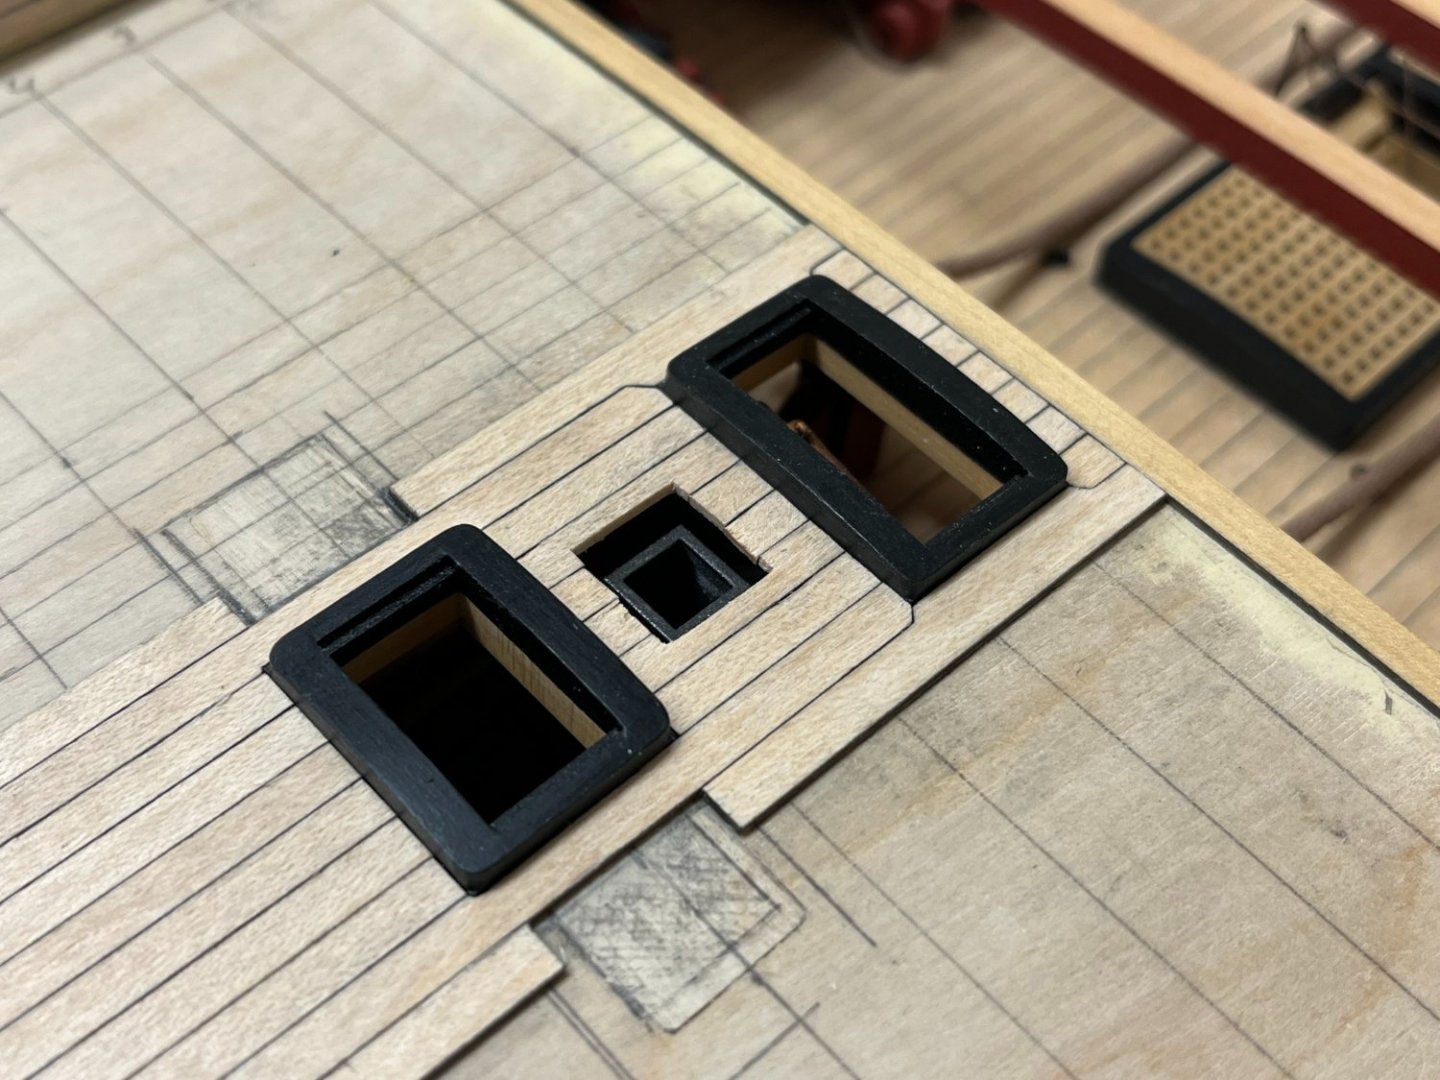
Hi David, Just jumping in before you commit re: the top tackle scuttle and pump scuttles. I'm of the opinion that the AOTS is simply wrong, and suspect that Chris's kit plans/instructions follow that. The plan below of the upper deck (of 'Jason' in this case, but likely consistent across the class) clearly shows the scuttles without any coaming, and I don't think there is any reason to suspect that the approach to these would change over time. Practically, these would be used infrequently, offer little in the way of light or other benefit of having permanent coamings and gratings...and likely be hazardous if anything other than flush, especially around the main mast and railing. They also do not appear built up on any of the Artois or other contemporaneous NMM models. All that being said, they do offer some nice visual interest so will look great whichever way you go. Good luck with the tapered planking, definitely time consuming but well worth the effort in retrospect. Looks like you've made a good start. Cheers Jason
- 310 replies
-
- 1
-

-
- Diana
- Caldercraft
- (and 1 more)
-
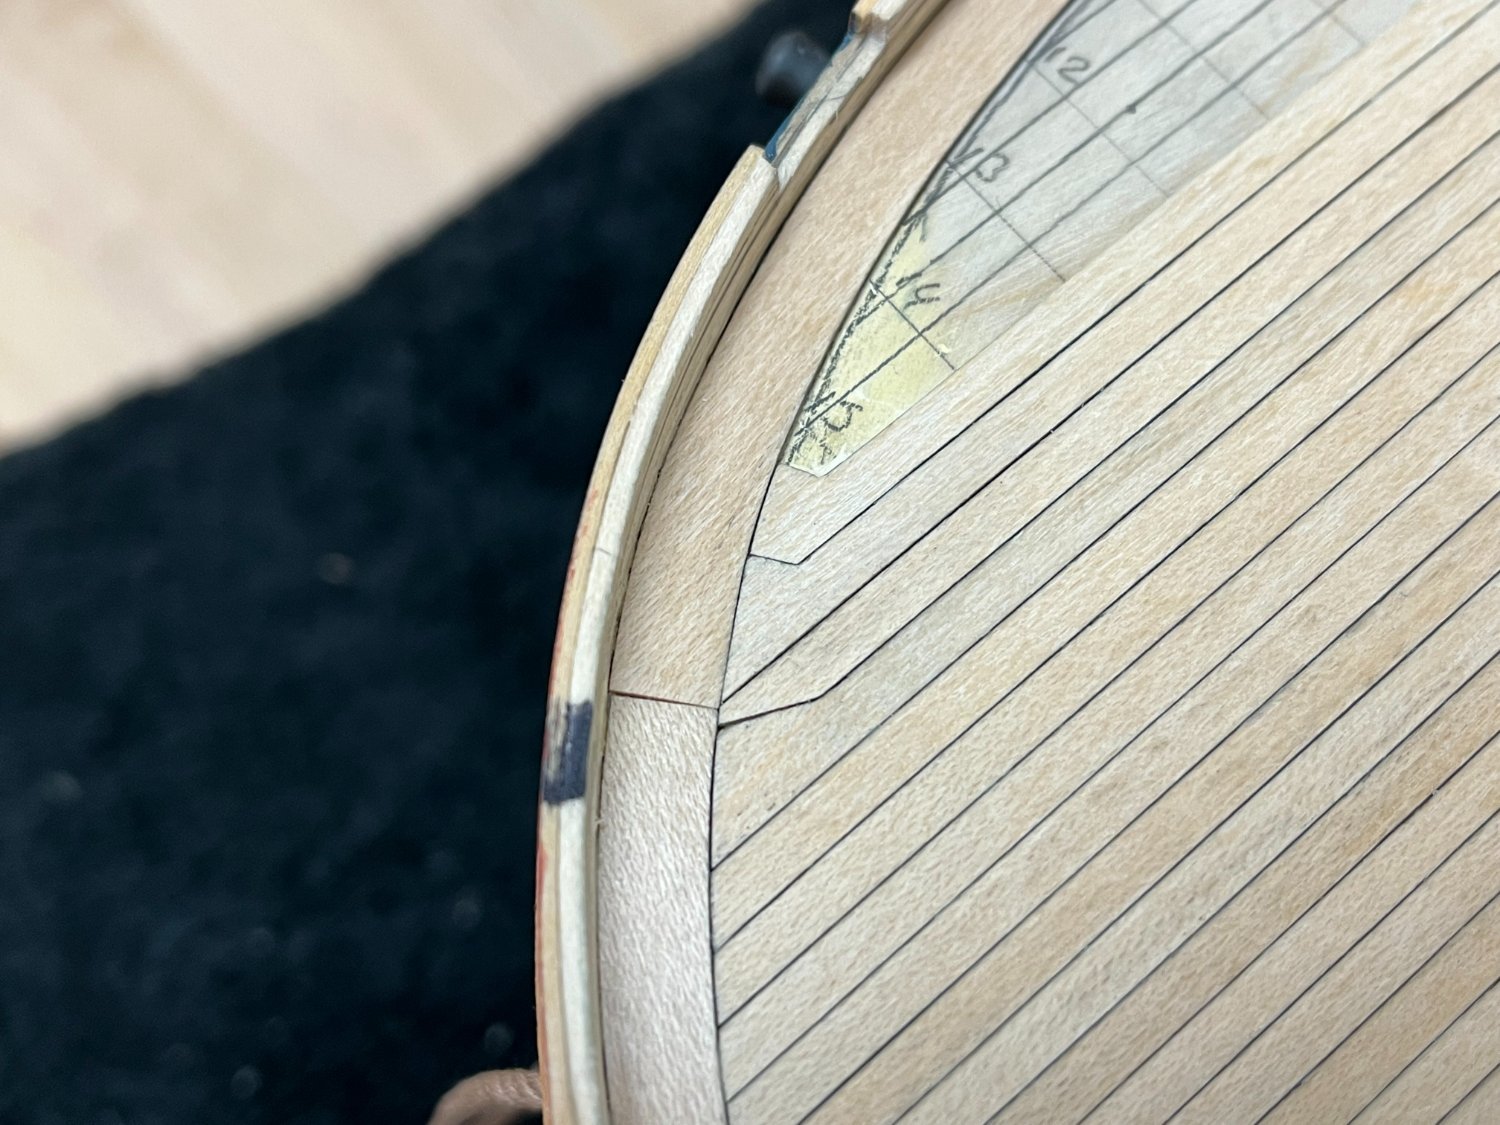
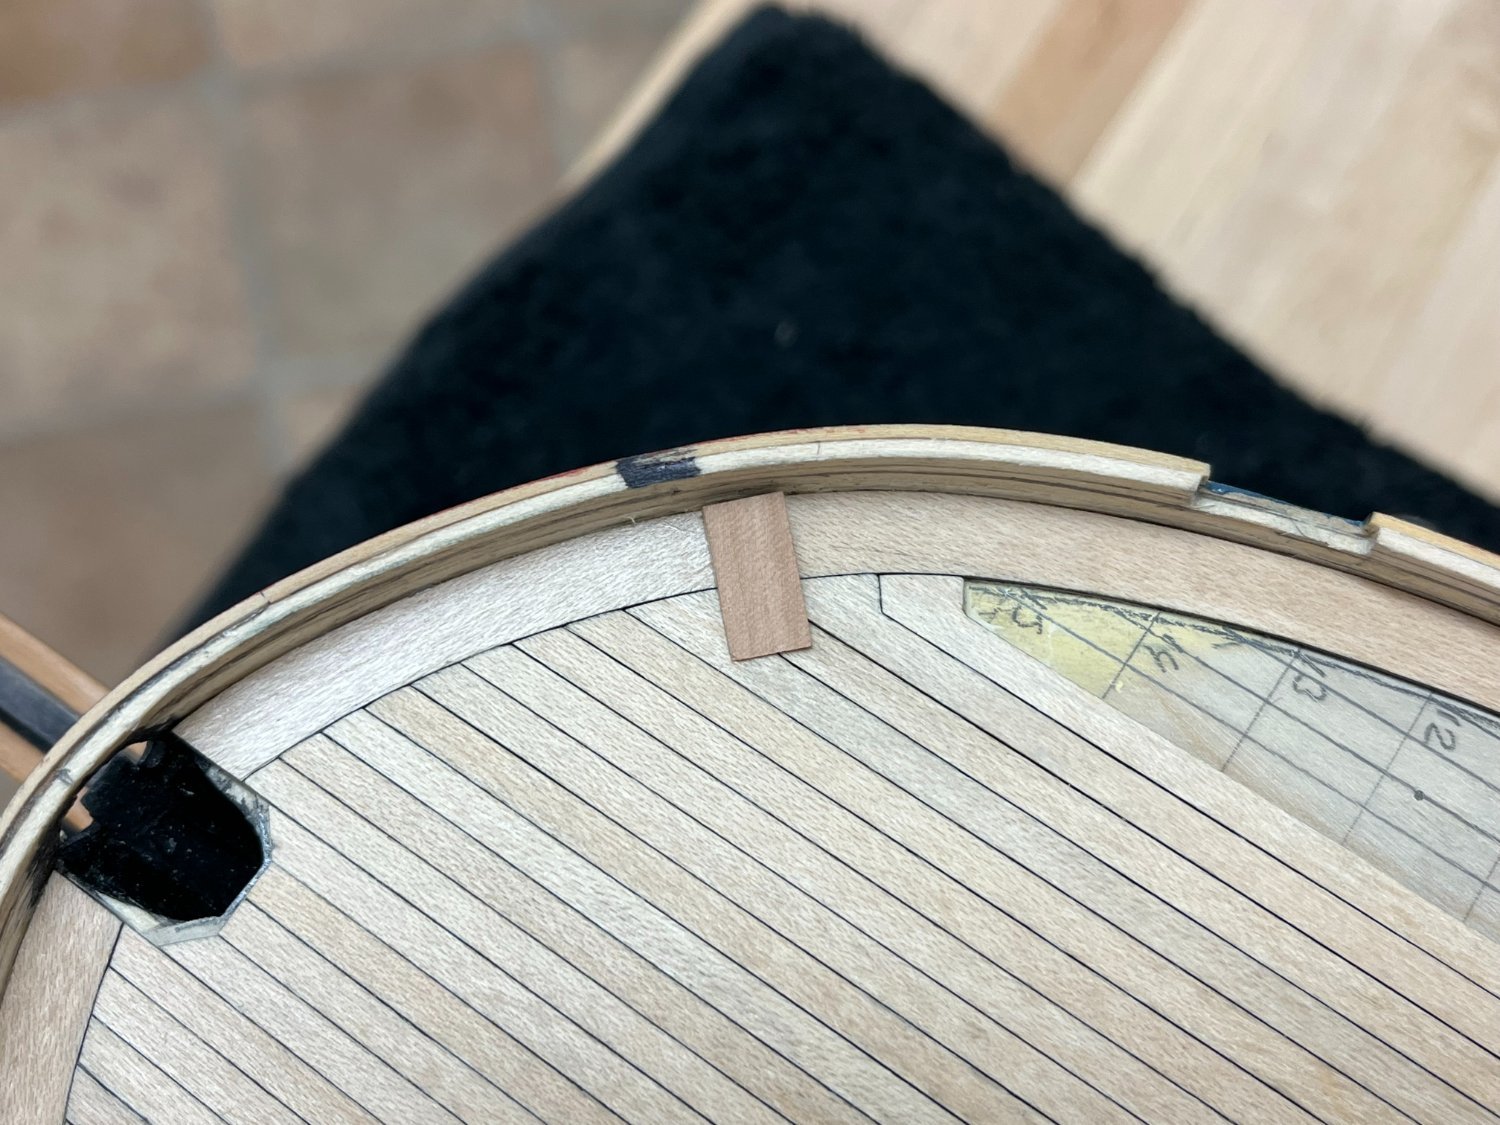
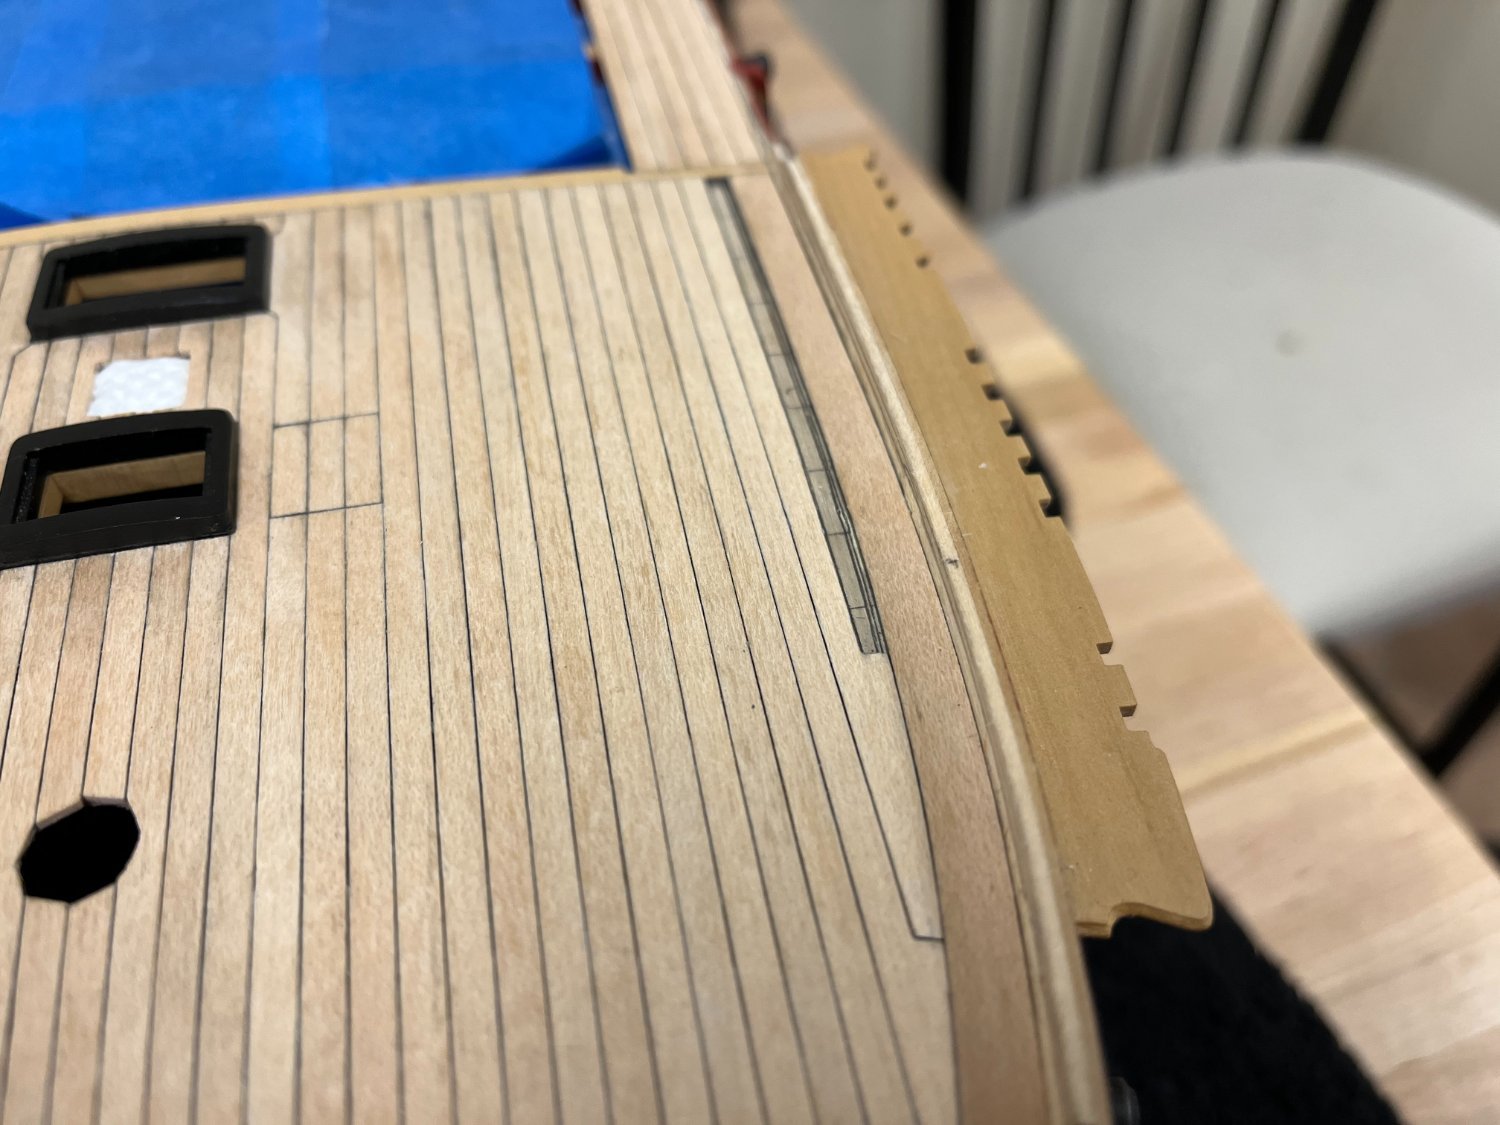
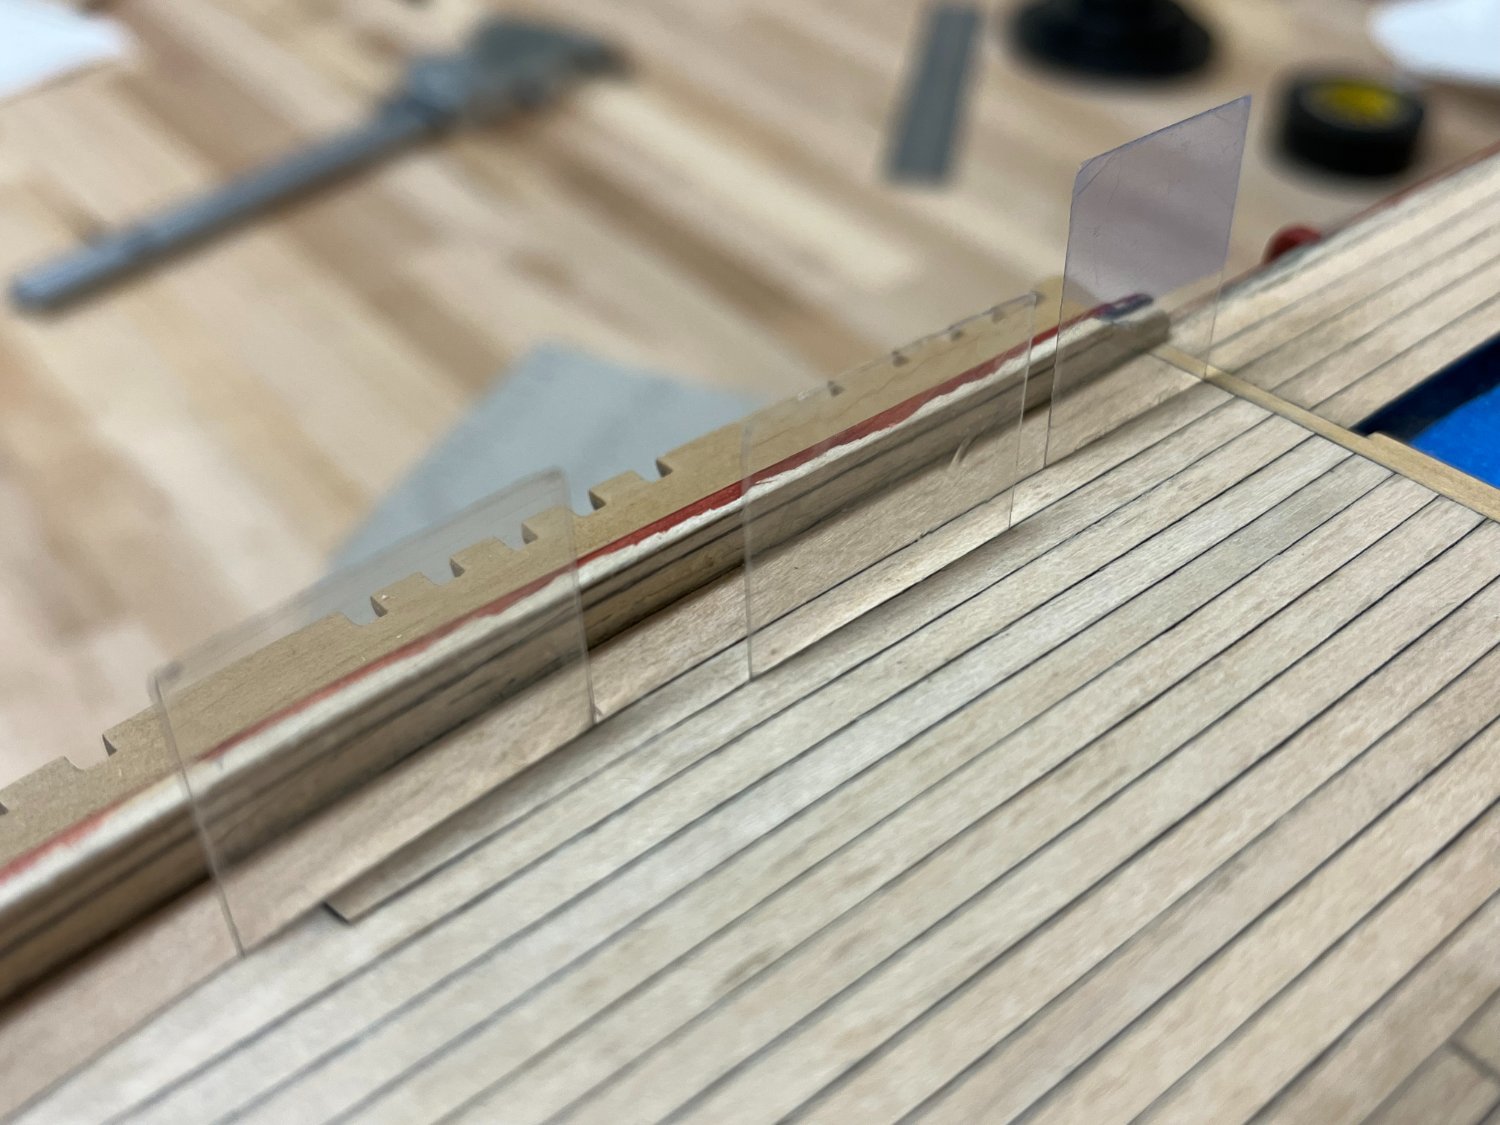
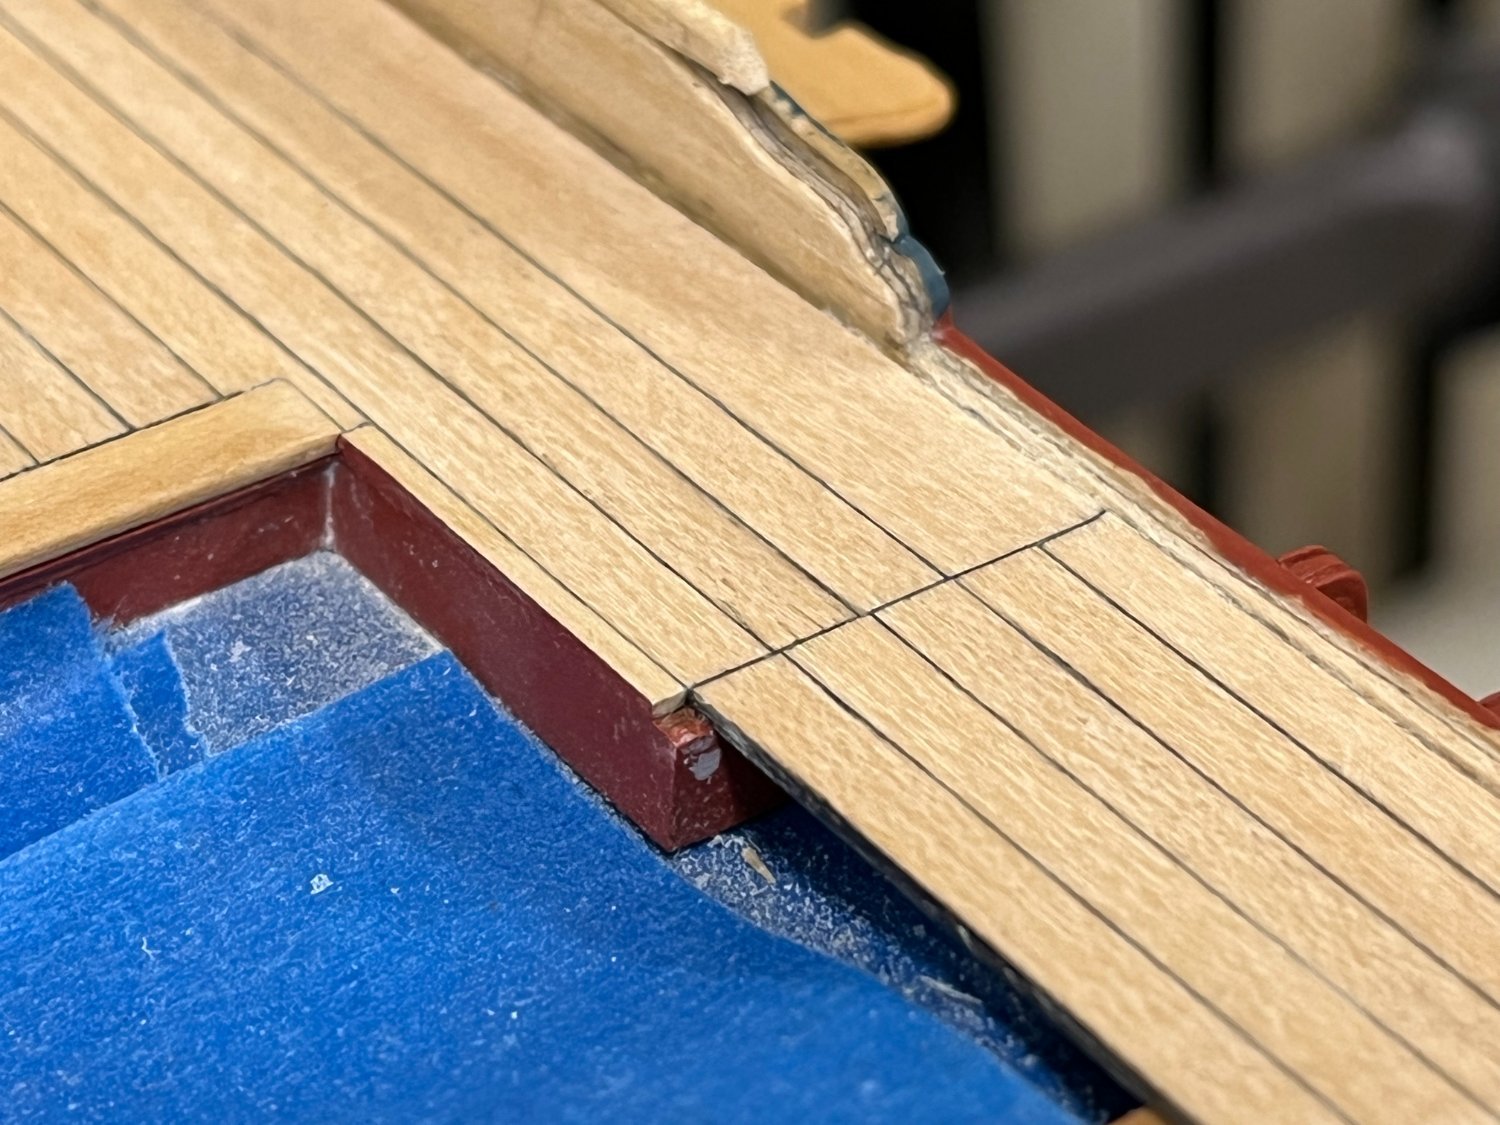
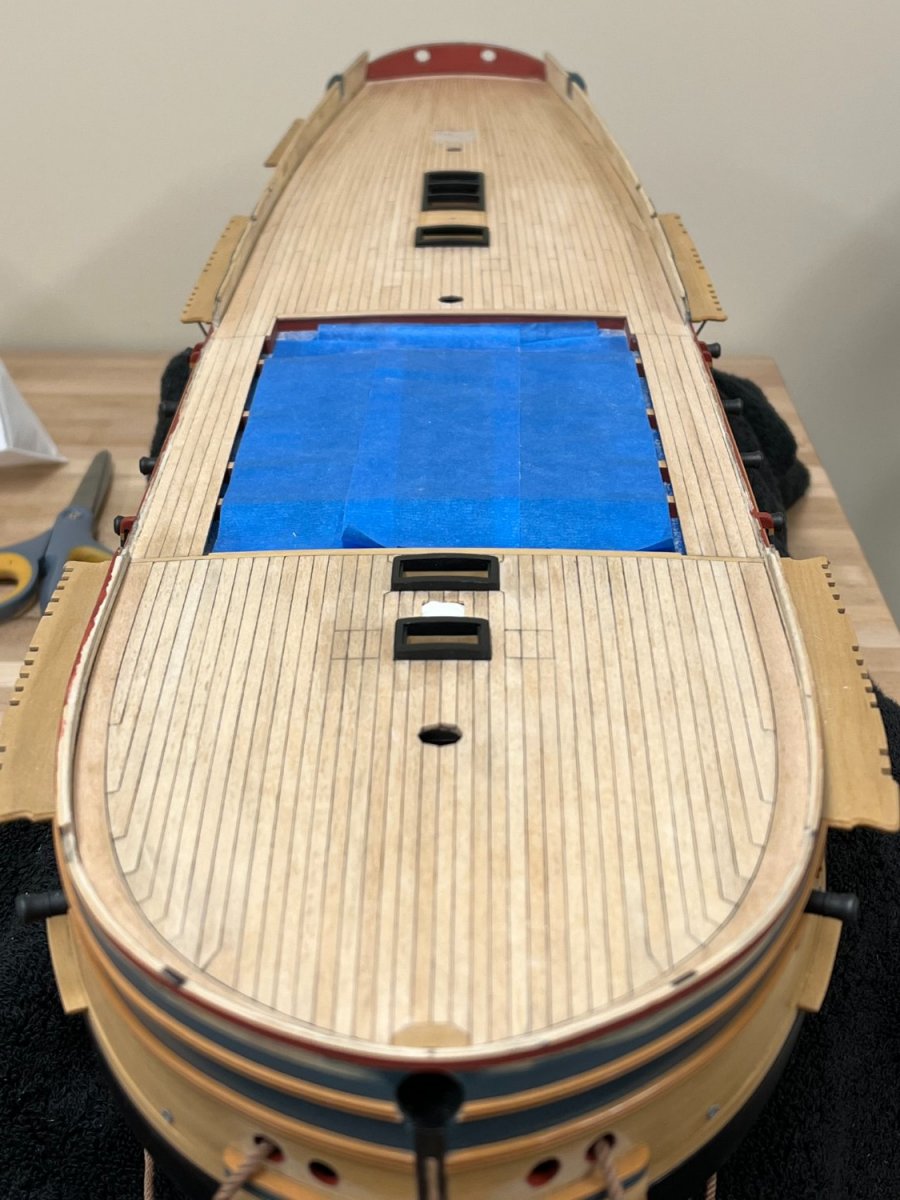
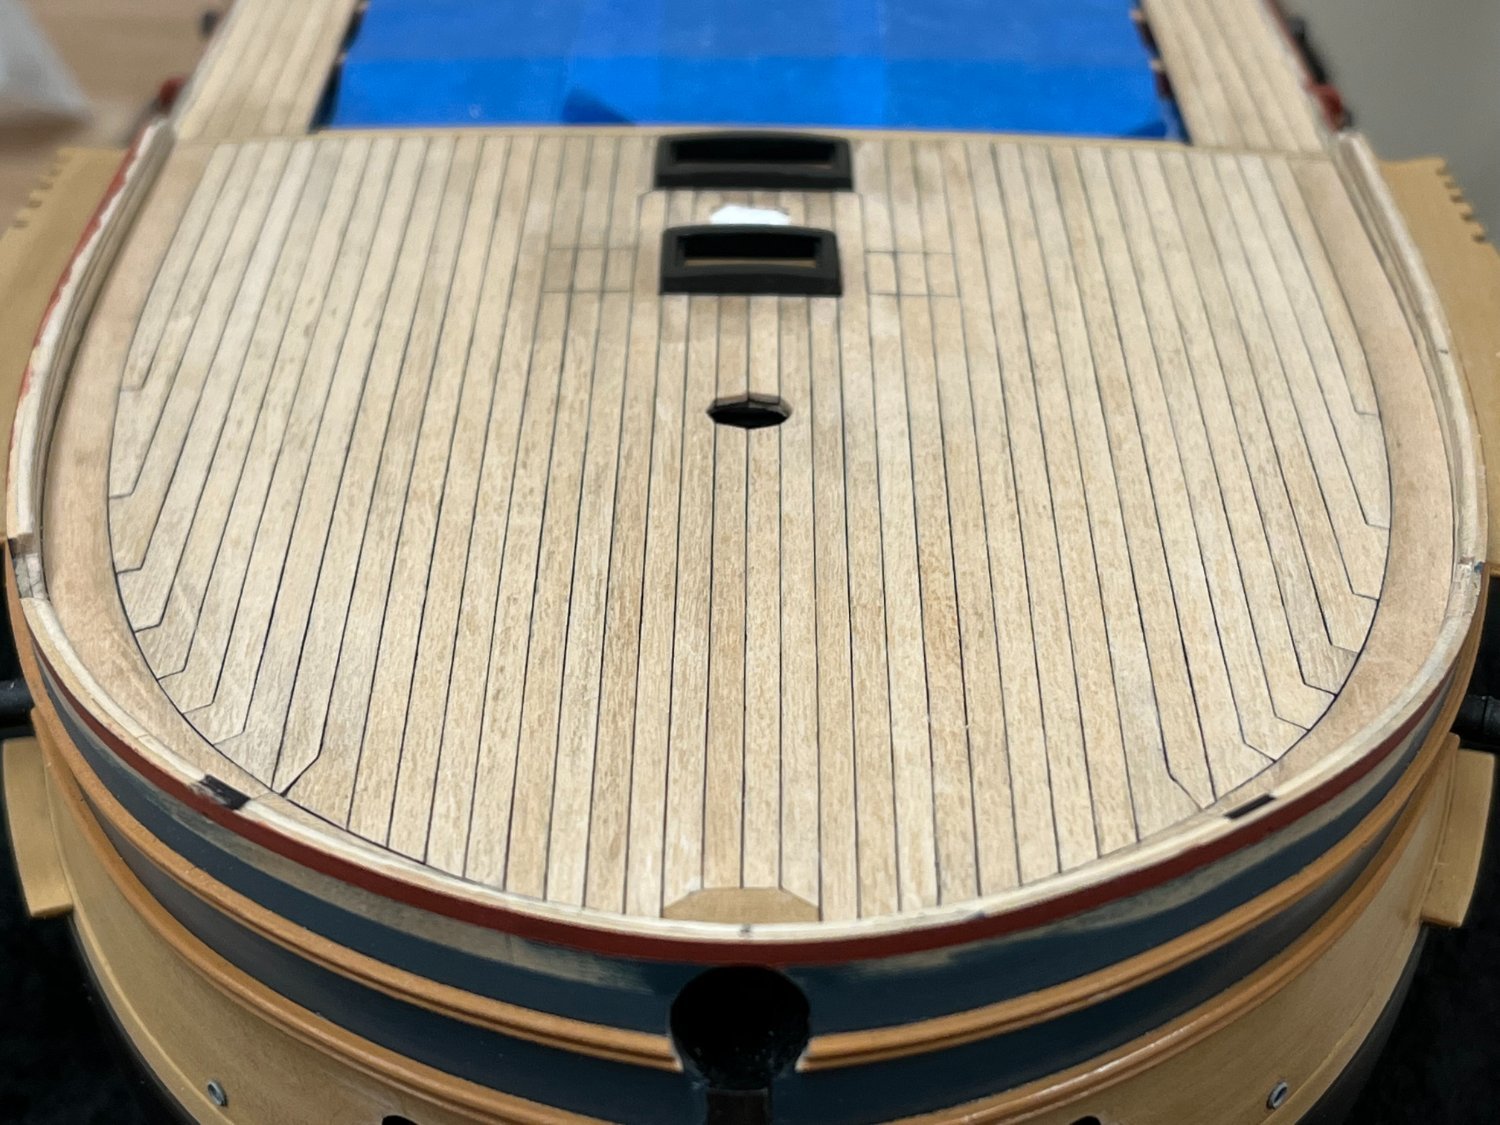
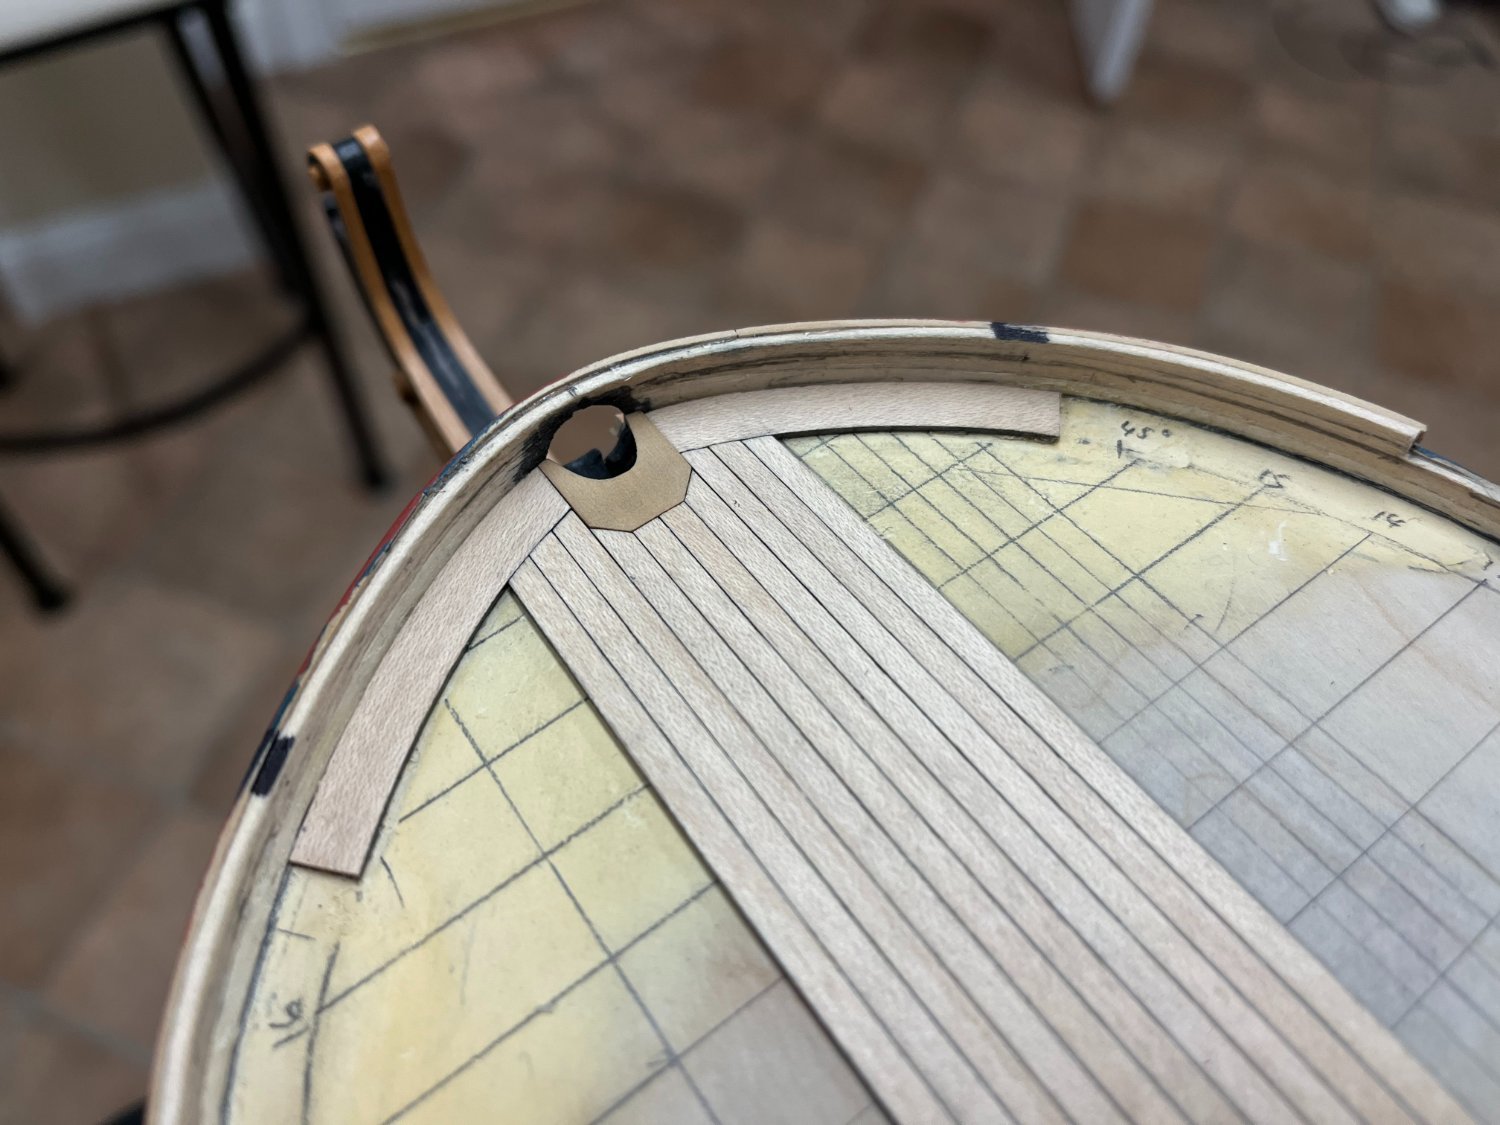
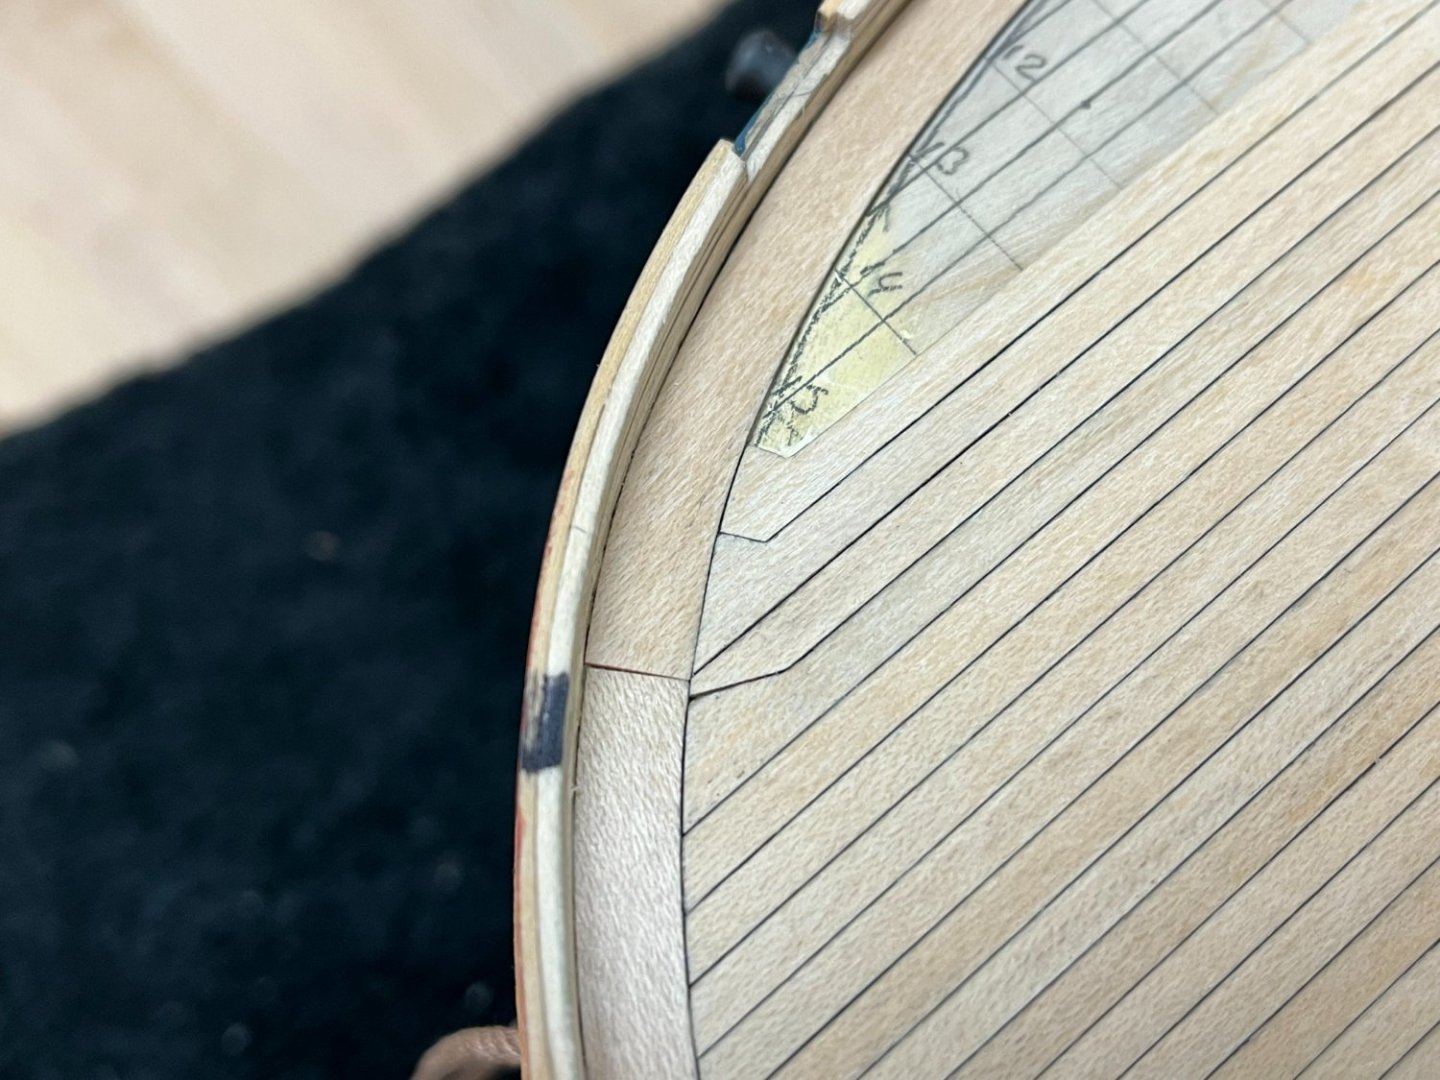
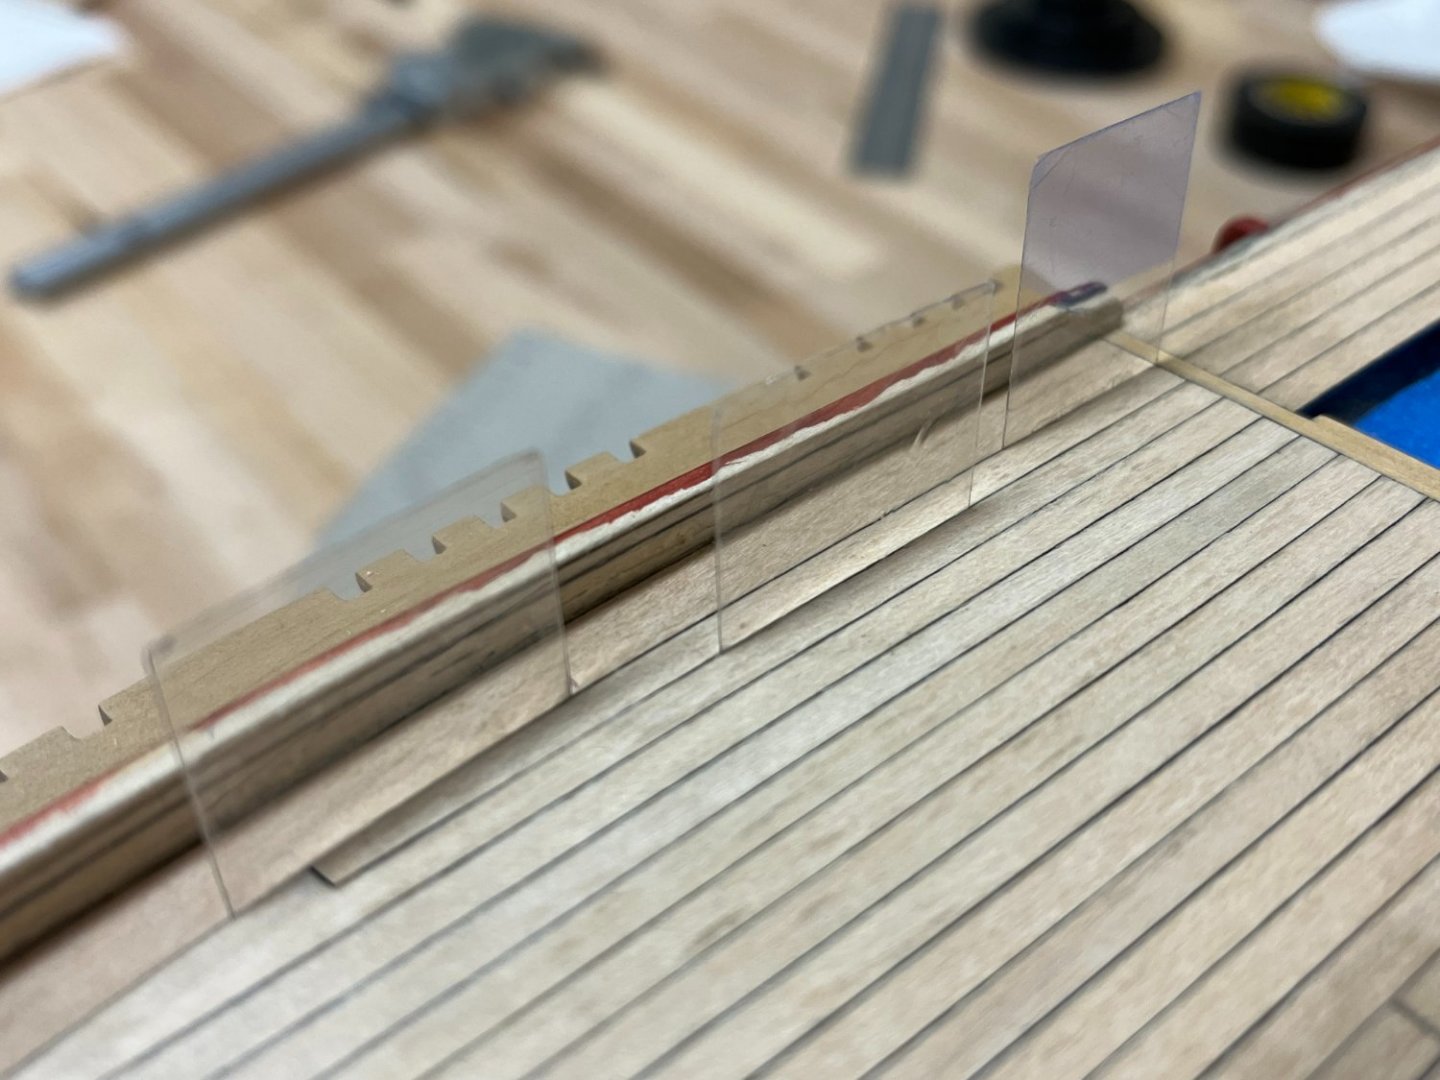
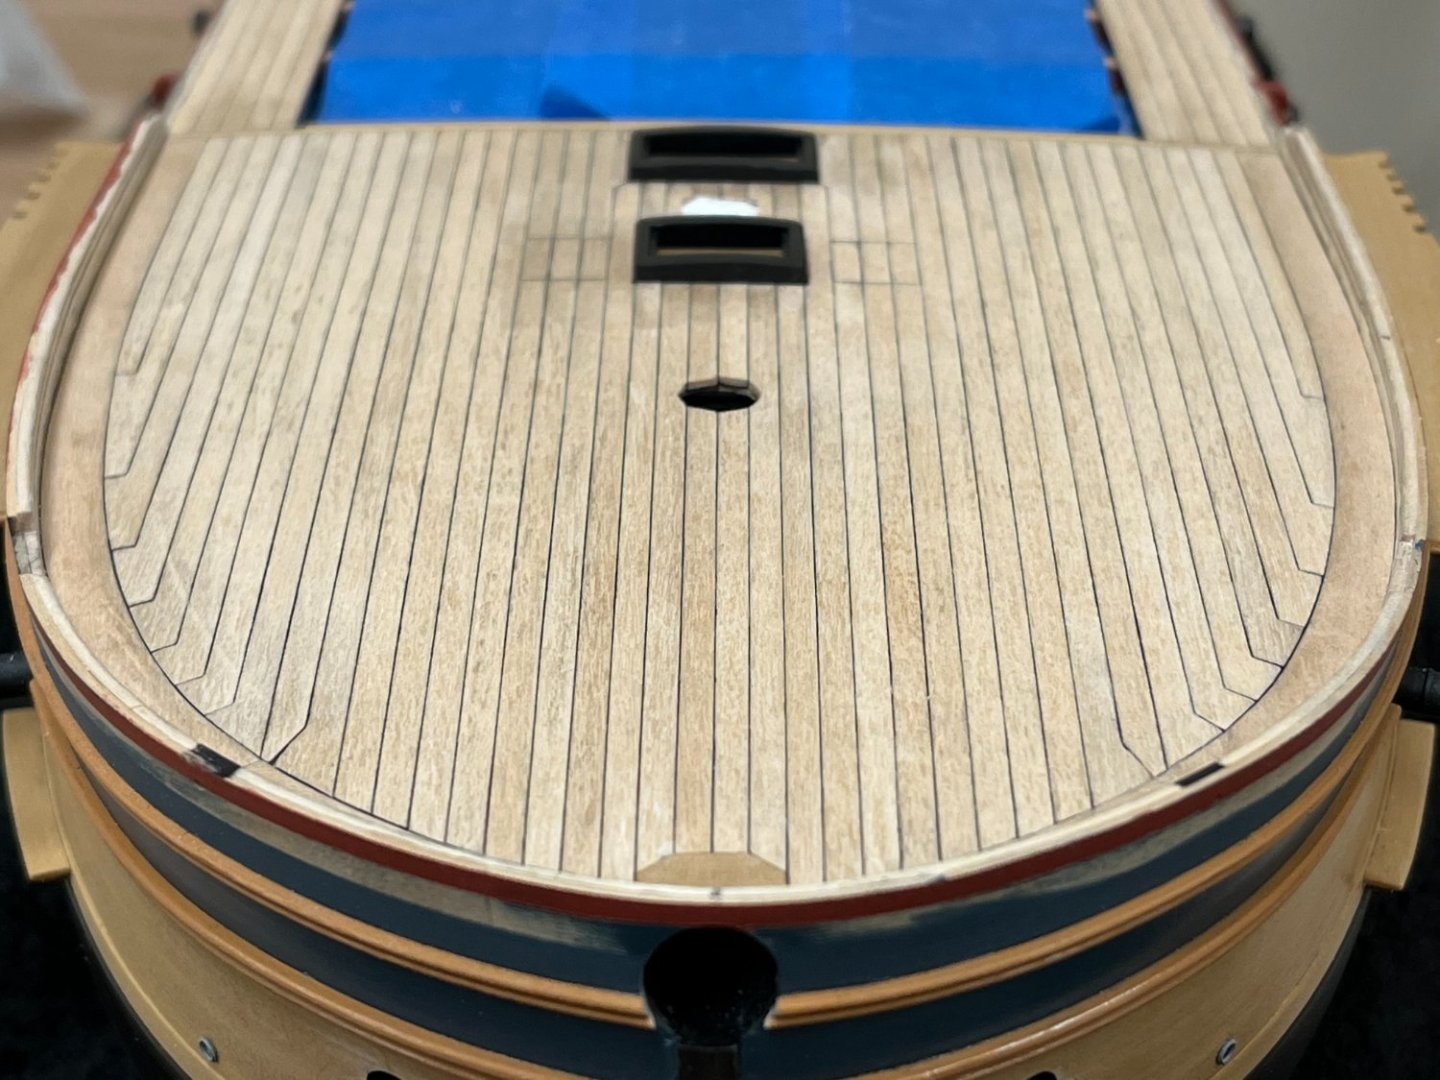
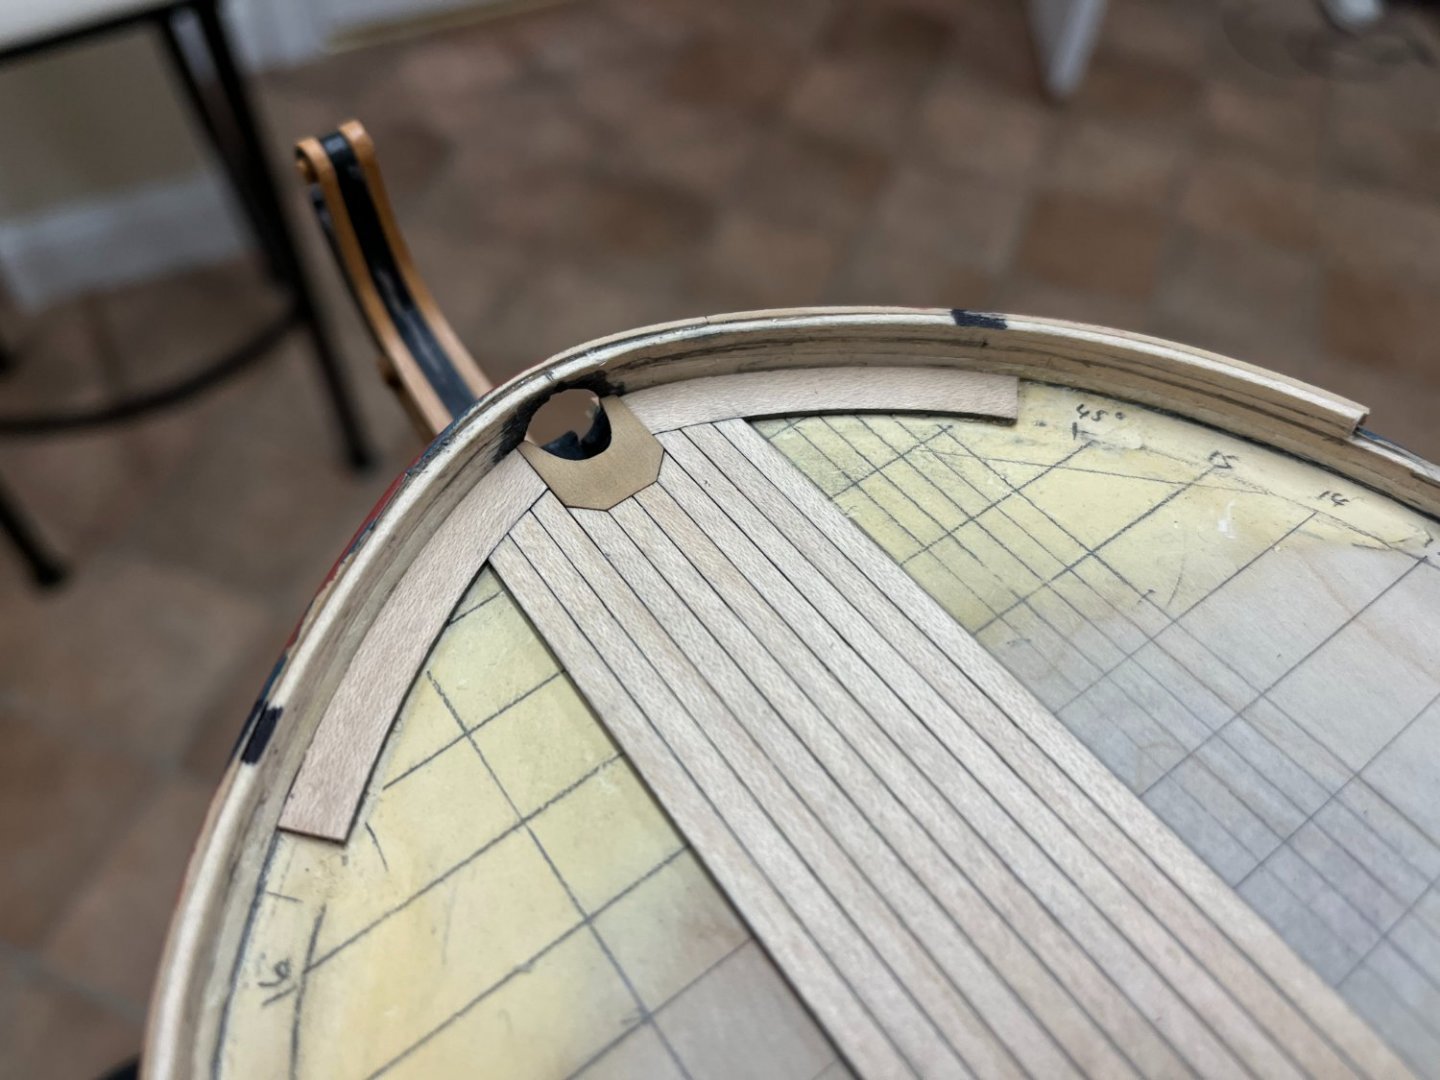
Foc's'l Planking Wrap-up: Foc's'l and gangway planking is now complete. Hopefully photo's tell the story. The position of the cathead has been estimated, and a rather bizare planking arrangement was used to hopefully ensure that this will look OK once the cathead is finally installed, basically wanted the planking to be as prototypical as possible, although this will mean staring at a rather jarring joint until this is installed. The second photo in the series below shows how I'm anticipating this will look once the cathead is in place, and which will essentially hide the joint of the waterway and the artificial planking arrangement. Once the angle of the plank-waterway termination was less than 45 deg, a switch was made to hooking the ends of the planks, and each of these had to be cut and shaped from 6mm strip (these were tapered the same as before) The process was continued until the area was complete. The only deviation being that the last 2 planks on each side were tweaked a little more to try to get these as even looking as possible, and of course the last plank being the most laborious to get an acceptable fit. It is hard to see in the photos, but the curve of the plank can be challenge to ensure that the simulated caulking looks as consistent as possible. I eperience this challenge on the quaterdeck as well, but a solution that helped here was the use of thin plates of clear mica to help position these as consistently as possible until glue sets (I use PVA glue almost exclusively for planking). The gangway planking in the waste was pretty straightforward, (in fact the only non-shaped planks on the entire top deck) and comprised almost my last acceptable pieces 4mm maple strip. It was very close, but I did not run out thankfully. Photo below shows how the gangway planking 'sits' on the lip of the entryway platforms that form part of the quarterdeck. The gangway does not have a waterway. Finally, some overall shots of the top deck, the foc's'l has not been scraped or cleaned up at all yet, which will be the next task. The question I ask myself is whether the time and effort to taper the foc's'l planking was worth it. I suspect that anyone looking at this would never notice as the final effect is very subtle, but I can't help but feel that the reason this is hard to see is simply because it complements the shape of the foc's'l without drawing attention to itself. Overall, I am very pleased with the result, and with this almost complete, it will be nice to be able to turn to other tasks.


-
The second photo with the kit part looks much more with how I'm reading the various profiles and how I will be approaching things. Of course, I'm just as liable to be mistaken as he next man 🙂
- 310 replies
-
- 1
-
-
- Diana
- Caldercraft
- (and 1 more)
-
Hi David, the trials and tribulations of the channel placement is shared by everyone so you're in good company! I would suggest taking another look at your hancing scroll, to my eye it looks a little on the small side, and possibly a little low, but its always hard to judge from photos. Been looking at this a lot recently, and it seem common practice for the radius of the scroll to extend above the sheer of the deck to transition to the quarterdeck bulwark, so that the rail sits above the level of the deck in the waist. The original plans suggest that this should be around 6mm in diameter at 1:64, which is pretty consistent with the kit supplied part. Unfortunately I lost the plans from the kit in my flood so can't refer to that. Of course, please feel free to ignore me!
- 310 replies
-
- 2
-
-
- Diana
- Caldercraft
- (and 1 more)
-
Somehow missed the end of this...looks fantastic Mike.
- 179 replies
-
- 5
-
-

-
- hatsuzakura
- pit road
- (and 2 more)
-
A stern very much after my own tastes in the colour palette BE, very nice indeed.
- 857 replies
-
- 3
-
-
-
- Sphinx
- Vanguard Models
- (and 1 more)
-
The counter applique looks fantastic, great idea, assume you will seal this somehow. The curvature on the counter rail looks spot on, did you prebend this?
- 857 replies
-
- 4
-
-
- Sphinx
- Vanguard Models
- (and 1 more)
-
Tom - your rigging is looking really good, very impressed that you've dived into making your own rope, must feel very satisfying.
-
Welcome aboard Tom, and thankyou for the kind words. Your Victory is looking very nice, and your attention to detail on the rigging is definitely paying off.
-
Hi Mike - yes they do taper, and I took exactly the same approach used for the quarterdeck planking described in post #668, being about 3mm at the bow and 3.8mm at the waist, and re-used an appropriate section of the template used to shape the quarterdeck planks rather than creating a new one. I've found that until you really get well into it, the curve is rather hard to discern, but the good news is that there isn't the same constraint as on the quarterdeck to terminate against the waterway.
-
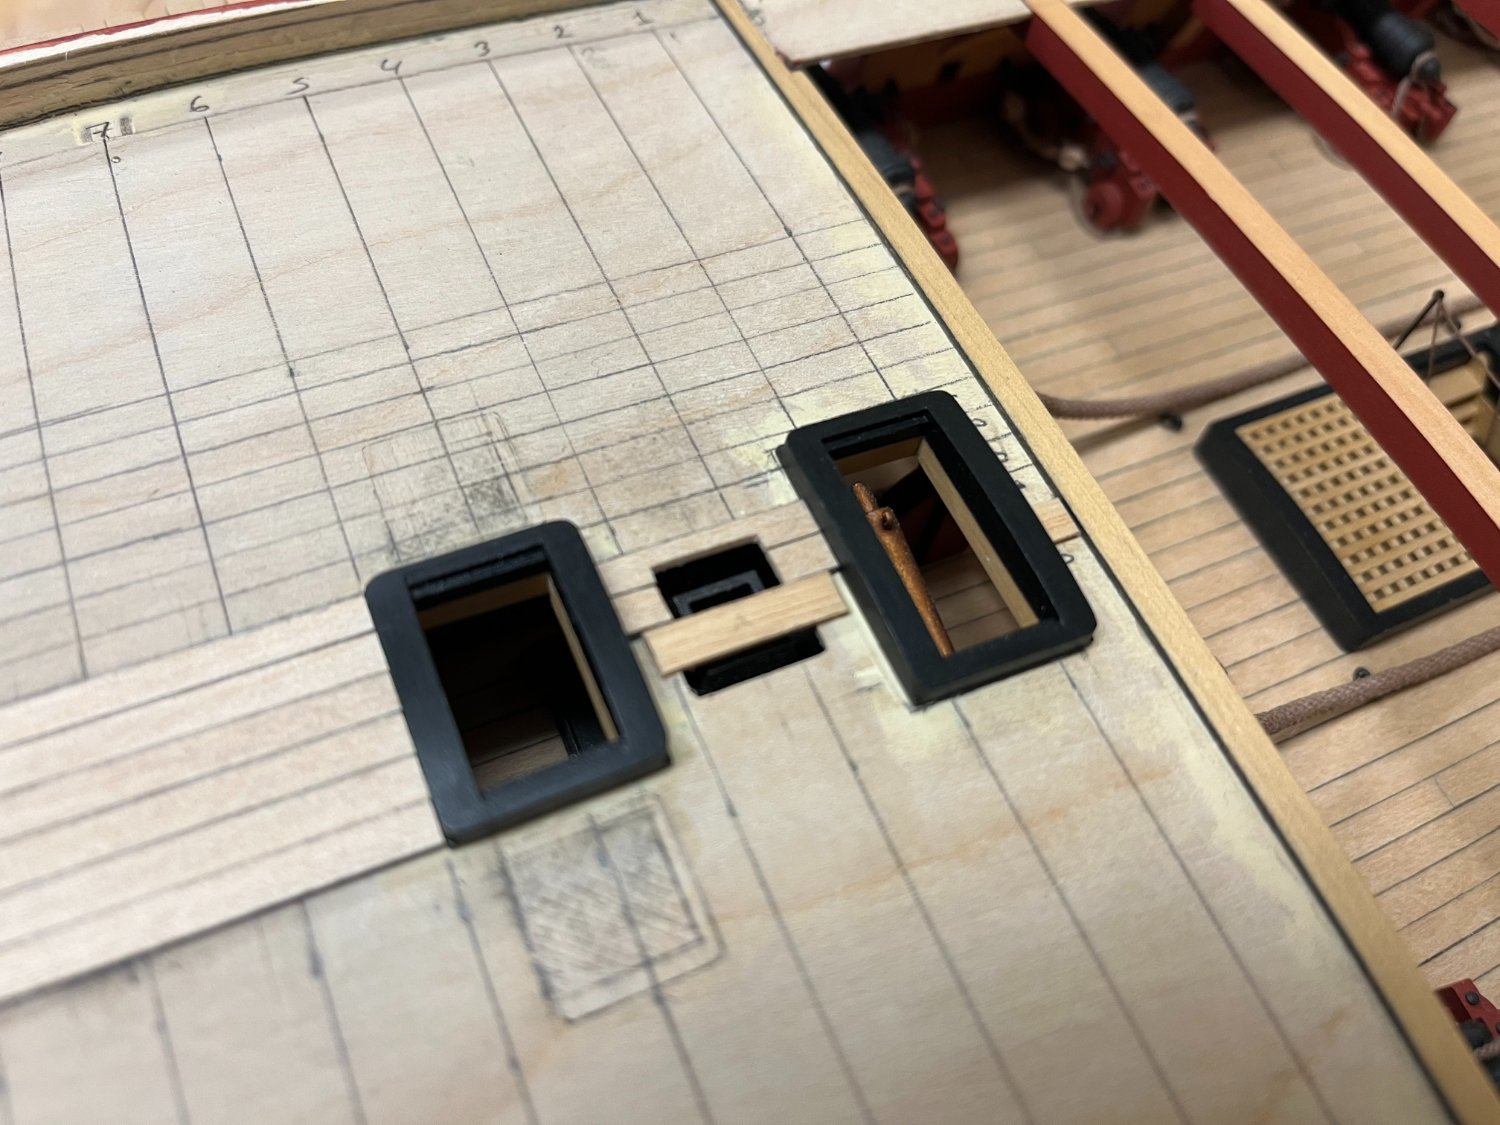
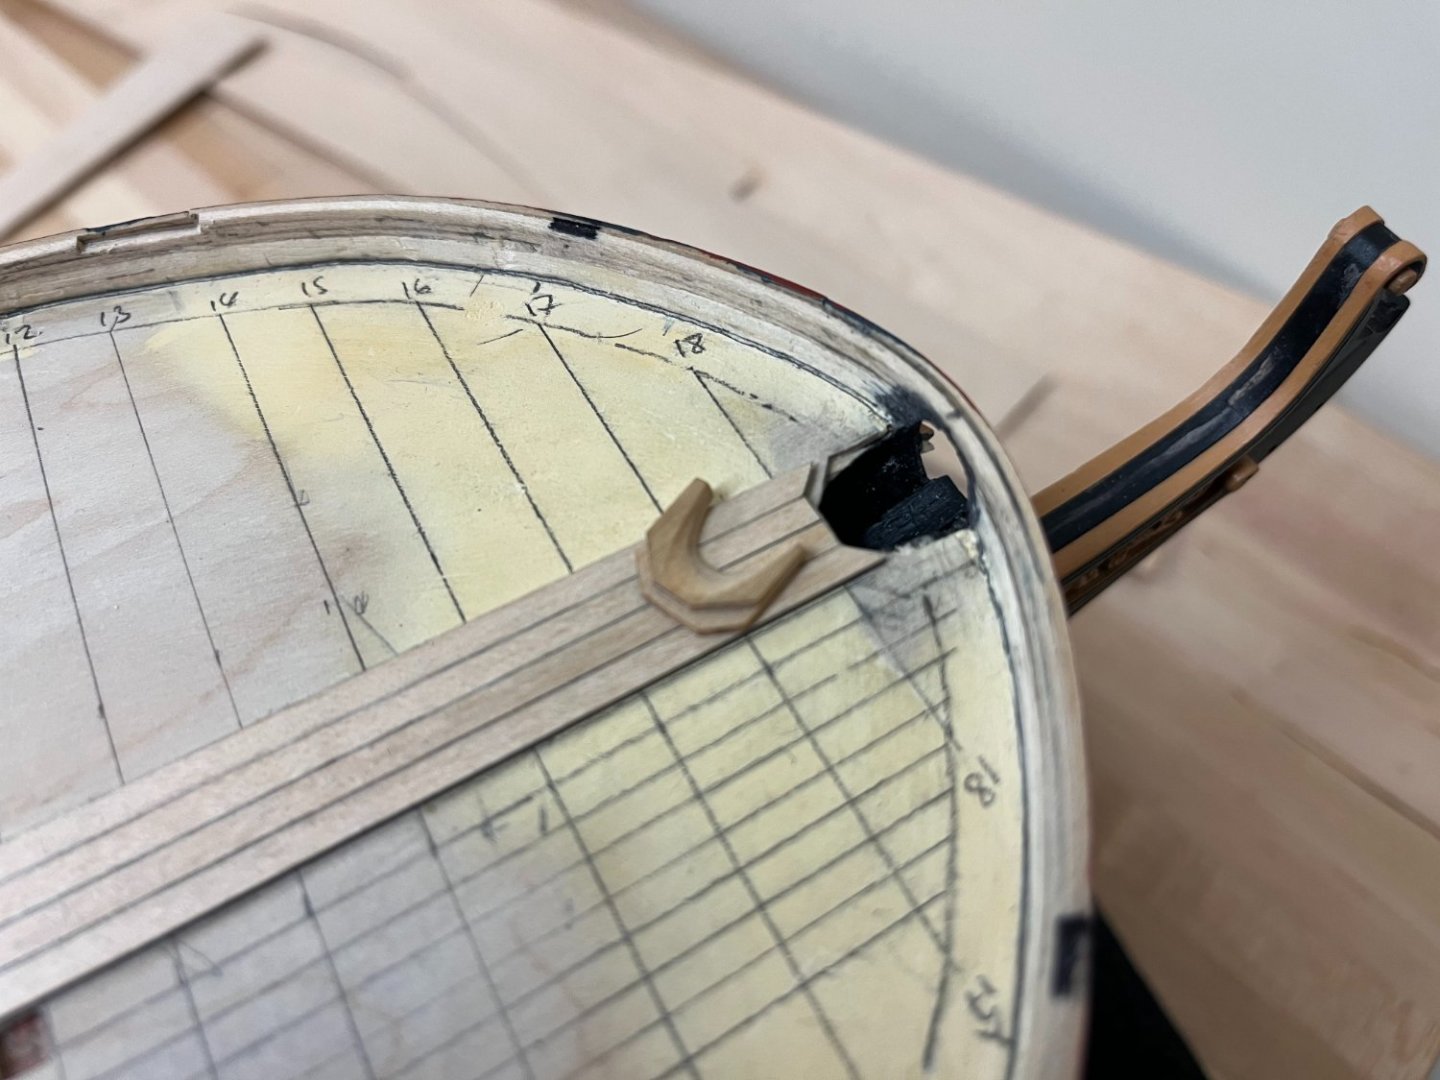
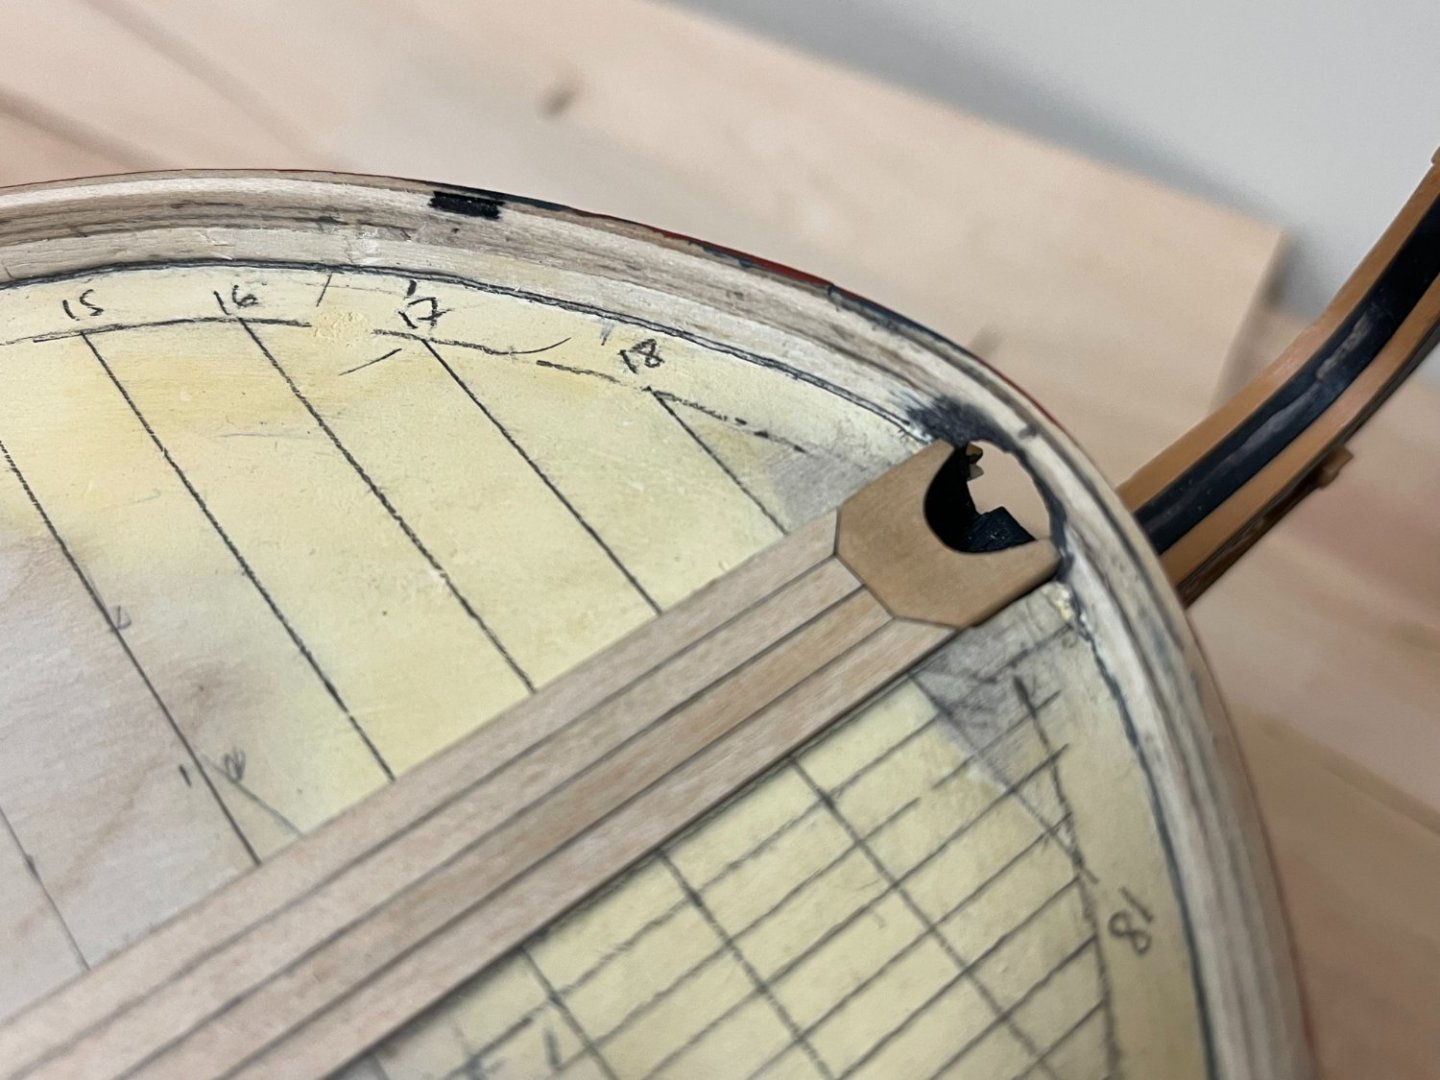
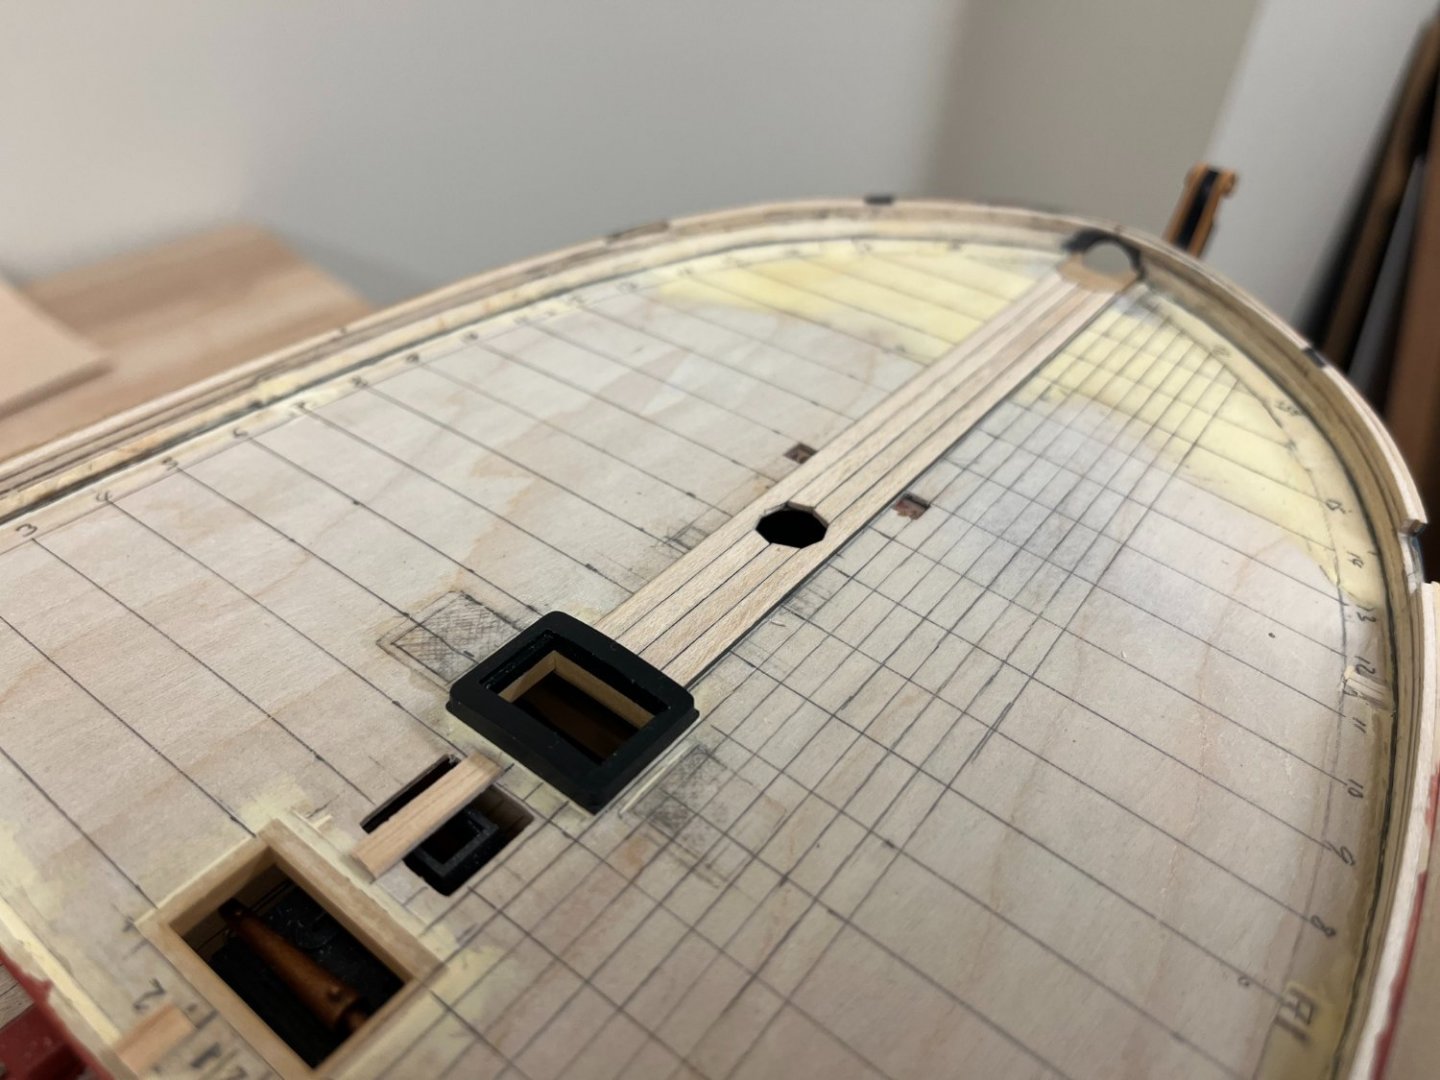
Thanks everyone for the continued interest and kind words. Planking of the foc's'l has started and wanted to catch up before I get too far behind, wanted to record how I approached this for my own benefit as much as anything. Breaking down into the main tasks: Ensuring appropriate sheer of the foc's'l: There was always going to be something to fettle here. There were a number of items that needed to be fine tuned before planking could get underway on the deck. There are a number of items that need to look right: Sheer of the foc's'l planking- this should be parallel to the wale Sheer of the deck - need to avoid any unnatural dips and bumps, probably caused by the false deck supports not being perfectly positioned These two elements need to also come together in a way that gives a gradual steady decrease in the bulwark height, and avoid situation where this does not transition smoothly This did require some filling of the false deck and additional sanding to get this to where I was happy. Marking the edge of the deck with a pencil line really helped with the visuals here as there are many curves competing with each other. Determining the appropriate taper of the planks: Really not much to go on here and went with a planned reduction of around 10-15% between the waist and the bow which seems consistent with many pictures and plans I could find. The only consideration here was to not taper these too much so that a 'half moon' shape develops towards the edge of the deck. Considering this, and estimating the number of planks needed, I used the same jig used for the quarterdeck to introduce the curve. Bowsprit partner: In David Antscherl's TFFM series, he notes that sometimes partners were used on the bowsprit. I latched onto this as a way to tidy up the way that planks terminate against the bowsprit....especially because I think at this point I will not be adding one (more on that later). Adding the partner here neatens up the planking in this area and also helps hide the PoF constuction a little more with the bowsprit not hiding this. This wasn't too challenging to make, first a key was cut into the false deck and a plug made to match. This was then glued to a larger boxwood sheet that would be visible, and which ensured that the partner would sit snuggly when in place. The top was deliberately left oversize at this point as the final dimensions would be dictated by the width of the planking. The concave curve of the underside was made with a suitably sized file approximating the bowsprit dimensions. Planking: With all the prelim work done, planking could commence! First step was to install some scrap wood strip on one side of the center line using a ruler as a guide. This proves to be very helpful in ensuring that the initial runs stay true as once the coamings are installed there is no simple way to do this other than relying on one's eyeball, and once the first central plank is in place can be easily removed. The fore-grating could now be installed, and experience from the quarterdeck suggested that using the bare minimum of PVA glue is a good idea in case that it proves necessary to fine tune the position. Luckily however this did not prove necessary. The remaining wildcard is how the planks will butt up against the installed coamings. As for the quarterdeck, fine adjustments were made to the strips to ensure that they would not result in inappropriately thin widths around the coaming. This also allowed the bowsprit partner dimensions to be finalised so that they all align appropriately. It's interesting to note that the partner is a slight wedge shape, reflecting the inward curve of the planking. Once the first 4 planks were on, the margin planks needed to be installed as all planking from here will butt up against it. For now, only the forward section has been installed, and the joint between then will (hopefully!) be hidden by the cathead. Planking could then continue aft, with a similar approach being taken for the steam grating coaming as before and the top of the beam being installed. The area directly to the rear of this was a bit of a pain as the planking strips are only about 5mm long and difficult to get nice clean tight joints. It proved necessary to once again make custom planks from maple sheet athwart the steam grating coaming, and these proved surprisingly challenging, mainly because there are many edges that need close alignment. The maple being used also does have a tendency to splinter at the edges. The gap on the outmost plank is where the top tackle scuttle will be. Hopefully things will speed up a little now the foundations are in place, at least until hooked planks are needed....

-
I definitely fall into the non-gold camp as well...my personal opinion is that the gold actually cheapens the look of a model. I also suspect that gold paint was not used (did it even exist at this period?) and that actual gold leaf would have been the method used. I recently obtained a copy of "Old Ship Figureheads and Sterns", in it the author alludes to the very elaborate and complex figureheads of the mid 1700's on 1st and 2nd rates (Victory of 1737 and Royal George 1756 being illustrated) were only partially 'guilded' on the primary element, with supporting details being painted.
-
I think the 2.1mm is much closer to the actual dimension than the kit supplied stuff which is much more in line with a first rate. I remember BE had put the formula(s) somewhere in his excellent Pegasus log. I used similar size rope from Syren as Ropes of Scale wasn't around when I ordered.
- 310 replies
-
- 1
-
-
- Diana
- Caldercraft
- (and 1 more)
-
Beautiful model you have going here Bug. Your approach to the various enhancement definitely adds to the period authenticity and well worth the extra time and effort. Your observation is spot on about always needing to think ahead is rule #1, rule #2 being (for me at least), don't permanently attach something unless you absolutely need to...which help mitigate #1 above
- 419 replies
-
- 3
-
-
- Victory Models
- Pegasus
- (and 2 more)
-
Looking good as always! Did you cut the slots at the side of the forecastle false deck or did it come that way? Seems a really obvious (in retrospect!) way to help ensure the deck sits properly without having to force it too much.
-
Somehow missed your updates, looking good Vane.
-
Fascinating to see the development of these new kits, thanks for shring.
-
Using foil is a really neat idea. I did remember seeing this in Dan Vadas' excellent Vulture build....that solution seem to provide more flexibility, utility and ability to easily maintain.
- 542 replies
-
- 3
-
-
- Sphinx
- Vanguard Models
- (and 3 more)
-
Remember that 'period' is also a factor here as paint options changed significantly over time and all we can refer to are really 'trends', certainly in the Royal Navy, and to Mark's comment above would be somewhat driven by the cost and availability of paint. There was no 'standard' to know how a specific ship was painted, looking at models in the NMM online archive will show quite a bit of variety between models of the same period. Red and yellow ochres were cheap(er) options in mid to late 18th century so would likely have been more commonplace being mixed by the painters whether onboard or in dockyards. In the Royal Navy, green and white became more common going into the 19th century as materials advanced, fashions changed, and the cost of paint became economically viable. I'm sure Vanguard probably went through many repaints and would have looked different at each. The hulls of ships were definitely unique, and helped in identification, until the nelson chequer became ubiquitous.
-
Very nice Mort, some really interesting modifications. Looking very shipshape.
- 60 replies
-
- 2
-
-
- victory
- caldercraft
- (and 1 more)