


Mike Y
-
Posts
1,437 -
Joined
-
Last visited
Content Type
Profiles
Forums
Gallery
Events
Posts posted by Mike Y
-
-
Small update: finally got around to replacing the stock ball bearings on the top wheel.
Luckily they are a pretty standard size, so I ordered SKF 608-2RSL http://www.skf.com/group/products/bearings-units-housings/ball-bearings/deep-groove-ball-bearings/single-row-deep-groove-ball-bearings/deep-groove-ball-bearings/index.html?designation=608-2RSL
Works like a charm! The nasty noise is gone! Should have done it from the very beginning, especially since these bearings are quite cheap (even SKF ones). Got fooled by Proxxon support who claimed that everything is fine and the bearings are fine, even after watching the video with the noise captured on it.
Replacing the bearings was easy, no temperature fit required - just gently bump out the old bearings with a hammer, and squeeze in new ones using a clamp for the even pressure without any stress.
-
"Keel clamp, adult size"
")
- druxey, Jorge Diaz O, dvm27 and 5 others
-
 8
8
-
Hoorray, Danny is back!
I missed your buld logs, even if it is not about ships
- Ryland Craze, mtaylor, Eddie and 1 other
-
4
-
Is it really a drill press?
Looks like a mill, if the bearings are good enough to handle some lateral forces?
And it is a damn nice mill! There is something charming in a hand-made tools (not DIY level, but this work-of-a-true-craftsman level). There is always some story behind it, one looks on that drill/mill and visualises a man with a glass of whiskey, sitting next to the fireplace and drafting the sketches of the machine
Cheers!
-
Seems like you had a busy weekend cutting all that blanks! The speed is truly impressive!
Sorry for commenting every second update...
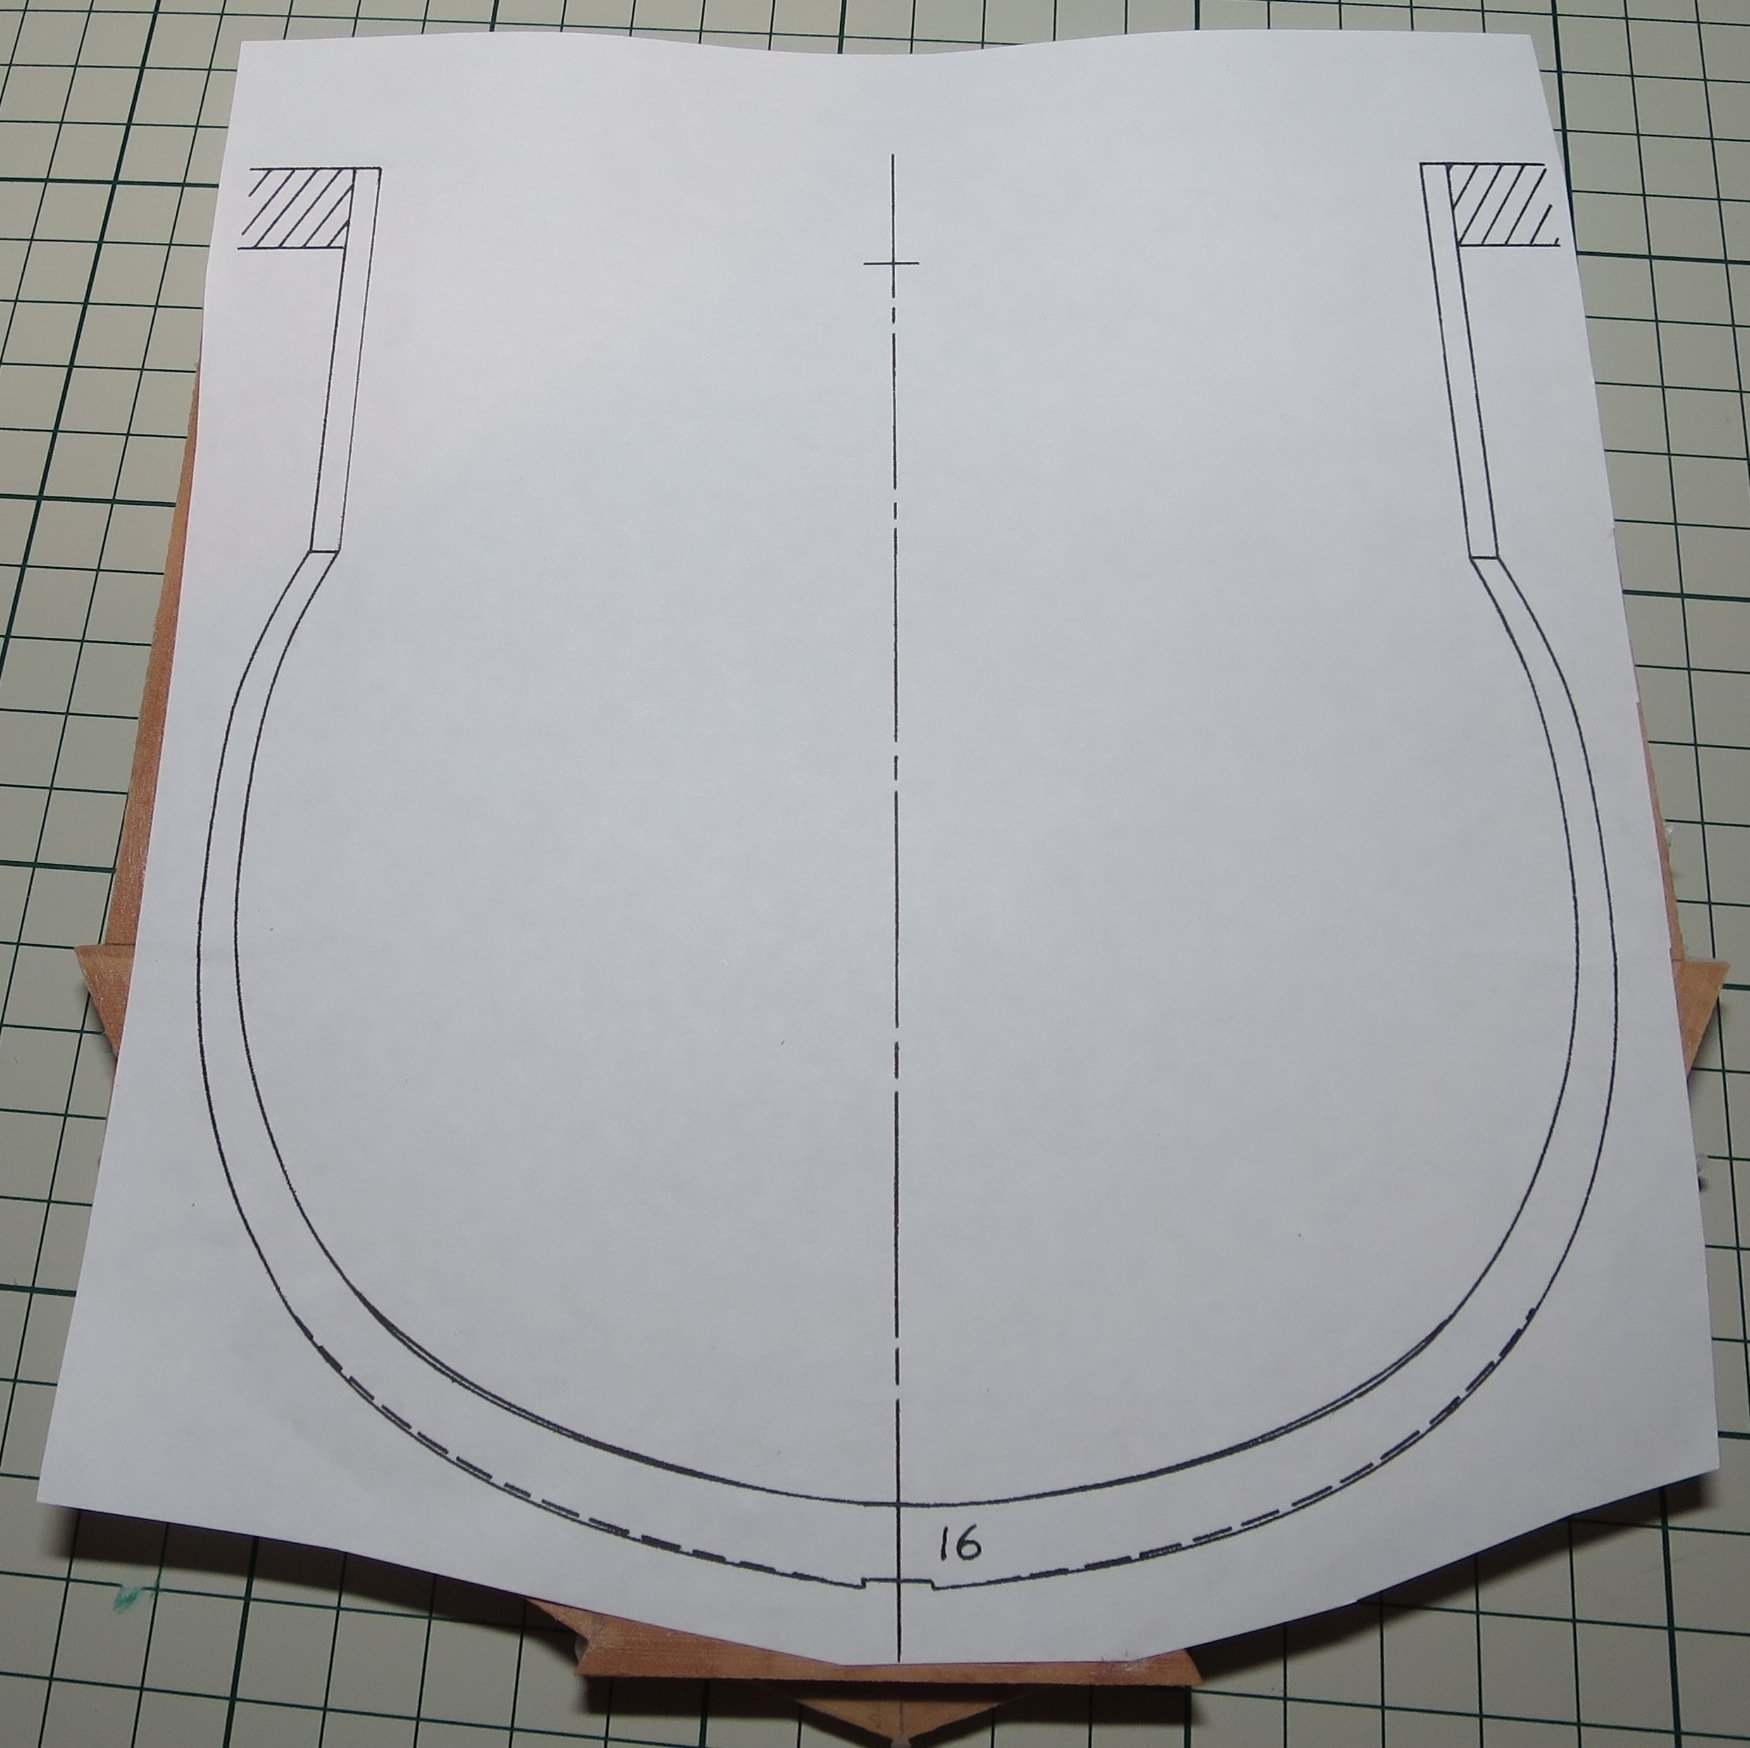
But you might want to consider not cutting the paper in the center of the patterns, to prevent distortion and an incorrect frame width (for the midship frames where both sides of a frame are joined in the bottom).
Like this:

- KennyH78, russ, Chuck Seiler and 3 others
-
6
-
It is really nice to see that tools in action!
- mtaylor, BETAQDAVE, Keith Black and 1 other
-
4
-
Can you tell more about your mill? It seems to be based on MF70...
-
Yes, I was on that island a few times, and was impressed by the view on the docks from top of the hill. But, as usual, you can't get to the boats without breaking in.
Though my favourite place is Skeppsholmen, especially its eastern part. Lots of wooden boats and ships, boatbuilding club, blacksmith workshop, smell of tar, drying lumber, etc... Really feels like a shipyard!
- Farbror Fartyg, Nirvana, Omega1234 and 1 other
-
4
-
Matle, thanks for the info!
Beckholmen is a bit tricky to stroll, it is mostly docks and just a little bit is open to the public. Or you know the right hole in the fence?
- Nirvana, Farbror Fartyg, Omega1234 and 1 other
-
4
-
-
Bob: got it, will photo.
However, seems like we need to wait a bit. Here is the official schedule of SS Mariefred for 2017:

So the first time it would be available to public is on 27th May. So before that it is probably in some dock somewhere.
I checked the facebook group, no clear info there. But there are some interesting photos and videos! https://sv-se.facebook.com/steamshipmariefred/
While waiting - please check if there are some other areas that you want to check. Especially if there is something that you need that could be only observed onboard - in this case I will need to pay the entrance fee, which is ok, but then I better be a good spy and make all the photos you need!
-
Hi Bob,
What part exactly? There are many windows on that ship
To avoid confusion, it would be nice if you can highlight the relevant part using some other photo.
Is it something on a side or a front of the ship? It is typically moored diagonally, so can't make a photo of the rear part without paying for the entrance ticket.
It is moored in the morning next to the city hall, so should be easy to photo!


- Mirabell61, Nirvana, mtaylor and 5 others
-
8
-
-
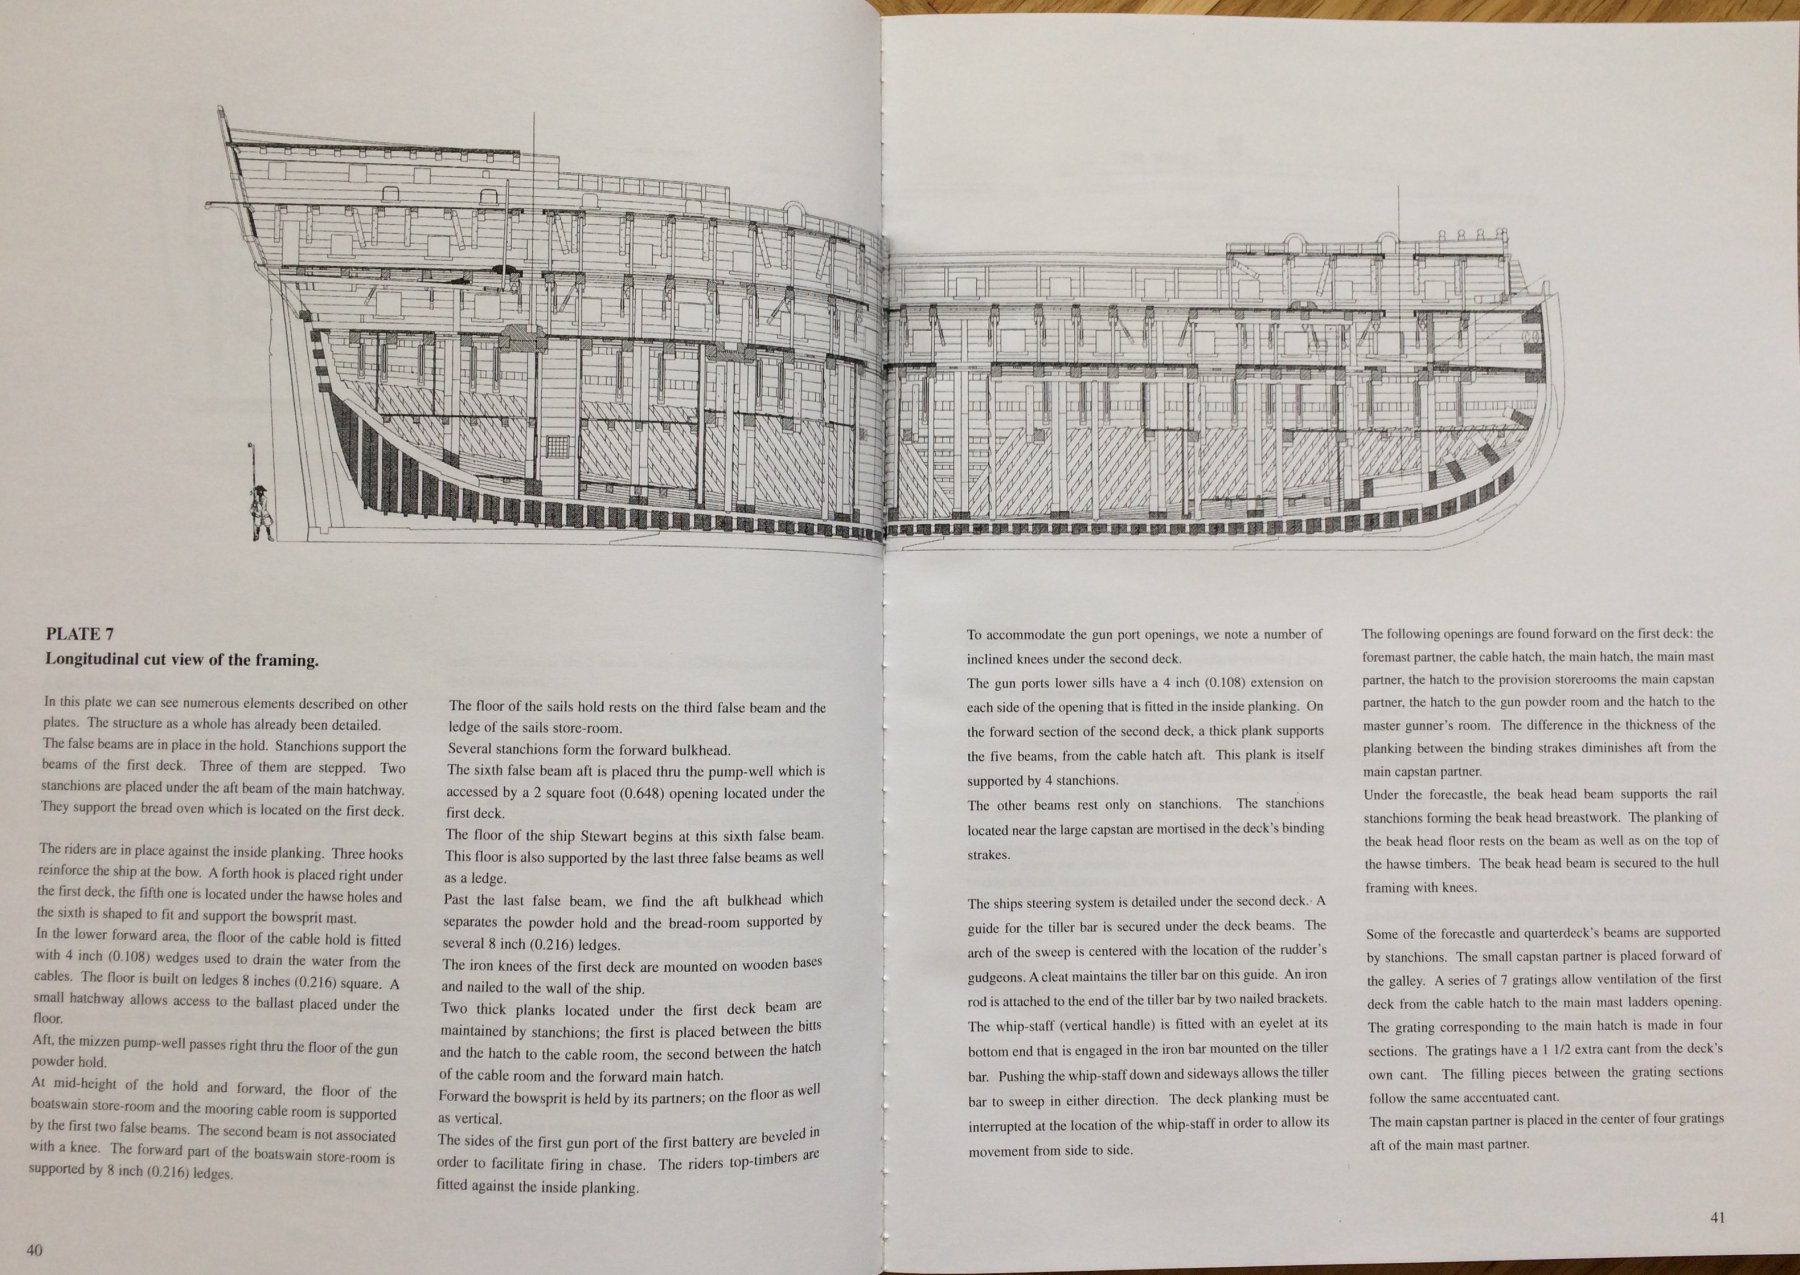
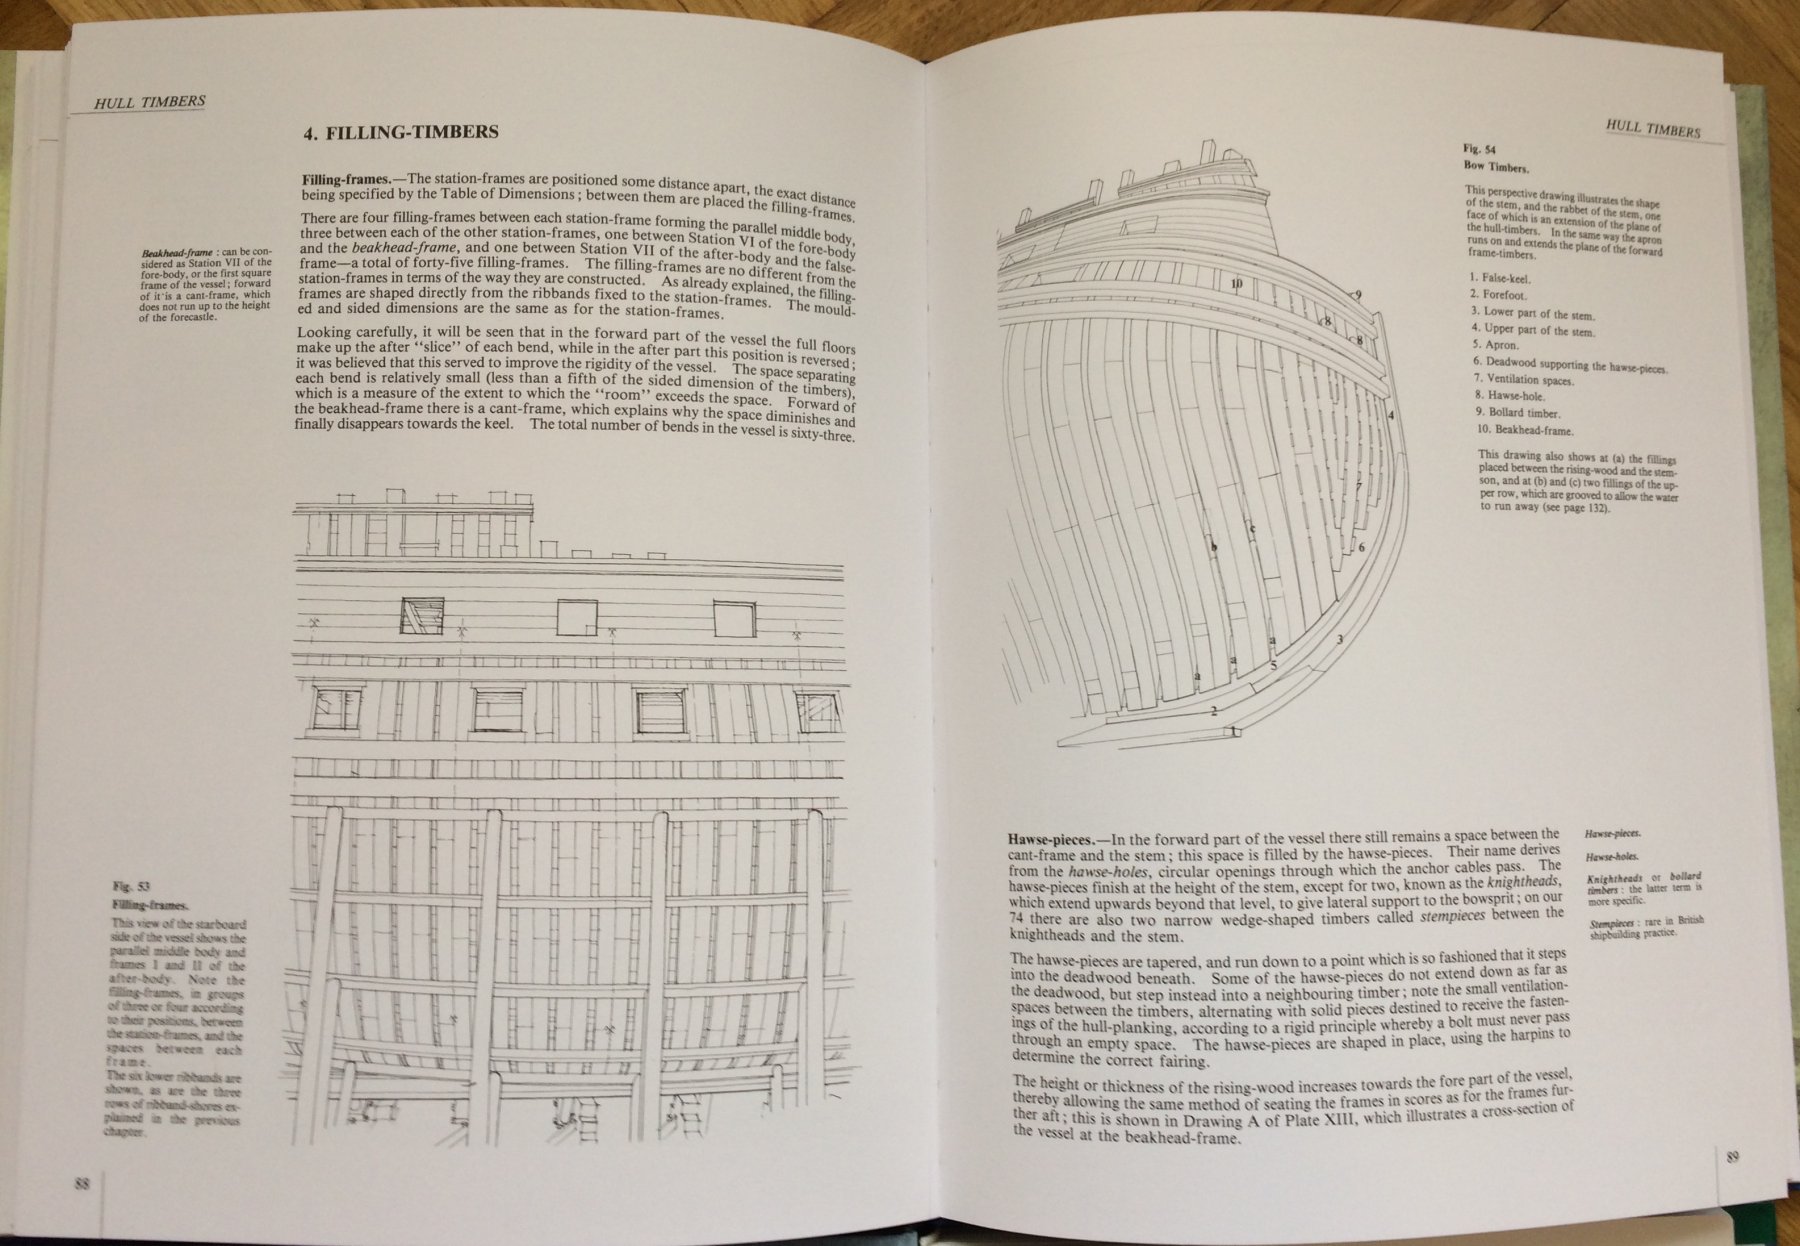
The monograph assume that you already know the way the ships were built at that period, and they only cover specifics and nuances of a particular vessel. Also, it assumes you are already familiar with the terminology. They are very condensed and detailed descriptions of a very specific ship, basically a set of plans with a very detailed comments.
That would be impossible to understand without reading some more fundamental book first.
For a better background, one probably need to start with the 74 gun ship books, that are fairly costly: https://ancre.fr/en/ouvrages-de-base-en/9-vaisseau-de-74-canons-1780-traite-pratique-d-art-naval-1780-en-quatre-volumes-base-de-la-collection.html#/tome-the_74_gun_ship_1_english
Also, they only talk about the construction practice and history, no useful advices or hints for modellers. It simply describes how the real ships were built, and does not cover "how to build it with the tools we have in a small scale".
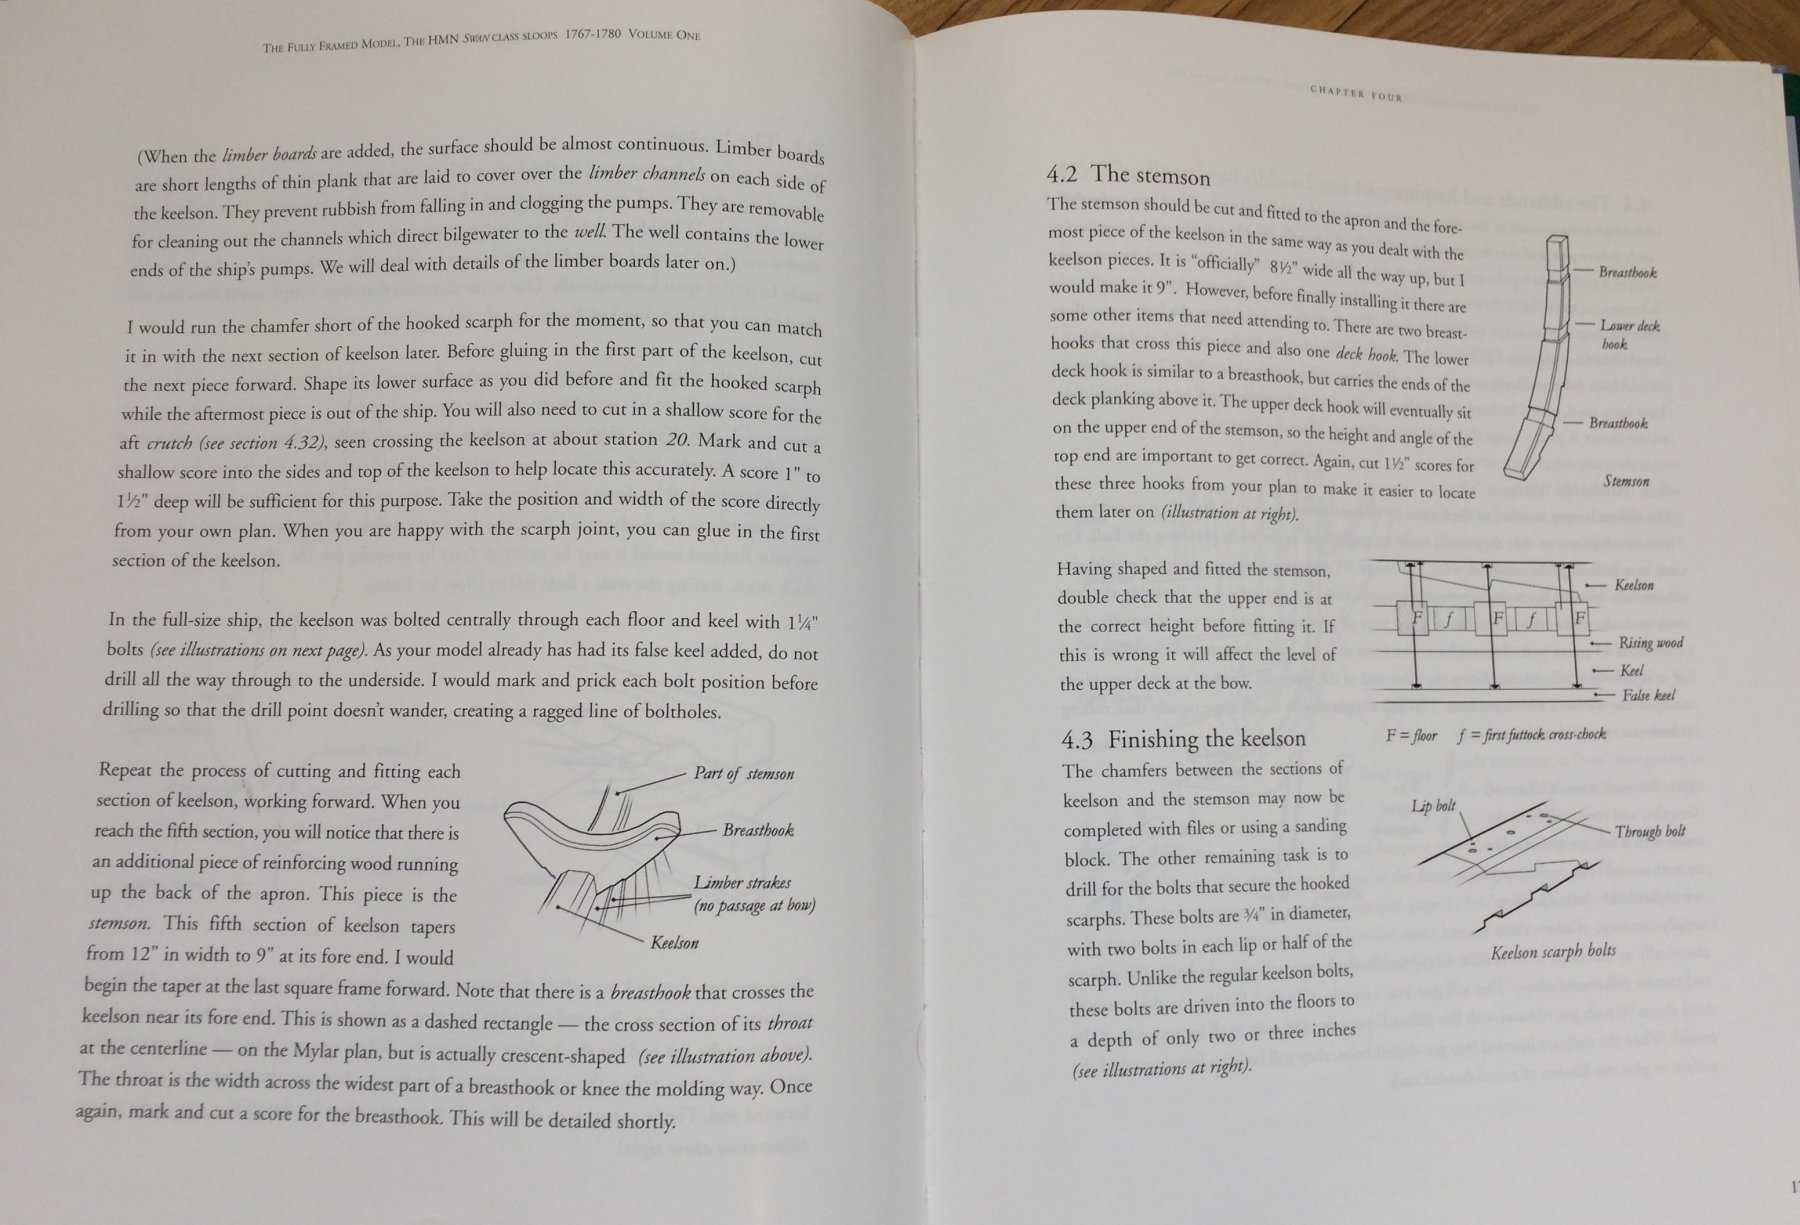
For the better "entry" into the historically accurate construction it would be probably better to start with TFFM or Naiad books - they cover it step-by-step, with a lot of tricks and great illustrations. They also cover the nuances of modelling such ships in a great detail.
Of course, there were quite some differences between the way French and British ships were built, so for the first fully framed model it would be better to start with that books and a British ship. Simply because these books are more friendly than the French ones.
TFFM: vol1: https://www.seawatchbooks.com/ItemDisplay.php?sku=109004 vol2: https://www.seawatchbooks.com/ItemDisplay.php?sku=109001
Naiad: vol1: https://www.seawatchbooks.com/ItemDisplay.php?sku=112002 vol2: https://www.seawatchbooks.com/ItemDisplay.php?sku=113006
So far TFFM is my main point of reference and the first book I open if I have some question. I read that you already ordered one - you will not be disappointed
-
Eric, I actually never used the instruction text (it is written in a very formal way, hard to translate). But the pictures in the instructions are quite detailed, so text is not really needed.
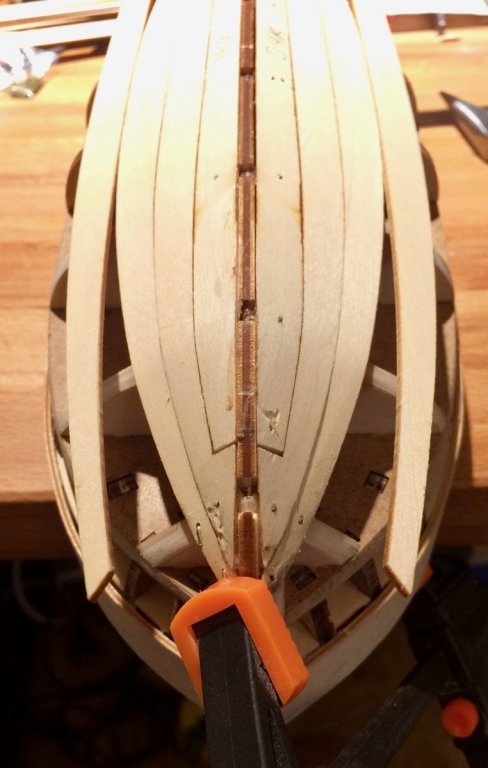
There is a longitudinal filler block that looks enough. They are all spiled. Seems to hold fairly well, there is enough surface for a proper glue adhesion.
-
-
Thanks for comments!
The planking is slowly progressing. Daria is taking some boring tasks, like marking the planks according to the manual (to avoid mixing them), sanding the plank edges, etc.
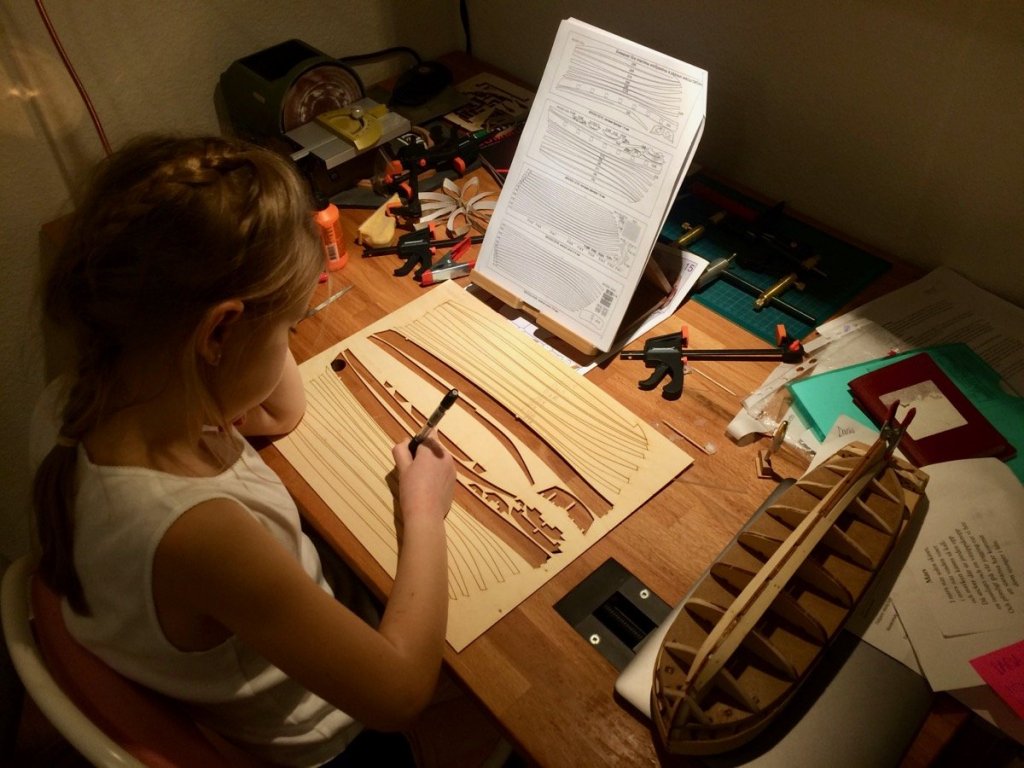
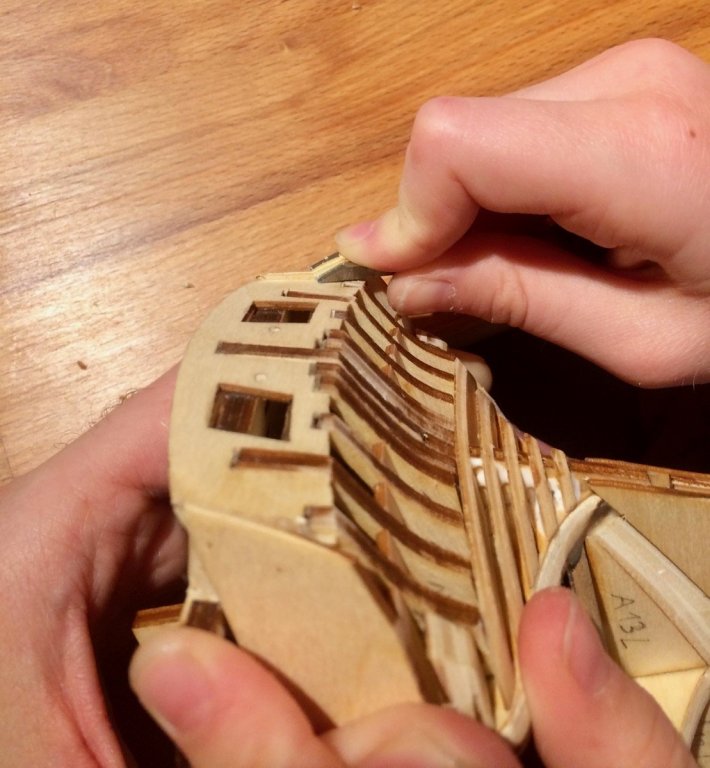
And she even nailed that planks in place! Typically, I was holding the nail with pliers, and she was carefully hammering it. Hard to do it alone, so this time her help was really crucial. We are going the easy route and not steaming the planks, just nail them to the hull and remove most of the nails later on. This is the way the manual recommends it as well.
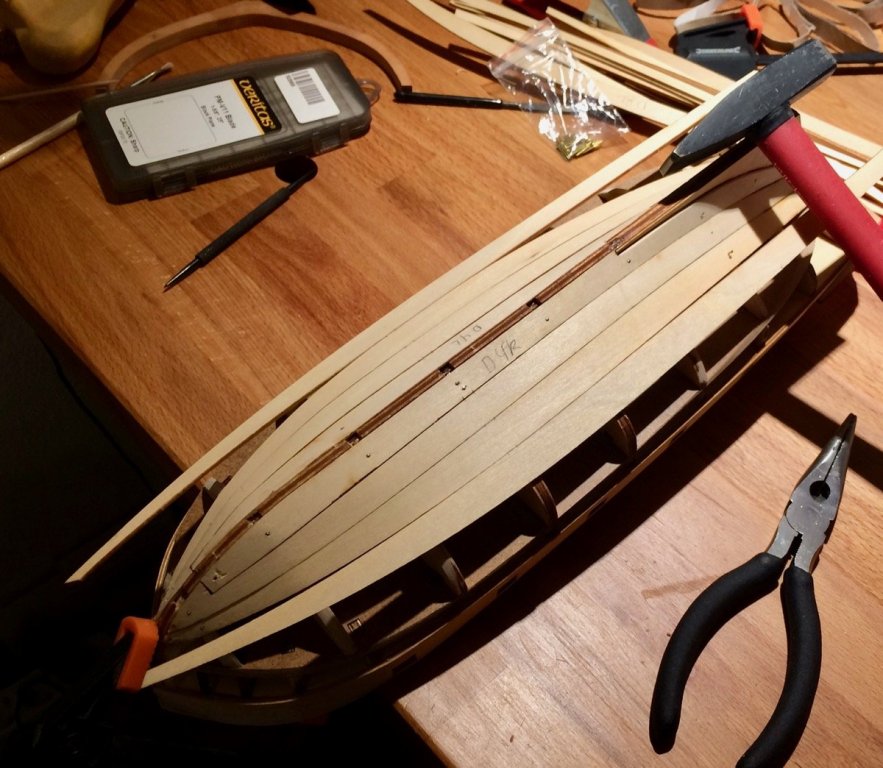
As a result, it looks quite ugly in some places, but it is a first layer of planking - so would not be a problem after fairing
- gjdale, greenstone, Nirvana and 5 others
-
8
-
Or you can simply take that decision later, after the hull fairing. Chances are that in a year or so, when the framing is finished and the hull is smooth and fair - you will fall in love with it and refuse to put any planks on it
")
One warning with the Hahn method - it mentally tricks you into focusing on the alignment of the bottom part of the frames (where the keel is), but when you flip the model - it is the top of the frames that are important. Be really careful with their alignment, and leave more meat on the thin parts of the frames when cutting them (marked red here):
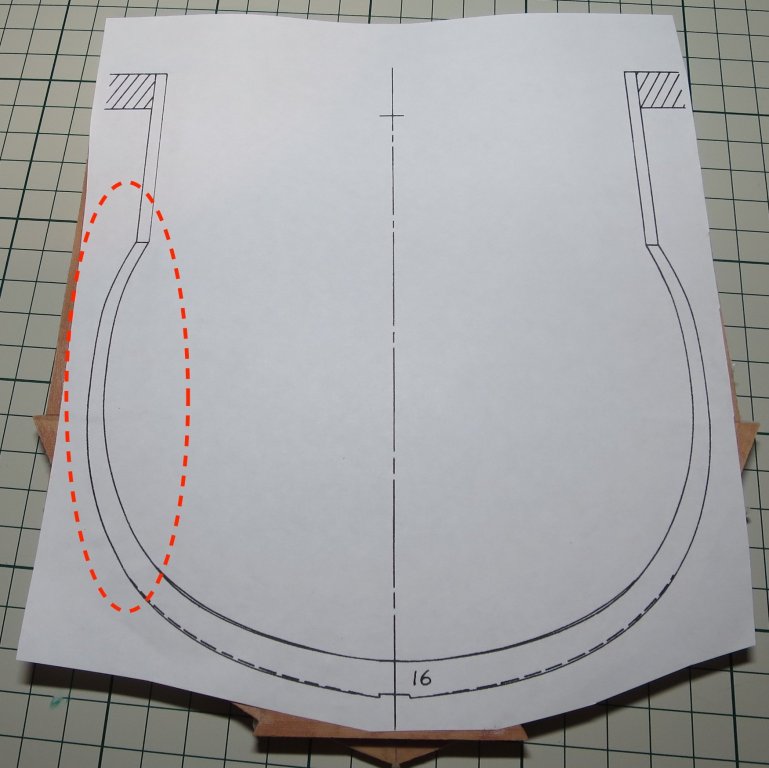
As soon as you flip the hull into the normal position - these areas will become the center of attention. Do not get tricked!
Re-check the frame alignment with a wood strip while you go, to avoid big problems when fairing it later on.
Especially with the scale you selected - it would be fairly easy to sand away extra material on the outside of the hull than to end up with not enough material.
- KennyH78, mtaylor, Richard Griffith and 5 others
-
8
-
Your timbering set already had pre-cut frame blanks? That is something new!
you might want to consider using some glass / acrylic plates when laminating the frame blanks - that will help to keep them flat, distribute the clamping pressure evenly and prevent warping due to the moisture in the glue.
P.S.: there is something magical in a fully framed builds of small scale, hope it will end up a beauty!
-
Indeed! Stopping on the exact right moment to avoid scratching the wood - that is quite a skill. Will practice more, thanks for the inspiration
- kees de mol, Eddie, mtaylor and 1 other
-
4
-
Not much happened, we were out of town for three weeks
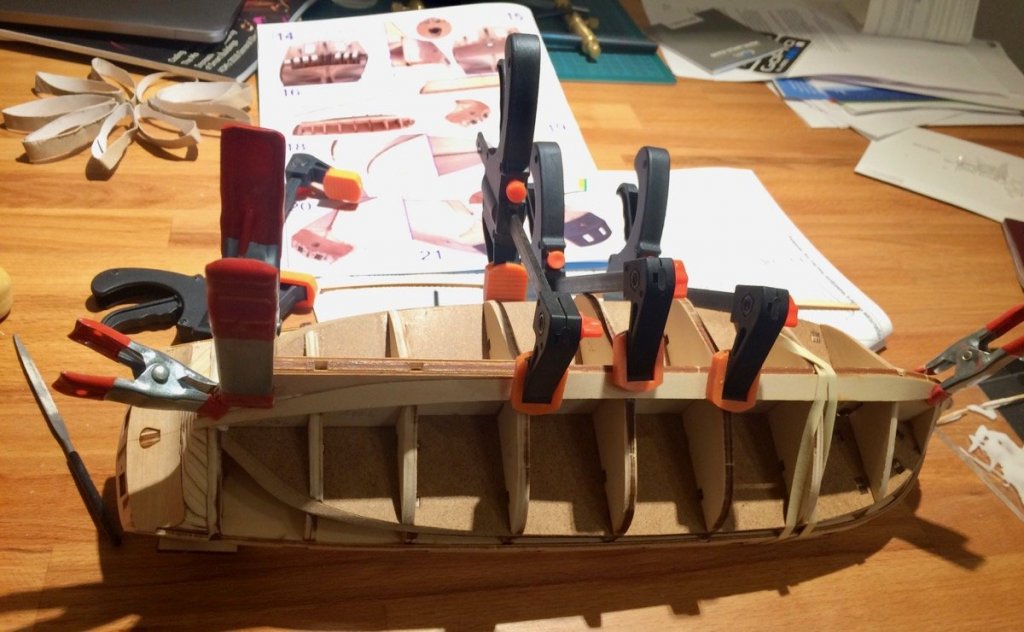
Using chisel for first time!
Starting the first layer of planking. Clamping is quite tricky, I should have prepared better
- gjdale, Nirvana, greenstone and 10 others
-
13
-
This may be a stupid question, but...
How do you make a brass nails flush with the wood? The only way I know is sanding, and it is hard to do on convex surfaces or in any confined place. But on your photos I see brass nails perfectly flush, and in places where I can't imagine getting with a sanding block. What is the trick?
- mtaylor, Eddie, zoly99sask and 1 other
-
4
-
I doubt anybody romanticizes the life on board. It is basically a floating prison with an extremely high mortality rate and inhumane conditions. Lots of people on board were there not on their own will. The ships are lovely, but trying not to think about how they were used daily...
In a similar way, we can admire a nice castle or a cathedral - but both were most probably built with a slave-like labour and a whole lot of people died during construction.
- Seventynet, Ulises Victoria, Canute and 6 others
-
9
-


Beavers Prize 1777 by Mike Y - 1:48 - POF - Hahn style
in - Build logs for subjects built 1751 - 1800
Posted
Still procrastinating, spending modelling time on things like handmade gifts to close family") And when not - playing with tools.
And when not - playing with tools.
Built a crosscut and miter sled for the Proxxon FET saw.
They are more precise and safer than the miter guide on the saw. Helping to keep fingers further from the blade and have a quick and consistent 90deg and 45deg angles.