


popeye the sailor
-
Posts
16,007 -
Joined
-
Last visited
Content Type
Profiles
Forums
Gallery
Events
Everything posted by popeye the sailor
-
 thanks for the kind comments and the likes there's still a few more thing I need to do to the rack and podium. the stern reels are in production as we speak. everything done brings me closer to the point where paint is unavoidable. I need to make an exhaust system for the cellar. I do have a neat idea for it, but I have to get over to the local hardware store and get a dryer duct. there are no dryers in operation in the cellar now........the ducting for the outside is not in use. I'm planning on taking a box fan, and wall off the back of it with the duct built into the center. then connect the fan to the outside duct with a duct hose. I'll be setting up a new table down there, close to the outside wall ducts.......good thing there are a few pallets lying around down there again....thanks for the good word. I thought it was bad that the projects were piling up before me........now they're starting to pile up behind me as well! it's so hard to keep from getting into the Titanic kit perhaps I can do a review of some sort......it's really a nice kit. the chrome for the stand needs to go though.....if you saw it, you'd understand why more soon!
- 956 replies
-
- 2
-

-
- andrea gail
- trawler
- (and 1 more)
-
now that is a really sweet looking vessel Doris! hard to tell that is a plastic kit hope you and yours had a great holiday!
- 883 replies
-
- 1
-
-
- royal caroline
- ship of the line
- (and 1 more)
-
just catching up on your progress.......I must say, the boat looks great! looks real sweet on board the 019! hope you and Gwen had a great Christmas!
-
gee......if you used a glass cutter.....you could put her in a bottle {I know that's not the proper way to do it}. fantastic progress Omega...your just about finished
- 120 replies
-
- 1
-
-
- mystic
- motor yacht
- (and 2 more)
-
awesome progress Michael.......very well done!
-
hope you are doing better Kees, and hope that you had a great holiday! looking forward in seeing more
-
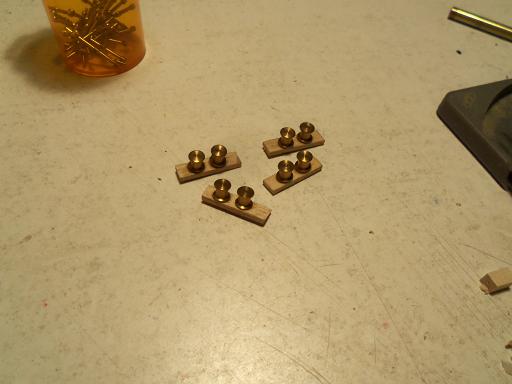
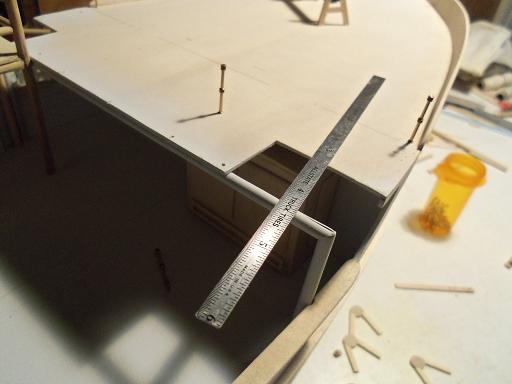
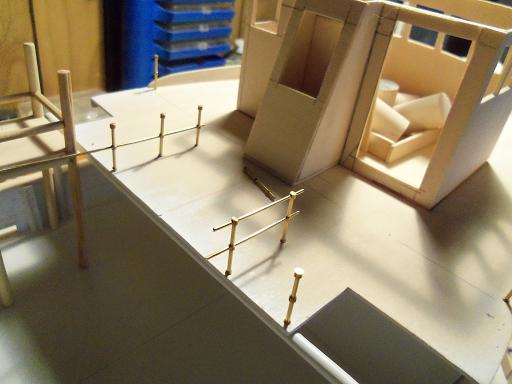
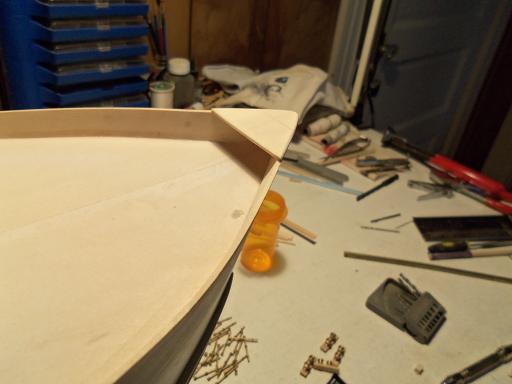
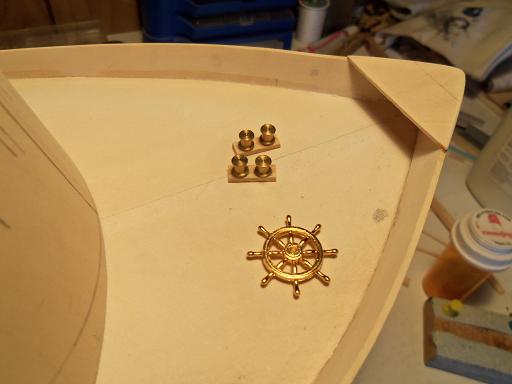
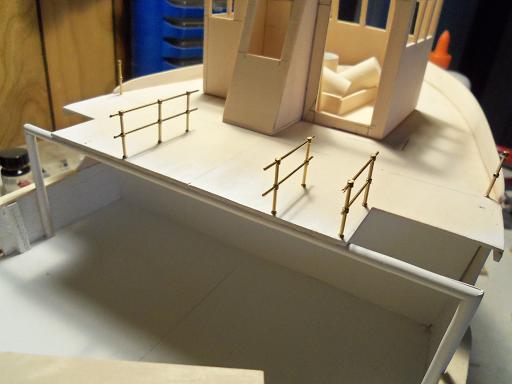
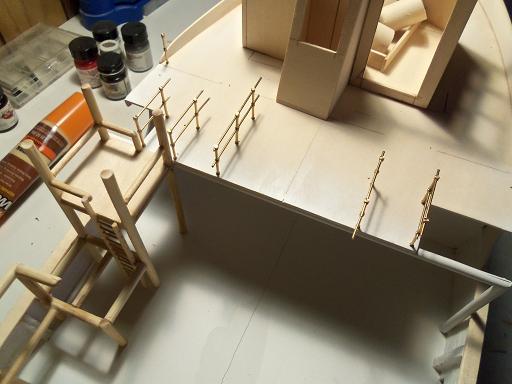
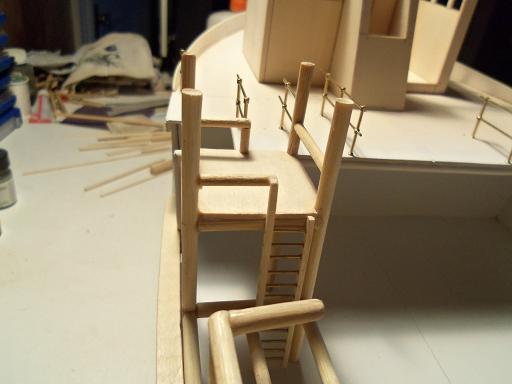
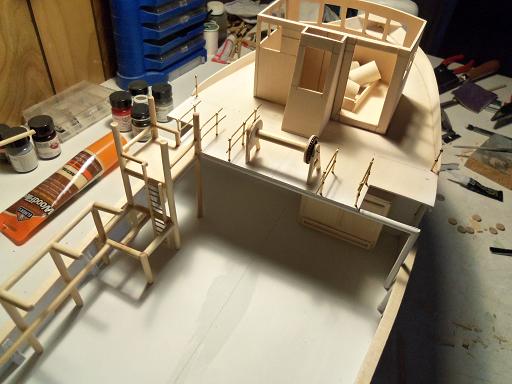
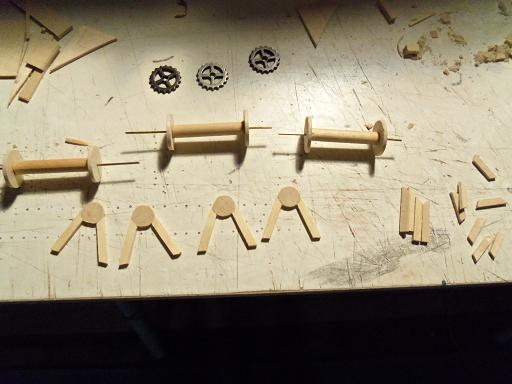
these past few weeks, leading up to this wonderful day, has been quite hectic........but that doesn't mean that I haven't been doing any modeling. an already started kit has come into my possession, which kicked off a super cool idea. after assessing what I will need to do, it has been tabled, until I finish some of these projects I have in the works. Christmas was good to me too.....getting a couple of kits that are unrelated to ship modeling......but I also got the Academy 1:400 scale kit of the Titanic ....that too will be a future project. a couple of days ago, I put some time in at the table, on the Andrea Gail. I had some bollard pins in inventory, so I made up the bollards for the A.G. and the trawler Syborn. I still haven't drilled the holes for the portholes yet, so I thought I'd make the railings for the fore deck, drilling the holes for the stanchions. there are a few short ones behind the pilot house, and two that run along the fore deck, to the bow. there is a cap for the tip of the bow, that I made next. the bollards were cut to size, and dug out the last ship's wheel I have on hand going back to the railings, more were added getting to the port side, the rack and podium still need to have the adjustments made to it. I need to trim the ladder and open up the railing leading to the fore deck. the adjustments were made ...and those railing were added at this time next will be the stern reels

- 956 replies
-
- 14
-
-
- andrea gail
- trawler
- (and 1 more)
-
super finish on the ship's boat Nils........looks great in her place on deck! hope your Christmas morn was special!
-
looks like you have thing well in hand all of those methods you mentioned can be done, and have been done by other modelers here on the site. just choose the one that suits you best and go for it I like to soak my planks in really hot water for a short time, them wrap them in wet paper towel until I'm ready to use them. after they set a bit longer, I set them up on a make shift bending board.......just a pine board with pre drilled holes, that I can insert plastic or wood dowels in {don't use metal}. I can bend them to any degree I need them to be, bow and stern. I've even 'cut out the middle man' and planked while they are still damp. I find that the glue I use {white glue or carpenter's glue} seeps into the wood better and creates better adhesion. faring the frame is important to get the proper shape and contour of the hull. without this, the planking will not sit flush to the rib, and cause the planks to buckle and create visible lines, that are sometimes hard to sand out. these split hull kits are harder to do, with the sense of getting both sides to be equal in shaping......not to mention, removing the screws that secure the frame to the board. I had one........I cemented both sides together, installed the deck platforms in place, and then fared the frame as a whole. looks like your doing quite well to me........careful planning will yield a good outcome. take your time......no need to rush.
-
ha...ha Sjors! we hit the like button at the same time! superb job my friend........I think Aggie has a sweet little tush!
- 1,616 replies
-
- 2
-
-
- caldercraft
- agamemnon
- (and 1 more)
-
she's looking great Boats have a great Holiday season!
-
ship's boat looks really super in place Ron..nice addition to the deck layout have a great Holiday my friend!
-
nice work on the rigging J.........really looking super! Happy Holidays to you my friend!
-
splendid work as always Augie.........have a wonderful holiday season!
- 2,191 replies
-
- 1
-
-
- confederacy
- Model Shipways
- (and 1 more)
-
auburn..........I was going to ask what hair color he used { so I'd never buy it } .....then I saw it was a hat whewwwwwww! {shoulda gave him a mullet.......} great bit of progress Wayne....you've done some nice detailing there wishing you and your admiral the greatest of holiday seasons!
-
you've made some great progress on her Piet! have a wonderful holiday season...you and your admiral!!
- 176 replies
-
- 2
-
-
- muscongus bay lobster smack
- Midwest Products
- (and 1 more)
-
I echo the same Matti.........hope your feeling better and have a great holiday season!
-
truly some great work Daniel.......wonderful trick with the mirror very nicely done! have a great Holiday season, my friend!
-
super job Larry!
-
looking very good Patrick.....looks like you'll need to change the moniker you have above you avatar
-
hello Les......just stumbled across your post.....I love a good treasure hunt! I looked on the Billing's Danmark site, and they list it, but it wasn't there. however, I looked on the Billing USA site, and the instructions are there. judging from the looks of those instructions, you probably have the complete instructions that came with the kit. I have a 1977 catalog, but the Canute is not listed, so the kit you have is most likely older than that. Billing's will, from time to time, stop production of a kit, to retool equipment to make the kit and concentrate on newer kits that are being offered. an important clue to note here, is that older Billing kits are not laser cut, and have printed detail on the panel parts...deck, structure parts...etc. if your kit is like this, then it's a sure bet, you've got an oldie I started in this medium with an old kit of the Nordkap....clueless of what lay ahead. being an old kit and not laser cut, put a daunting spin on things, but I'm happy to say that I built it, using 98% of the original wood. it spent about 20 years in my friend's attic....the wood was almost petrified! I've built a few other Billing kit since then, and have gotten quite used to the vague plans that Billing includes in their kits. yes......they are pretty scant in their direction of assembly.......I sometimes wonder how Billing can group their kits the way they do. the construction of an advanced beginner's kit, is really not much different than an expert kit, in my view, the only difference is the size and scale. the St Canute kit looks to be a neat kit........1:50 scale @ 22 inches long.....that's a pretty nice size .....cripes, the Nordkap is 1:50 scale, and it's about 32 inches long. being a total 'greenie' when I built it......I had a lot of fun...I'm sure you will too! tutorials are nice, but they don't show any cool techniques.......I would suggest looking in on some of the other folks builds, perhaps you'll get a few ideas......there are some pretty smart folks here I notice that the St Canute went by other names.....do a search for them and try to find pictures of the actual ship.......good way to see how the ship was fitted and what colors are where. if you've started a build log.......I'll find it......looks like a really neat build. above all........have fun, and enjoy the experience. I hope you asked Santa for tools and supplies!
-
mighty sweet looking frame Mark can you still get planking from Jeff? are you planking her from the bottom up.......and does this mean she'll be leaving the jig? congratz Mark.....this is quite a milestone!
-
very nice work Sjors.........gonna look fantastic when you get 'er done all the way around!
- 1,616 replies
-
- 2
-
-
- caldercraft
- agamemnon
- (and 1 more)
-
looking absolutely sweet!........better than Matchbox!
- 120 replies
-
- 1
-
-
- mystic
- motor yacht
- (and 2 more)