Jump to content

Recommended Posts

Posted

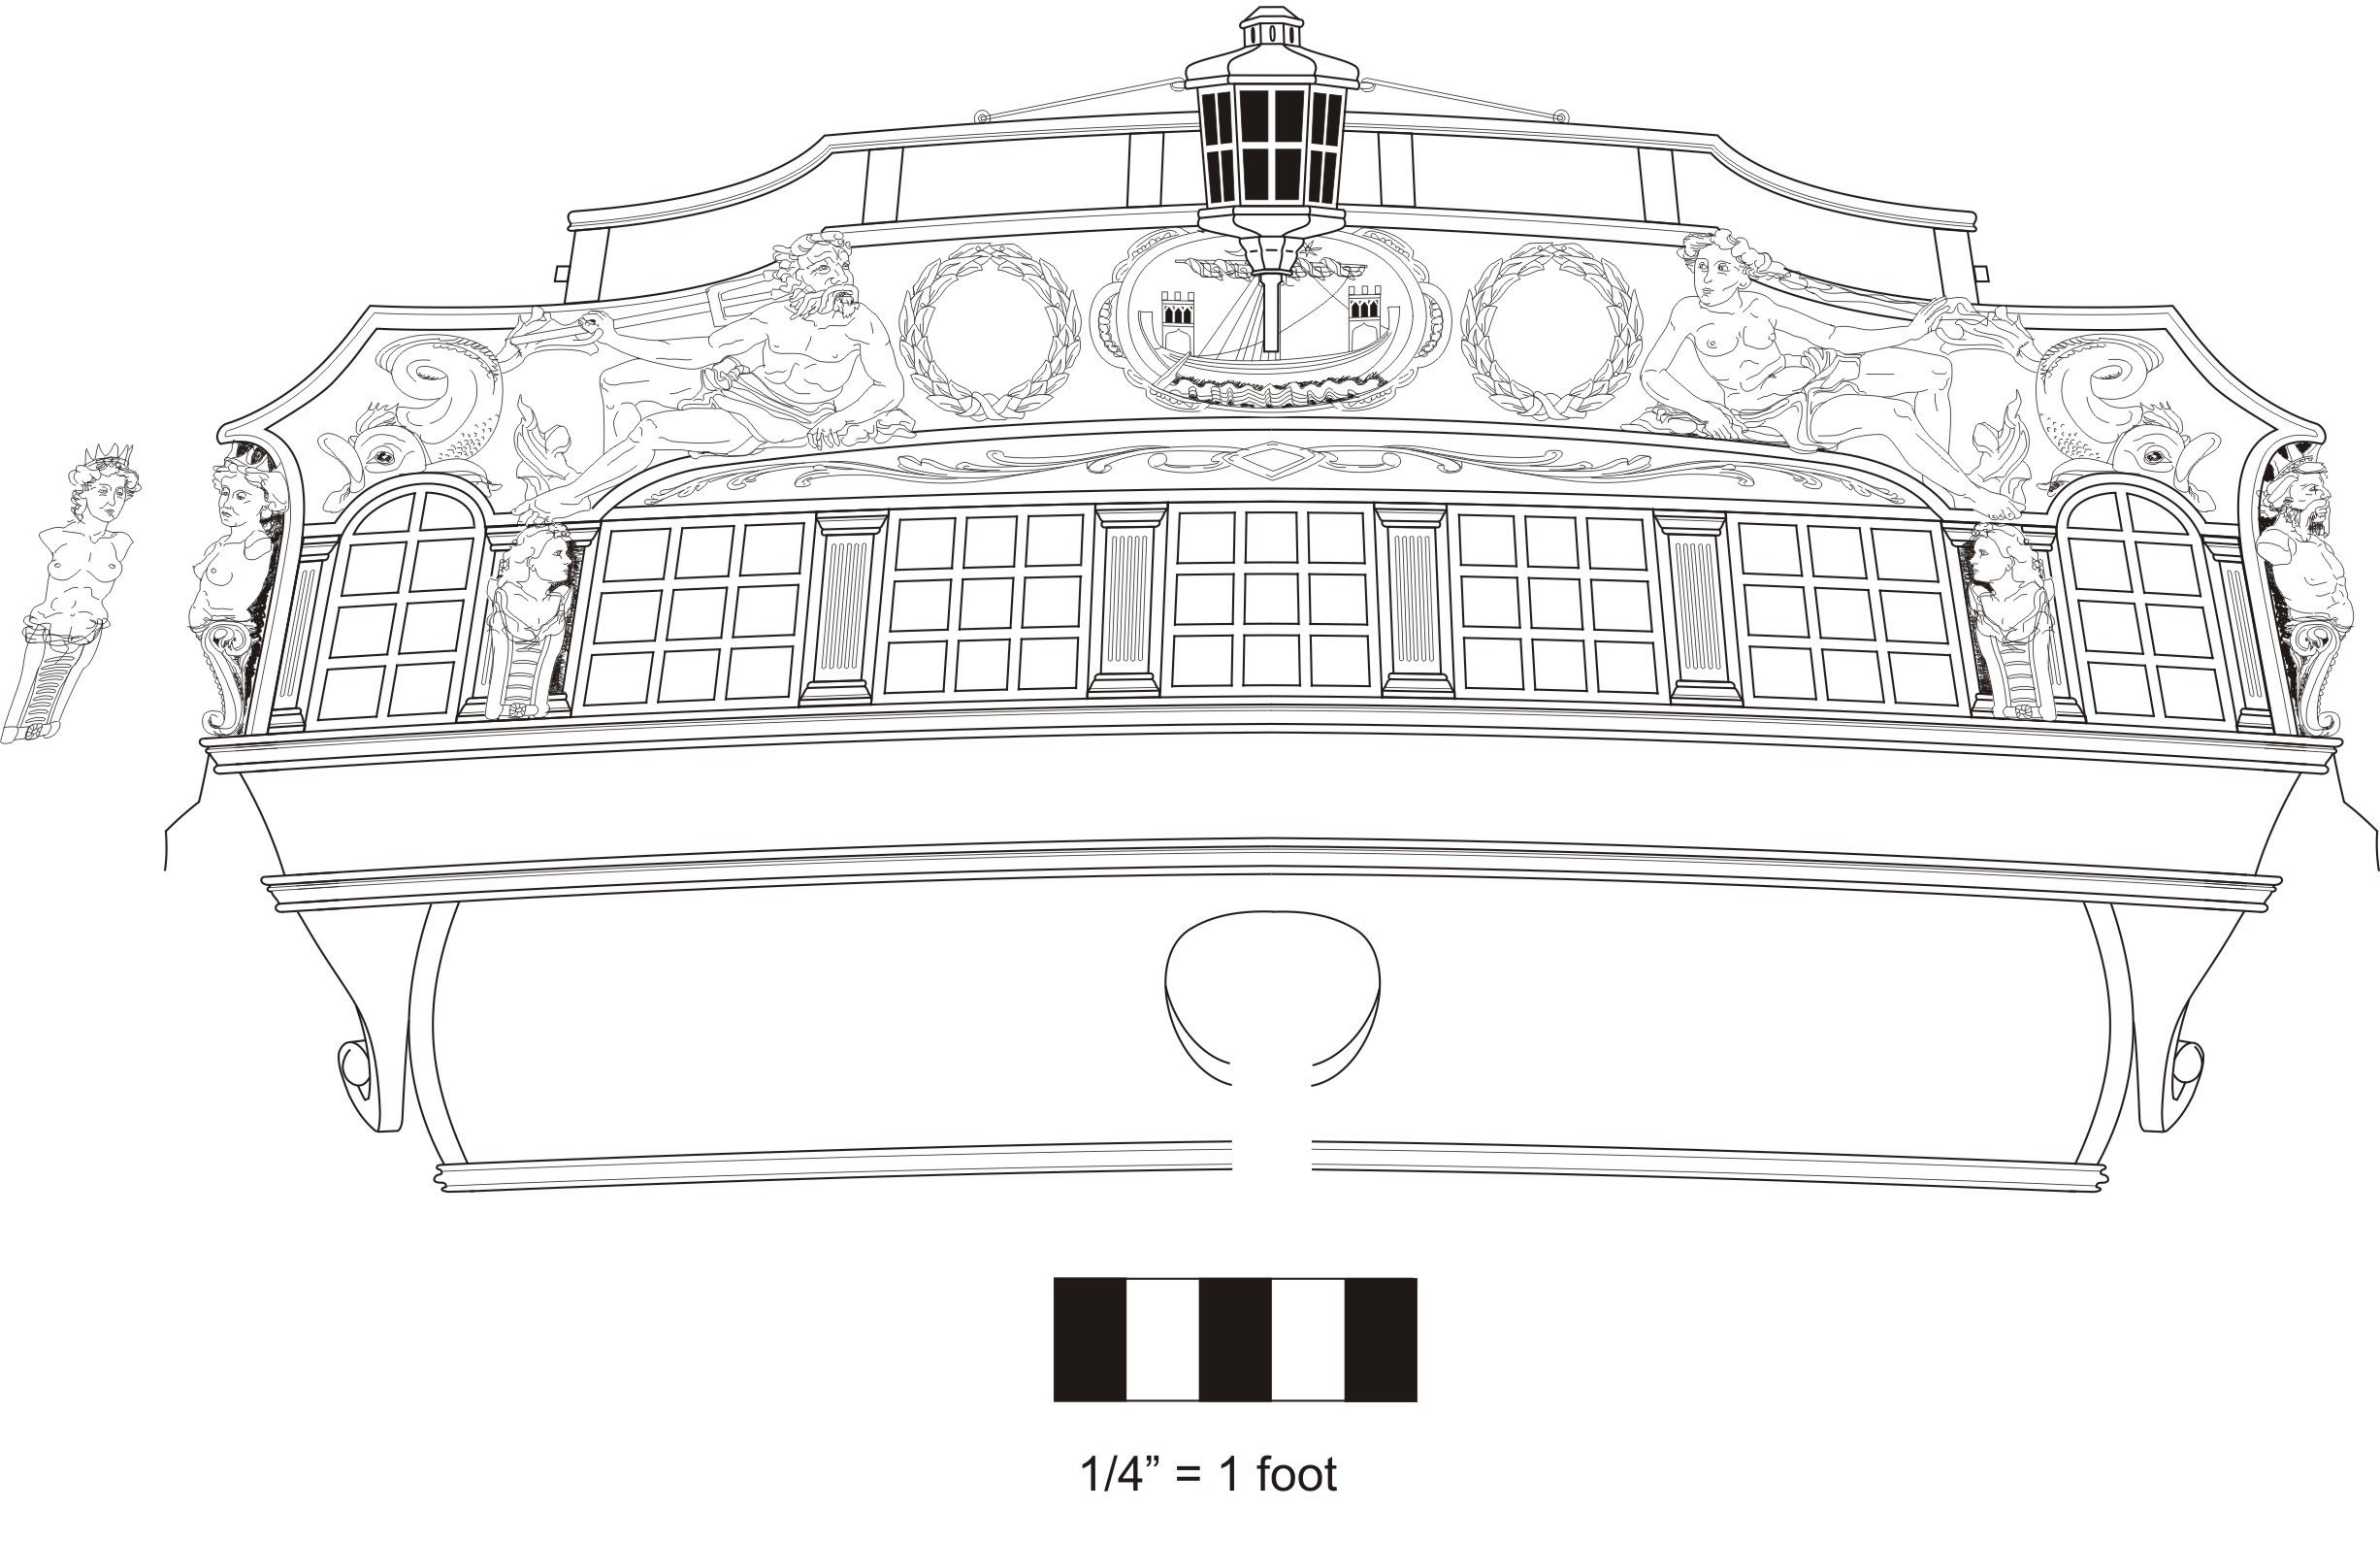
Work on the transom details has begun.  The first thing to tackle was the fancy molding around the top of the transom.  Its a very typical shape which makes scraping them a bit difficult.  I remember doing that on the 1:64 version of the Winnie.  So since I was happy with the results of the laser cut molding on the sides of the hull, I decided to try and make these with the laser cutter also.  Its a simpler profile but it meant laser etching the bottom half of each molding segment.  


In the photo below, you can see the molding that is finished.  I sanded off the laser char with some 320 grit sandpaper.  I also had to sand the char from the bottom half by folding small pieces of sandpaper and cutting a straight sharp edge on it.  This allowed me to clean up the face of the etched area.  You will never get it all off.  Dont worry about that.  Get most of it clean and what remains will give a good effect when you apply some poly.  You can also see a few pieces I havent sanded yet.

transommolding.jpg

In the next photo you can see I have added the molding.  Try and get some tight joints between each segment.  But before I glued them into position, I had some painting and prep work to do.  


First - you must paint the top of the transom black along with the stern frame extensions.  The outside of the transom top edge (port and starboard) is left unpainted as shown.


Second - paint the insides of the two round ports red.


Third- You can paint the upper transom blue.  Cerulean blue to be exact.  Paint it above the cove and windows for now so after adding the molding you get a nice clean edge.


Now I know some of you hate the thought of painting.  It will also be hard to match the blue of the friezes exactly.  So I also provided a paper backing to match the friezes.  Personally I would prefer to paint this area but I did use the paper version.  Just leave a small gap all around the perimeter so you can glue the molding and coves on and still get a clean edge.  You can see in the photo the paper version and the nice clean edge you get when the molding is glued on.  If you have to touch up the paint on the round ports just be careful.  When you cut the paper around the ports you will probably mar the inside of the ports a bit.  But no worries as the wreaths will cover any paint mishaps.  Just as mine did as you can see.


transommolding1.jpg

When adding the molding I started with


First - the two segments port and starboard with no etched detail.   


Then I added the center piece on the top of the transom and worked my way out towards the sides.  This is important because of the way the etched molding intersects with the non-etched pieces along the sides.  Hope that makes sense.


Then I needed to make the cove which is what the carvings sit on.  It is a laser cut piece that still needs a bit of carving work.   See below.  I will explain the steps.


Transomcove.jpg

The photo above shows the cove in stages.  The top shows the untouched example straight off the laser cutter.  Notice the laser etched line to indicate the molding along the top.  There are also some handles on either side which will eventually be removed.  In addition, along the bottom it is notched out so you can add a strip of wood which will become the moldong along the bottom of the cove when you are done shaping it.


The first step is to take a chisel or in my case a sharp #11 blade and bevel the inside up to the etched line.  Do this slowly.  You are basically creating a straight bevel under what will be the molding along the top.  It should thin down to about 1/32" thick along the bottom if not even thinner.


Step two is to use some 320 grit sandpaper or even a curved chisel to sand the inside round or concave.  The cove is only 5/64" thick so it wont be to rounded and it wont take that long.  Just try and maintain a consistent molding along the top.  Try and define that molding pretty good across the top. The bottom image in the photo above shows the cove shaped.  Its somewhat concave. I cleaned it up with some fine sandpaper so I could paint it red next.  The trick is to try and define the top molding and make it slightly concave.


Then I painted the inside carefully.  I tried to leave a consistent width molding along the top.   It worked out pretty good actually.  By the way this is cedar so its soft and sands and carves like butter.


To finish it up....you need to add the 3/64 x 3/64 strip of cedar along the bottom edge.  Glue it on good.  But this molding is thick......height-wise.  So I sanded it to around 1/32" thick so it wouldnt appear too heavy on the model.  Then cut off the two handles on each end and sand them clean as indicated by the etched lines.  The photo below shows the carvings glued on top in the center.

transomcove1.jpg

A few additional notes on the cove which is actually a very complex piece!!!  The top edge must be beveled.   If you glued this on now the top edge would be sloped downward in the wrong direction.  The top edge actually needs to follow the slope of the deck believe it or not.  So you must sand an angle or bevel it down towards the back.   This gets complex as the curve of the cove means that bevel is not consistent as you work your way towards the sides.  But do the best you can with this so your carvings will sit properly on top of it.


In that same photo below, you can see that I have glued the cove into position.   But before I did, I also glued the wreaths and center medallion in position.  This helped me position the cove properly almost right up against them.  


Then I continued by sanding and adding the smaller cove on the false lights and the small lengths that connect them.  These three pieces are also laser cut.  They are thicker than you need so you can really sand off the char and get them clean.  But make sure they are the same thickness as the molding along the top of the center cove when you are done.  They need to look like one continues even thickness molding across the transom.  Hope that makes sense.  They are also not as deep as the center cove.  I only finished one side so far.

transomcove2.jpg

With those pieces completed, you can add the other carvings.  This may sound easy enough but there is some prep work to do.  The reclining figure for example.  Note how the hand and clothing hangs over the front of the cove.  To do this, you must file a slot or notch on the back side of the carving.  Be careful.....these are small and delicate.


In addition,  note how the head intersects with the molding.  Rather than file the back of his head, I cut away the molding instead.  This takes careful planning.  You must do this in order to have the figure sit properly otherwise it wont fit.


Finally, Jack did a fantastic job on these carvings as you can see.  But because CNC machining is a violent process,  some f the items were left thicker than needed so they wouldnt break.  This is true of the castings as well.   So you should thin down the trident so the handle is rounded and delicate.  I probably should have gone more delicate.   You may also want to round off the legs and other areas so they arent so flat.  I am talking about the back edges.  Look at the arms and legs.   This thins them a bit and also creates an undercut of sorts to help the illusion of a fully rounded carving.


transomcarvings4.jpg

transomcarvings1.jpg

This photo really shows how the hand and clothes look as though they are draping over the cove.   You can see how I filed a notch in the back so it would look like this.

transomcarvings2.jpg


I am sure I left out a lot of details!!!!  But feel free to ask me any questions.  I think it looks pretty good at this point.  Jack really did a masterful job on the carvings.   These are the resin versions.  I treated them with the gel stain as I mentioned earlier.....really makes them look nice.  What do you guys think???

Posted

Wow, that is some awesome stuff.  Its going to be a big challenge to work with those small pieces and make everything come together.  Yours looks absolutely fantastic !!!!

Till next time.....     😎

Steve


Finished:              Artesania Latina Constellation;   Model Shipways USF Confederacy:  Medway Longboat 1742 - Syren Ship Model Company

Current Build:     Syren's Winchelsea 

Posted (edited)

Excellent tutorial!  I think this all looks incredible, Chuck.  I have a question about painting, as I will some day transition to wood builds.


When you paint the cove, for example, do you prime/seal first, or can you go directly to color?


Thanks, in advance - you are doing an incredible job.  I appreciate your care and attention to detail very much!

Edited by Hubac's Historian

We are all works in progress, all of the time.

Posted

Thanks guys...


Painting techniques!!! Another loaded question.  It really depends in who you ask. But i will explain my preferences.  I like sand the surface with 400 grit.  Then I seal it with wipe on poly.  Then i apply the Acrylic paint in very thin coats like water color.  Building up many layers.  
 

Now unfortunately you will get many who say this is not the right way.  But it has always served me well.  
 

I'm sure you will get many other suggestions about how it should be done.

Posted

No its a bit darker.  I posted them for download so go ahead and download them and print them out.  Set your printer on the highest print quality.  Its hard to say.  It looks different in photos depending on the lighting.  For example this photo was taken with my Iphone.  It looks different than the blue in the photo below it.  But its the same model.....taken a few minutes apart.  Its probably somewhere between the two in reality.   Although my camera takes better pictures.  Thats the bottom photo which is what i use for my log photos.


phonepic.jpg


transomcarvings4.jpg


Posted

I am so glad to hear you say that you've had good results painting over Wipe-on-Poly since I'm just about to do that on the Medway Longboat. Also, the top photo of the stern of the Winnie is jaw-dropping. I believe I will eventually have to build this ship...sooner than later I hope. It's just soooo beautiful!


Bob 

Bob Garcia

"Measure once, cuss twice!"


Current Builds: 

Hms Brig-Sloop Flirt 1782 - Vanguard Models

Pen Duick - Artesania Latina 1:28


Completed: Medway Longboat 1742 - Syren Ship Model Co. 

Member of the Nautical Research Guild


Posted

As expected it's beautiful workmanship and great innovation.

Rusty

"So Long For Now" B) 


Current Builds: Speedwell


Completed Build Logs:  HMS Winchelsea 1/48   Duchess of Kingston USF Confederacy , US Brig Syren , Triton Cross Section , Bomb Vessel Cross SectionCutter CheerfulQueen Anne Barge, Medway Longboat


Completed Build Gallery: Brig Syren , 1870 Mississippi Riverboat , 1949 Chris-Craft 19' Runabout


Posted

Thank you guys!!!  I appreciate the kind words.   For everyone..... Its not too late to join in with the group and build your own Winnie.   


Chuck

Posted

Thanks guys.....finished the carvings today.  All that is left to do now is the fluted columns between the windows and the last two carvings.  Hopefully get to that next week.  That will finish up chapter 3.  


Then I have to make all this stuff for you guys which might take a while including writing that 3rd chapter.


Thanks again Jack!!!  This wouldnt be possible without you!!!  Fantastic work!!!


sterncarvings2.jpg

sterncarvings4.jpg

sterncarvings3.jpg

sterncarvings5.jpg


Posted (edited)

First of all, thank you very much, Mr. Passaro. You have made it a reality. More importantly, you have not only given me, but also given all members the opportunity to participate in this project. You have taught everyone the skills of making the whole project, so that the fans not only enjoy in making(this model), but also learn the knowledge of ship model. I really enjoyed the process. 


I would also like to thank the enthusiastic members who participated in this group project together, and many members provided valuable modifications (design of the carvings), and thank MSW for this communication platform.


Thanks,

Jack

Edited by hjx
Posted

I am stalled on working this endeavor as I am remodeling a first floor work area in our house for both my wife's art works and my model building. In doing so I had to move some 1970 ish model kits from a well known US manufacturer. It was striking to open the box of Rattlesnake and examine the dormant kit. I mused to myself, in today's light,  that the kit should go to the "auction block" or elsewhere.


Indeed the industry has come a long way in nearly 50 years especially so in the last 10 or so. But Chuck, I think I speak for all modelers when I say you have advanced this wonderful "passion" to a level that may not be achievable in a full production environment. And it is hard to see how it can be surpassed! You are truly gifted and the fact that you share your gifts is remarkable.


Joe


  • 3 weeks later...
Posted

No progress on my Winnie but I finally found a day to fix my Cheerful.  It got severely damaged when i brought it to the joint clubs show.  The model got smashed on the ride back and the rigging pulled off the pin rails and the stern knees.  It was a bear to position those pin rails against the bulwarks with so much tension on the lines.  But i managed it without having to re rig anything except for the rope coils on the pin rails. The rigging on the bowsprit was also ripped away from the tip of the bowsprit. and that needing fixing.   Bigger job than i would have liked.
 

They are never the same after such a repair but I am glad its done.  It was also filthy and covered with webs and dust.


i will now put it away where it will be safe and protected.


Interesting size comparison and note the color.  The cheerful is all boxwood.  The cedar Winnie really looks good in comparison and its 75% cheaper.

5232FEF9-7DEA-4D0C-B0F5-3E7A2052C507.jpeg

984F1877-FF8E-414F-AB83-B54FA10AECD8.jpeg

Posted

I’m glad to hear you were able restore the Cheerful. Way to nice a model not to. 

Rusty

"So Long For Now" B) 


Current Builds: Speedwell


Completed Build Logs:  HMS Winchelsea 1/48   Duchess of Kingston USF Confederacy , US Brig Syren , Triton Cross Section , Bomb Vessel Cross SectionCutter CheerfulQueen Anne Barge, Medway Longboat


Completed Build Gallery: Brig Syren , 1870 Mississippi Riverboat , 1949 Chris-Craft 19' Runabout


Posted

The stern transom details are now completed....along with chapter 3.  I still have to finish writing it though.  Then I will start getting the laser cut pieces together for you folks.   The columns were added to finish it off.  These were done exactly like those on the quarter galleries.  The outside face of each upright between the windows were painted blue first.  I was careful not to get the paint on the sides of the uprights.  The top and bottom of each column was was cut to length from a strip of 3/32 x 1/32" boxwood.  This strip was first scraped to create the profile needed (all those steps in each base and top).  Once I cut and angled each piece I used a needle file to also shape the ends to match the profile.  Then the center fluted column which is laser cut and etched was glued between them.  I just removed the char and then tweaked the length for a tight fit.


Lastly, the two small figures were glued to the front of those wider

 columns.  That really finished the look of the stern.  I am quite happy with the results so far.  The color of the resin was tinted a bit as previously mentioned.

sterncarvings2.jpg

sterncarvings6.jpg

sterncarvings7.jpg

sterncarvings8.jpg

sterncarvings9.jpg


Chuck


Posted

Looks awesome!

Jeff


In progress:
Medway Longboat 1742 - Syren Ship Model Company -1/2" scale

USS Constitution - Model Shipways - Scale 1:76

HMS Granado - CAF Model - 1:48

HMS Sphinx - Vanguard

Posted
21 hours ago, MEDDO said:

The Cheerful is a wonderful little cutter.  Seems the cedar is an outstanding alternative.  I wonder if a bit of a sensitivity to western red cedar translates over to the alaskan yellow

I'm building the Medway Longboat and it's AYC. I found that I need to wear a dust mask when I'm sanding it especially when I'm sanding with very fine grit. The very fine dust gets me coughing. I think it's probably wise for us to wear a dust mask regardless of the wood we are sanding since even the dust we aren't so sensitive too can't be good deep down in our lungs.


Bob

Bob Garcia

"Measure once, cuss twice!"


Current Builds: 

Hms Brig-Sloop Flirt 1782 - Vanguard Models

Pen Duick - Artesania Latina 1:28


Completed: Medway Longboat 1742 - Syren Ship Model Co. 

Member of the Nautical Research Guild


  • Recently Browsing   0 members

    • No registered users viewing this page.
×
×
  • Create New...