Jump to content

Recommended Posts

Posted

Hi Chuck,

congrats to those beautiful carvings...


Nils

Current builds

-Lightship Elbe 1

Completed

- Steamship Ergenstrasse ex Laker Corsicana 1918- scale 1:87 scratchbuild

"Zeesboot"  heritage wooden fishing small craft around 1870, POB  clinker scratch build scale 1:24

Pilot Schooner # 5 ELBE  ex Wanderbird, scale 1:50 scratchbuild

Mississippi Sterwheelsteamer built as christmapresent for grandson modified kit build

Chebec "Eagle of Algier" 1753--scale 1:48-POB-(scratchbuild) 

"SS Kaiser Wilhelm der Grosse" four stacker passenger liner of 1897, blue ribbond awarded, 1:144 (scratchbuild)
"HMS Pegasus" , 16 gun sloop, Swan-Class 1776-1777 scale 1:64 from Amati plan 

-"Pamir" 4-mast barque, P-liner, 1:96  (scratchbuild)

-"Gorch Fock 2" German Navy cadet training 3-mast barque, 1:95 (scratchbuild) 

"Heinrich Kayser" heritage Merchant Steamship, 1:96 (scratchbuild)  original was my grandfathers ship

-"Bohuslän" , heritage ,live Swedish museum passenger steamer (Billings kit), 1:50 

"Lorbas", river tug, steam driven for RC, fictive design (scratchbuild), scale appr. 1:32

under restoration / restoration finished 

"Hjejlen" steam paddlewheeler, 1861, Billings Boats rare old kit, scale 1:50

Posted

A beauty ☺️ I always appreciate your tips. When I saw the idea to use binder clips to prevent breaking the bulkheads, I thought, why dit not I think about it ?  The simplest ideas are often the best. But You have to found them 😉

The Winchelsea will is going to be a wonderful kit. Thanks Chuck !

Jean-Paul


'You are not carving a bear with a chain saw here folks',

Chuck Passaro, ´Queen Anne Style Barge´ manual of instructions


Current builds :


Finished build :


Next on list :

  • HMS Winchelsea 1764 - Syren Ship Model - 1:48
Posted

Always a pleasure to see Chuck bring his masterful touch to the development of another major creation.  Just wishing I were a younger artist and could participate in this build.  Working with Chuck really cranks up the creative juices in a modeler, for sure.
Happy to take a front chair to follow this build, while I enjoy building his English Pinnace.

Thanks Master Passaro, for allowing us mortals to follow along.

Dave


Sawdust Dave -

Current build - USS Constitution 1:60th (scratch)....

Visit my blog site - All previous builds.... http://davesmodelships.blogspot.com

Posted (edited)

Hi every one!


I'm glad that Mr. Chuck allowed me to participate in his KIT development, and thank you so much for the helpful advice from so many enthusiastic members...I'm really working with British model companies, which have obtained written licenses of commercial development from NMM . I can tell you a little more that there are two projects under development, one is the 50gun in the 17th century, the other is the 74gun in the 18th century, both of which are British ships, NMM style.


At present, one project has entered the stage of 3D modeling. When I complete the modeling of this model, it will  enter the validation of the actual model immediately. Several ship model experts participate in the design of this project, and there will be ship model masters to participate in the validation of the actual model.


The design software used in the design process, as well as 3D sculpture software, and CNC programming software(CAM) are legal and obtain commercial license.


Thank you again, MSW Forum and Mr. Chuck.


Jack

Edited by hjx
Posted

The hull fairing is now completed.  Nothing unusual to report.  I didnt break any bulkhead extensions and the binder clips worked out great.  This is a big hull so it took a few days per side to fair.  As is typical there is a fair amount of material to remove at the bow, especially close to the keel at the bottom of the bow fillers.  I just took my time and before I knew it I was done.


Once completed, I used a batten (scrap 3/32" x 3/64" strips) to locate a smooth run for the TOP of the gun port sills.  The top of the batten was initially lined up with the laser-etched reference lines for the sills.  Then after viewing it at many many angles I tweaked it untle I got a nice run from bow to stern.  There are no dips and it matches port and starboard.


Even though there are laser etched reference lines there are so many factors that could cause them to be higher or lower by just a hair.  This will throw off the run of the ports so the batten is an absolute must.  Its the only way to spot where the run of the ports needs adjustment.


Then I used a sharp pencil to mark the top of the batten and then removed it.  Next up I will start adding the port sills and then follow that with the remainder of port framing.  You can check my run of those battens in the photos!!!  I think they are almost good to go.  I hope you can see the laser etched reference on the sides of each bulkhead and my new pencil lines on the outside and along the top edge of the batten.


hull faired.jpg

hull faired1.jpg

hull faired2.jpg

  • 4 weeks later...
Posted

I have been making some steady progress on the framing.  I just didnt want to bore you guys with this part of the project.  Building the skeleton and framing is not that fun to look at.  But here is the quick run down....


The bottom port sills were added first.  Even though you really only need them where the gun ports are, I recommend that the bottom sills are placed between every bulkhead.  It really makes everything solid.  If you cut the sill to the correct length it also squares up teh bulkheads really good.  Even the best attempts at squaring them to the false keel doesnt work.  


portsills2.jpg

You might note that the three sections at the bow for the sills are laser cut.  That makes it much easier.

portsills3.jpg

You may be tempted to measure the length off your model where the port sill is going to placed.  This is the worst thing you can do.  It is too easy to push the bulkhead one way or the other which of course forces the other side of the bulkhead in the opposite direction.  This will really screw up your gun port placement.


You could also measure off the plans....this is better but still not ideal.  The best place to check the length between two bulkheads is on your model BUT....up against the false keel.  This will give you the best results.  If you do this for both sides everything will be really square and symmetrical. See below.

portsills.jpg

Once done this was repeated for the upper sills or lintels.  I used a spacer the correct height to place them all easily without measuring.  I only did these where the actual ports were and a few other important locations.  These are all shown on the plans.


portsills1.jpg

Then the port sides are added.....I have laser cut these.  There are many shapes and angles to choose from.  You still have to bevel the top and bottom where needed because they must be perfectly vertical.....just like the bulkheads.


portsides.jpg

I used a spacer for these too so the ports were all the same width.


portsides1.jpg

This is what it looks like with all the port framing finished.  Pretty boring stuff.  I am about to start on the stern framing.   I should be planking before very long.  The outside was faired smooth.  I wont bother with fairing the inboard side of the bulwarks yet.  Its better to wait until after the hull is planked above the wales for that.  Although I will probably rough chisel some heavy stuff away a little at time inboard when the mood strikes me.


portframingdone.jpg

portframingdone1.jpg


Posted

Nicely framed, Chuck. I look forward to your usual excellent planking job. Have you ever considered a varnished finish like so many Navy Board models had? The finish holds up even after centuries.

Greg

website
Admiralty Models

moderator Echo Cross-section build
Admiralty Models Cross-section Build

Finished build
Pegasus, 1776, cross-section

Current build
Speedwell, 1752

Posted

Always a pleasure to watch you work! 

Rusty

"So Long For Now" B) 


Current Builds: Speedwell


Completed Build Logs:  HMS Winchelsea 1/48   Duchess of Kingston USF Confederacy , US Brig Syren , Triton Cross Section , Bomb Vessel Cross SectionCutter CheerfulQueen Anne Barge, Medway Longboat


Completed Build Gallery: Brig Syren , 1870 Mississippi Riverboat , 1949 Chris-Craft 19' Runabout


Posted

Thanks Rusty,


You might be getting a care package in the mail of sorts for this project very soon.


Greg, I would love try a varnish but never did it before.  I would need to experiment.  I dont even know what a good brand would be for that to start with...but I will see.


Work is progressing quickly now.


The stern frames were added after I placed the last "bulkhead 29" piece in position.  They were glued into the many slots for them which should position them close to the angles we need....but not perfectly.


Then I taped some tick strips to the frames using a stern framing guide I developed for the project.  They were taped to each frame as shown to locate where the stern lights (windows) would be located. The locations for the top and bottom of the windows was transferred to each frame.


sternframes.jpgI then inserted some stern window guides laser cut to shape between each frame.  These are the exact shape and size for the windows.  I didnt glue them in at all.  They are just pushed between each frame and they stay in position really well.  We will be removing them after the sills and framing for the windows is completed.sternframes1.jpg


It doesnt matter if you add the top or the bottom framing (sills) first.  They were all laser cut but still require some beveling on the sides to conform to the curved shape of the stern.  I just used a 3/16 x 1/4" strip to make the lower sills.  Its tricky getting the angles correct so I had a few do-overs.  But this is a crucial part of the build so I was very careful to get a good fit.  They were thicker than what was needed so I could fair them once they were  glued in position.  The window templates were a godsend!!!  If my sills were too wide they spread the frames apart and the template fell out.  This is a good indication that you still need to sand them a bit more for a perfect fit.  Only when after positioning the sills and they didnt make the window templates fall out did I glue them in permanently. 


Then I started fairing the fore and aft sides to thin down the transom framing to about 3/32" thick along the top edge of the upper sill pieces.  This is the time to do the inboard side because you have good access to it before the quarter gallery framing is added.


sternframes2.jpg

This is what it looks like after the fairing was completed....I still have to fair the port and starboard sides and bulkhead 29 to conform to the shape of the hull....I will do that later today or tomorrow.  Then its time to do the quarter gallery framing....


So close to finishing the skeleton framing now!!!!  I left the center window guide in position to show you guys how well they worked.  This was a much easier way to align and frame the stern than the previous methods I have used.

sternframes3.jpg


Posted (edited)

Sweet work, Chuck! Those laser cut window patterns do a great job in establishing a nice smooth run of stern lights.


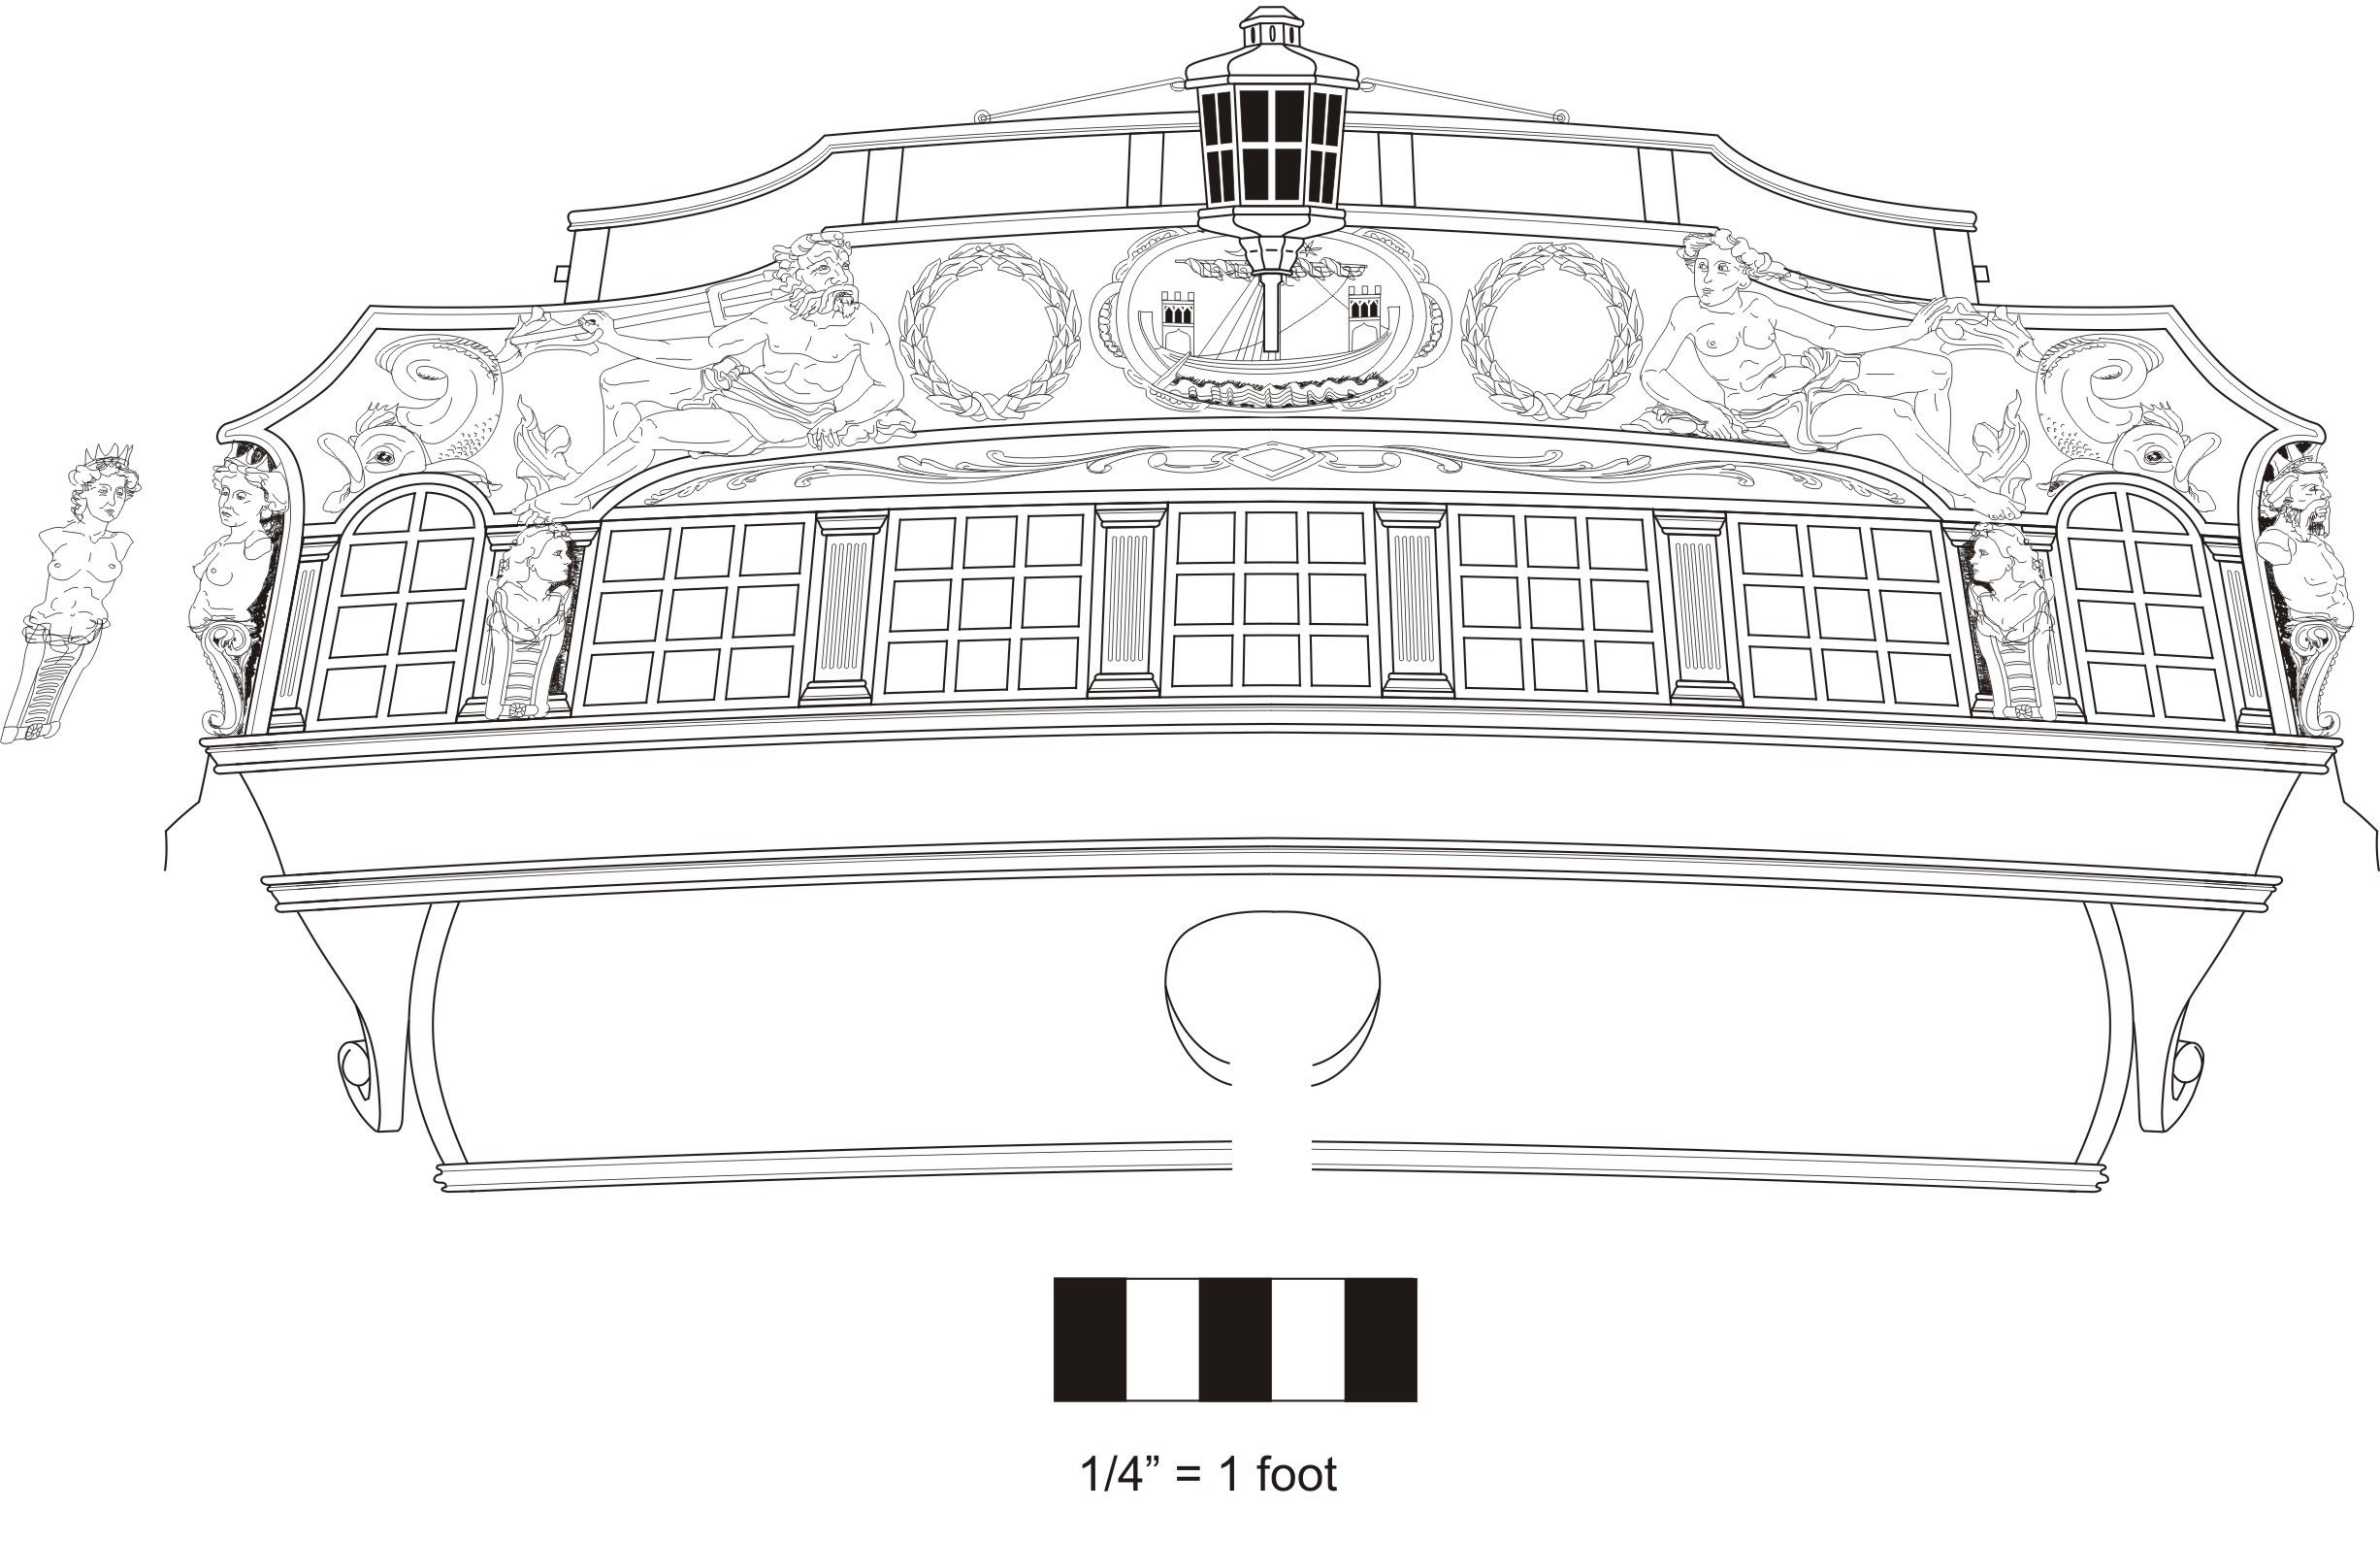
I'm intrigued by the tafferel with side lights lying on the base. Was this an earlier attempt to frame the area or is it to be applied over the work you just completed?

Edited by dvm27

Greg

website
Admiralty Models

moderator Echo Cross-section build
Admiralty Models Cross-section Build

Finished build
Pegasus, 1776, cross-section

Current build
Speedwell, 1752

Posted

It is a pleasure to see your work Chuck; the clean lines and crisp joints are always inspirational!


cheers


Pat

If at first you do not suceed, try, and then try again!
Current build: HMCSS Victoria (Scratch)

Next build: HMAS Vampire (3D printed resin, scratch 1:350)

Built:          Battle Station (Scratch) and HM Bark Endeavour 1768 (kit 1:64)

Posted

Thank you guys.


I finished the quarter gallery framing....I will skip the details on this here.  I also added the laser cut hance pieces.  Except for the bollard timbers at the bow, all of the framing is completed.  The bollard timbers are tricky so I will wait until I get back from the joint clubs show next week to make those.   Once they are done it will be time to start planking.


Here is what the framing looks like completed....basically this represents all the parts for the starter package including the bollards that I will make next week. 


framingdone.jpg

framingdone1.jpg


Chuck

Posted (edited)
On ‎4‎/‎15‎/‎2019 at 5:02 AM, Chuck said:

Greg, I would love try a varnish but never did it before.  I would need to experiment.  I dont even know what a good brand would be for that to start with...but I will see.

I strongly suspect that the British Admiralty dockyard models were shellacked, not varnished. Shellac will outlast varnish by orders of magnitude. "Orange" shellac (natural colored,) will darken, and its gloss increase, with each successive coat. It's easily thinned with denatured alcohol. It's also easily removed with denatured alcohol. The darkening and gloss rate of increase will depend on how thick it is. This is referred to as the "cut," expressed in pounds, e.g. "two pound cut," which would be two pounds of shellac flakes to a gallon of alcohol. Most prepared canned shellac ("Bullseye" is a good brand found nearly everywhere) is sold in "two pound cut." Thinning it 50-50 yields "one pound cut," and so on. Multiple thinned coats are the best approach. Applied to thickly will fill in detail, as might paint.  It dries quickly, about as fast as the alcohol evaporates. Shellac on ship models has lasted for somewhere around 5,500 years, so far, if models found in the Egyptian tombs are any indication.


Some top end woodworking catalogs sell shellac in "flake" form, which is the crushed excretions of the female lac bug. You have to add your own alcohol. Mixed shellac supposedly has a "shelf life," and hence the sale of the crushed flakes alone. I've never had any problem with the premixed canned shellac going bad on the shelf over a period of years, though. Other's mileage may vary, but I've never found the higher price, shipping cost, and hassle of ordering flakes by mail and mixing my own worth the trouble and I've used a lot of it over the years. It's a stock item in my paint locker.


Varnish is more difficult to work with, primarily because of extended drying time and the need to resort to chemical strippers, heat guns, or scrapers and sandpaper to remove "goofs." Thinned shellac has the consistency of water and will penetrate bare wood easily. Not so much so varnish. If too much shellac is applied, it won't have brush strokes, runs, and sags ("curtains" in the trade). it tends to soak into the wood and dries quickly. Too much varnish and you end up with brush strokes, runs and sags, much like enamel paint. This is less of a problem with thinned varnish for "model scales," but varnish is finicky. Sometimes the gloss is dulled when it's thinned too much, especially if mineral spirits are mistakenly used instead of pure spirits of gum turpentine, and other times, it can refuse to dry and remains sticky. A capful of Flood's "Penetrol" in a quart of varnish will improve its ability to "lay down" and a teaspoon of Japan drier will improve drying ability. Like oil paint, varnish does require something of a "learning curve" to master the art of conditioning it as required to get a perfect "Steinway piano" finish. (Steinways are actually French polished, I believe... with shellac!) Most quality marine varnishes are adequate, Z-Spar brand "Captain's" varnish is a good one, as is the European and pricier Epiphanes brand (which requires the use of their proprietary thinner.)

Edited by Bob Cleek
Posted (edited)

Hi Bob - excellent finish tutorial.  Had to butt-in on the Steinway comment.  I was a pattern maker there for a number of years.  Steinways are lacquer finished; sprayed in successive coats until there is really quite a thick film.  Sprayed pianos go into a temperature controlled drying room for a number of weeks, for the finish to fully cure.  The surface is then wet-sanded in successively finer grits until leveled and to a satin sheen.  A hand applied compound provides the final soft sheen.


Pianos can be ordered with a mirror polish.  This is ultimately achieved with compound and a rotary buffer, after the initial sanding.  They really lay that lacquer down thick!


While I was there, there was a lot of talk about switching to polyester, but it was going to be expensive to get up to NY code, and the finish, when damaged, is not easily repairable.  Polyester film also lacks the “feel” of lacquer; it can literally be plastic-y.

Edited by Hubac's Historian

We are all works in progress, all of the time.

Posted

Please don’t ask me the specifics, because I don’t know, but there are environmental regulations that determined what exactly the spray environment needed to be and how they disposed of the excess polyester resin.  To bring that portion of the factory up to code was going to be cost prohibitive, at the time, because the company was experiencing a significant dip in sales.  If peak production meant that the company was selling 11-12 pianos a week, when I started in ‘05, they were down to 7-8 pianos sold when I left in ‘09.  They just weren’t selling enough pianos to support that shift, at the time.


I will end this train, here, so that we can get back to talking about Chuck’s model, which really is fabulous.  Bravo!  I look forward to seeing his work at Joint Clubs next week.

We are all works in progress, all of the time.

Posted

My head hurts just reading through that stuff.  I am probably just going to stick with sanding sealer or wipe on poly!!!  😁

Posted

When I get the outboard planking completed I will start selling the starter kits.  I want to get ahead of everyone so nobody has to wait for the next installment....I have no idea when I will finish planking but I will start planking the first week of May.


Posted

At 1/4" scale the hull will be 38" unrigged.  Its a big model and you will be able to show some great detail.


Chuck

Posted

Chuck,

Reading through this thread regarding the "Winnie" has really whetted my appetite.  Your work looks absolutely marvelous.  Are you taking names for "pre-sales" or will it be first come, first served?  If you are taking names, please add Jim Van Laningham of Boone, NC, to your list. Otherwise, I will just keep my eyes peeled here and on your website for the first installment of the model and hope for the best.  If the "Winnie" is anything like your Medway Longboat on which I am working now (and I am sure it will be even better), it will be absolutely wonderful.  I really look forward to building it!

Jim

Posted

Thank you very much.  It will be a while yet.  I dont want to release the starter package until I am well ahead of folks.  Not until at least the planking is completed.  I did however finalize the starter package parts and I will probably start laser cuttinf them next month.  I just want to start stockpiling them for the eventual release.


But yes it will be a first come first serve sort of thing. 

  • Recently Browsing   0 members

    • No registered users viewing this page.
×
×
  • Create New...